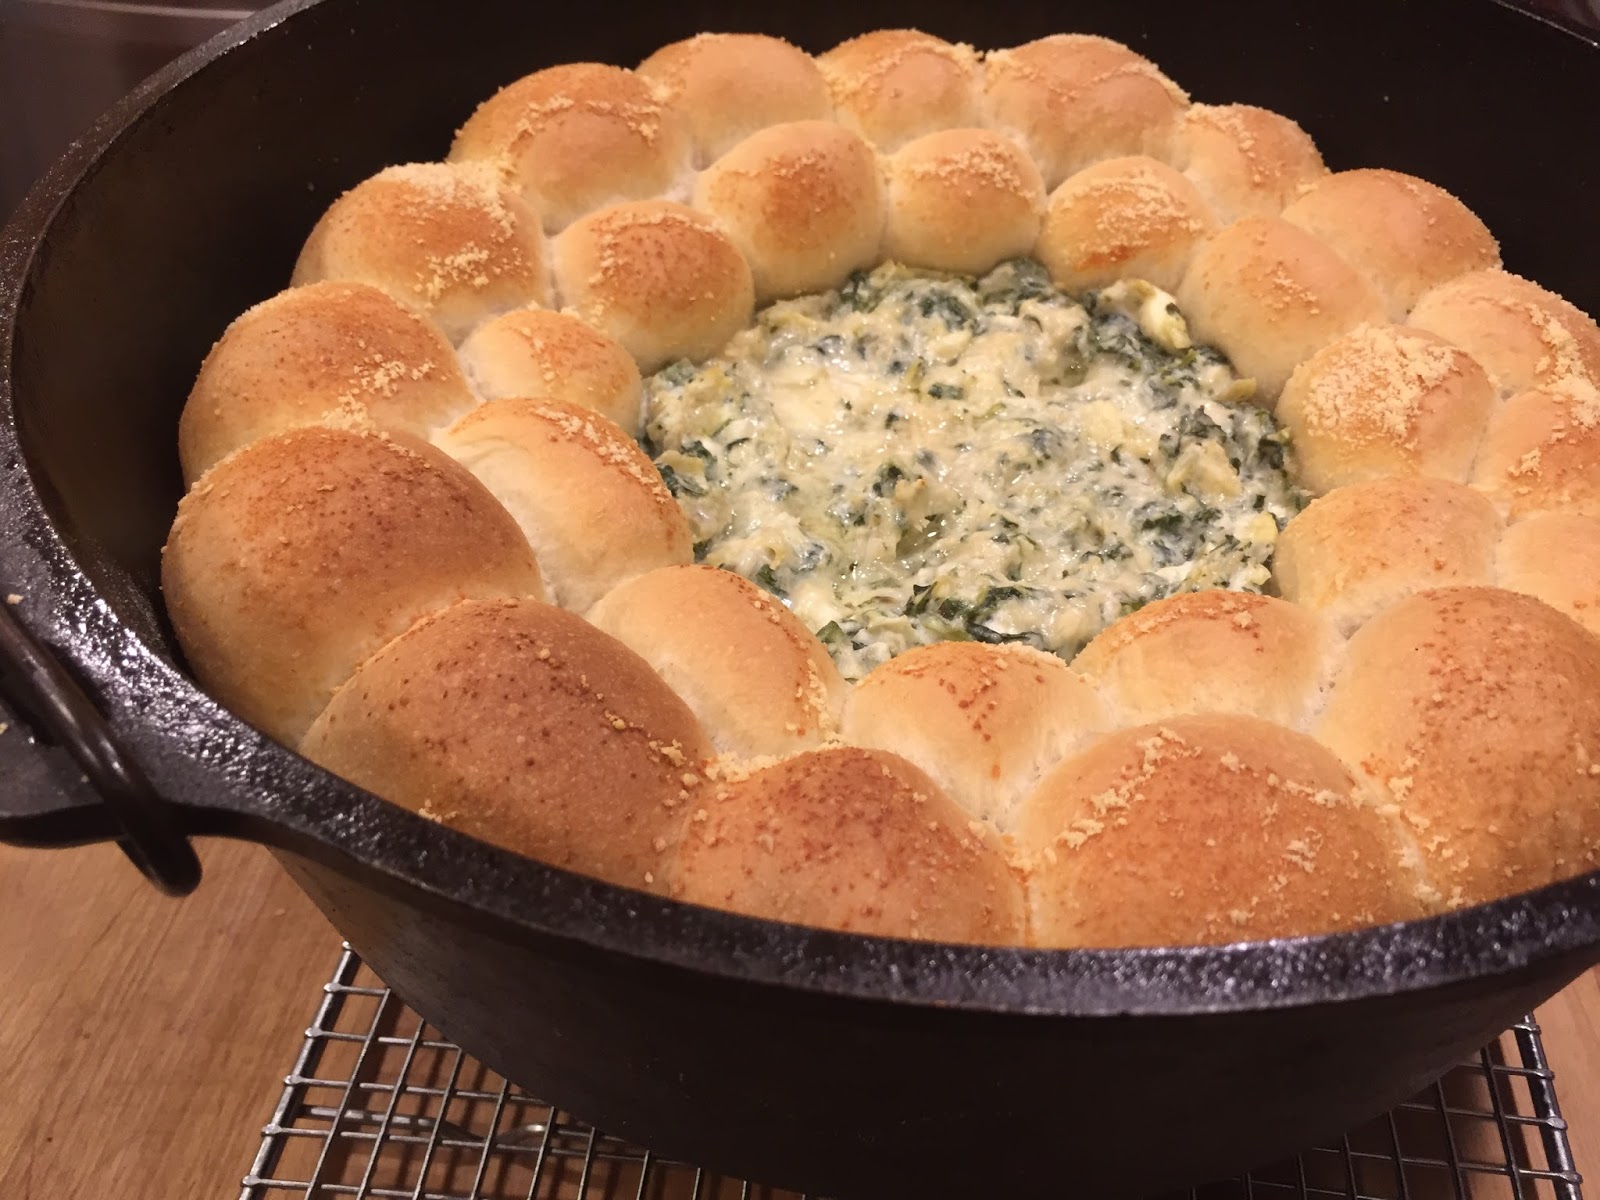
Use a 14 inch Dutch Oven that has been well greased. Grease up a relatively straight sided bowl to be placed right side up in the center of the Dutch Oven. Size it properly to get 2 rows of finished rolls. The dip will fill this space created by the bowl once removed.
Preheat oven to 375°F if using the kitchen oven.
The rolls are from our OldFashioned White Bread recipe. Use 1 Tbsp Agave or 1 ½ Tbsp white sugar in the recipe where it calls for Agave. Follow the recipe through the first rise of the dough. Turn out on a floured board and divide into 24 – 28 equal chunks of dough. Tuck each piece of dough into itself to form a roll. Arrange two rows of buns between the bowl and the side of the Dutch Oven. Spray the tops with cooking spray such as Pam, or brush with melted butter.
Cover the Dutch Oven with Plastic wrap and set in a warm draft free area (top of the pre-warming stove) to allow the dough (now rolls) raise the second time. This can take anywhere from a 1/2hr to 1hr. Allow the dough to double in size.
In the meantime prepare the ArtichokeSpinach Dip up to the point of baking. But do not bake it. Refrigerate the dip while waiting for the buns to rise.
If baking with charcoal start your coals 15 minutes prior to the following steps.
Once the buns have risen, heat the dip until warm using a sauce pan or microwave. Just to the warm point. Do not cook it.
Once the dip is just warm, gently slide the bowl out of the center of the rolls. Spoon the dip into the center hole the bowl created. Pack the dip up against the raised rolls circling the interior of the Dutch Oven. The center hole should now be filled with dip about 1 ½ to 2 inches deep. Do this gently so you don’t make the raised rolls deflate and go flat.
In a standard kitchen Oven bake uncovered at 375°F for about 40 minutes or until the rolls become golden brown.
Baking with charcoal, bake covered; applying more heat to the 14 inch Dutch Oven lid, and less underneath to get 375°F (Generally 19 coals on the top lid. 11 coals underneath the Dutch Oven. Arranged coals just inside the outer perimeter – If using a different sized Dutch Oven adjust accordingly) Bake around 40 minutes or until the rolls are golden brown.
Per the Artichoke Spinach Dip recipe remove from the heat and garnish with Mozzarella Cheese and Fresh Ground Pepper.
6-7 cups of medium tart apples (Granny Green), cored, peeled and thinly sliced
1/2 cup sugar
1/4 cup brown sugar
1/4 tsp. salt + a few shakes on top of apple mixture before placing the top crust on
1 tsp. cinnamon
1/4 tsp. nutmeg
½ tsp. cornstarch
3 Tbsp. flour
3 Tbsp. butter
2 Pie Crusts
Mix all ingredients in a large bowl except the butter and pie crusts.
Then pour the mixed ingredients into the pie crust lined plate/tin. Dot with chunks of the butter.
Add a few shakes of salt on top of the apple mixture now in the bottom pie shell.
Top with the other crust. Cut steam slits in the top crust and sprinkle the top with some additional sugar.
Foil protect/tent the exposed crust edge to prevent premature browning
Bake at 450°F for 15 minutes. Remove the foil that is tented over the crust edge.
Reduce heat/coals to 350°F and bake for 35-45 minutes, until apples are tender and juices are bubbling out of the steam slits.
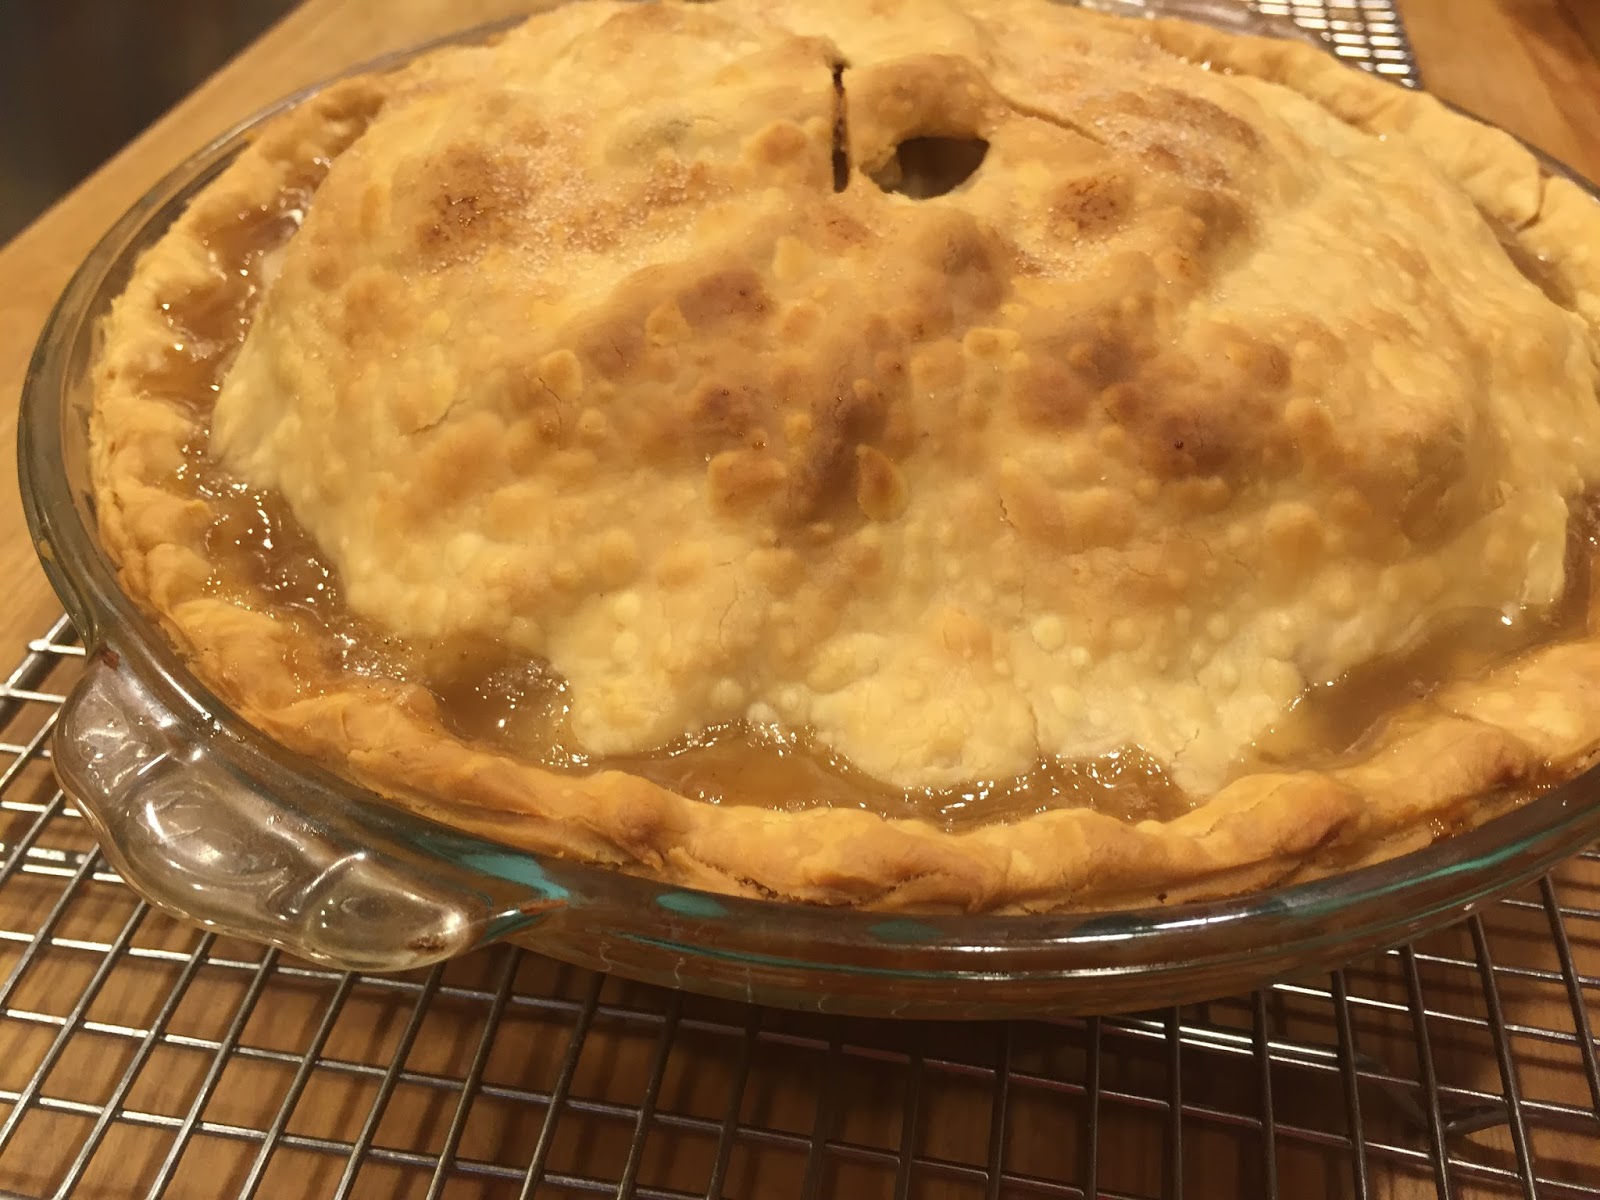
Dutch Oven baking for pies in general. Whether using a glass pie plate or metal tin plate (Not deep dish pies with crust directly in the Dutch Oven) raise the plate/tin off the bottom of the Dutch Ovens cast iron. Several methods are used. Any type of trivet works. I personally use an adjustable leg trivet with very short legs. Mason jar metal rings work too. The trivet or spacer goes in the bottom of the Dutch Oven before the pie plate/tin is placed in the DO.
I always tent my outer perimeter exposed pie crust with foil for the first 15 minutes of any recipe. This avoids premature crust browning. Use the normal recipe for a conventional oven and adjust your charcoal coals to equal the heat settings.
A long piece of foil (double it if using cheap thin stuff) is draped in the Dutch Oven prior to the pie being placed in. The ends of this foil can be rolled up or left hanging out under the DO lid. This foil is used for lifting the pie out after baking. This foil lifter is especially useful when the pie plate/tin and the Dutch Oven sides are a tight fit.
Glass pie plate shown on an adjustable leg trivet (shown with 1 1/2 inch legs
When pie baking in a Dutch Oven the bolt legs would be removed an 1/2 inch bolts/legs used
This is a product test and our opinions (this is not a paid advertisement)
We are starting our initial testing of one of the various CRISBEE products for seasoning Cast Iron. Check back to see updates on how we feel about the product.
We received via UPS the (2) Puck Box for testing. 2 – 3.25oz Pucks of the Original formula. On the Crisbee website it indicates the ingredients are a proprietary blend of Soybean Oil, Palm Oil, and Beeswax.
This product and others they offer (like apple pie scented) can be found on their website http://www.crisbeepuck.com/ Please mention you found them through the Toponautic Blog.
I want to pause here and say over many years, decades actually, I have used a wide variety of oils, lard, shortening etc. Anything someone might say works better. Years ago I stopped messing with oils, and settled on vegetable shortening. I have to say for a long while I like the results I get with plain old white vegetable shortening (Crisco).
Of course stating what you actually use then starts a whole huge debate. I rank cast iron conditioning methods right up there with talking religion or politics. You can’t win no matter what sways your particular notion of things. There are also a whole pot full of ways on doing things. With that said, I keep an open mind and am open to something new that might come along. That puts me at the place I am at today testing the Crisbee product that is new to me.
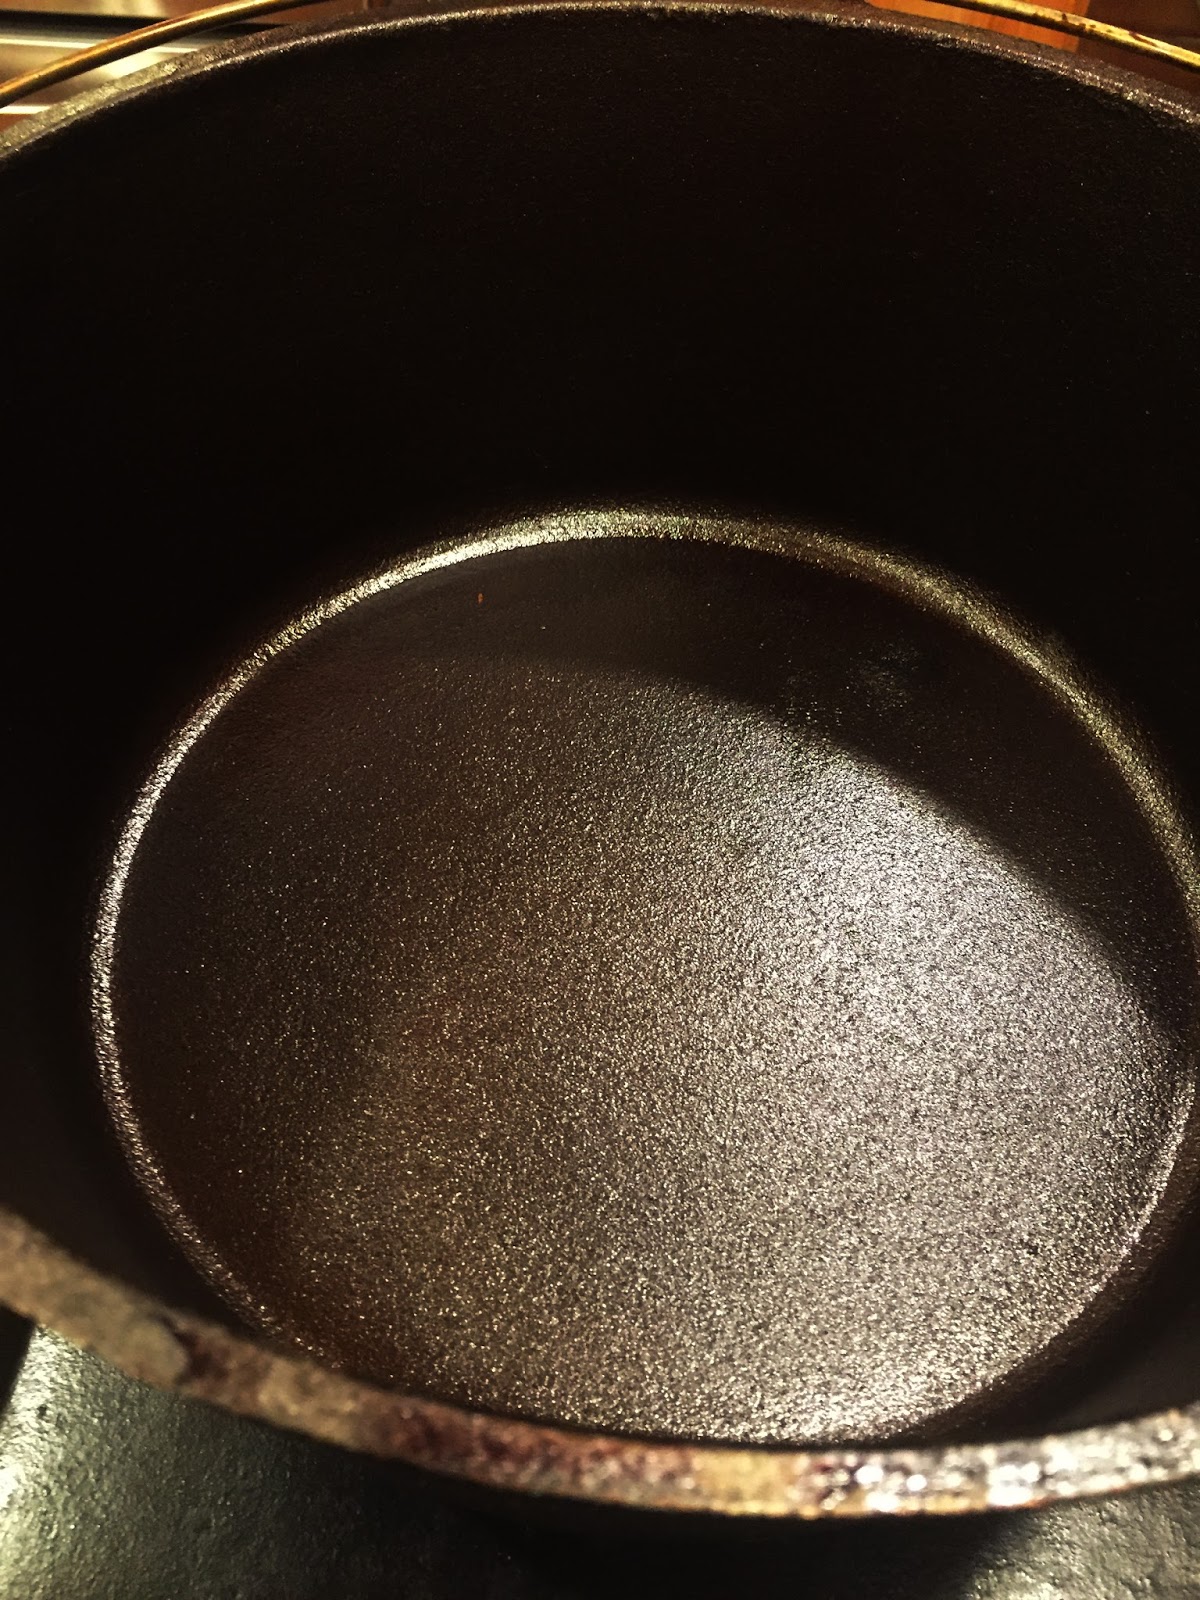
For testing purposes I will be seasoning a raw cast iron Dutch Oven as one of our tests. This is an 8qt Texsport Deep Dutch Oven that was recently picked up at a garage sale. It is the only thing I have hanging around without at least one layer of season already on it. This Dutch Oven still had its tags attached. It also had its factory layer of wax or paraffin. I have since burned that factory layer off and will be proceeding with baking on a first coat of seasoning using the Crisbee product.
I normally collect vintage Cast Iron and have over 150 pieces. This Texsport is not anything special. But when you run across them at a garage sale for $5 or $10 they are hard to pass up. They are rather rough compared to some of my coveted Griswold. So if something rough seasons well, image what some of the nice vintage cast iron might do.
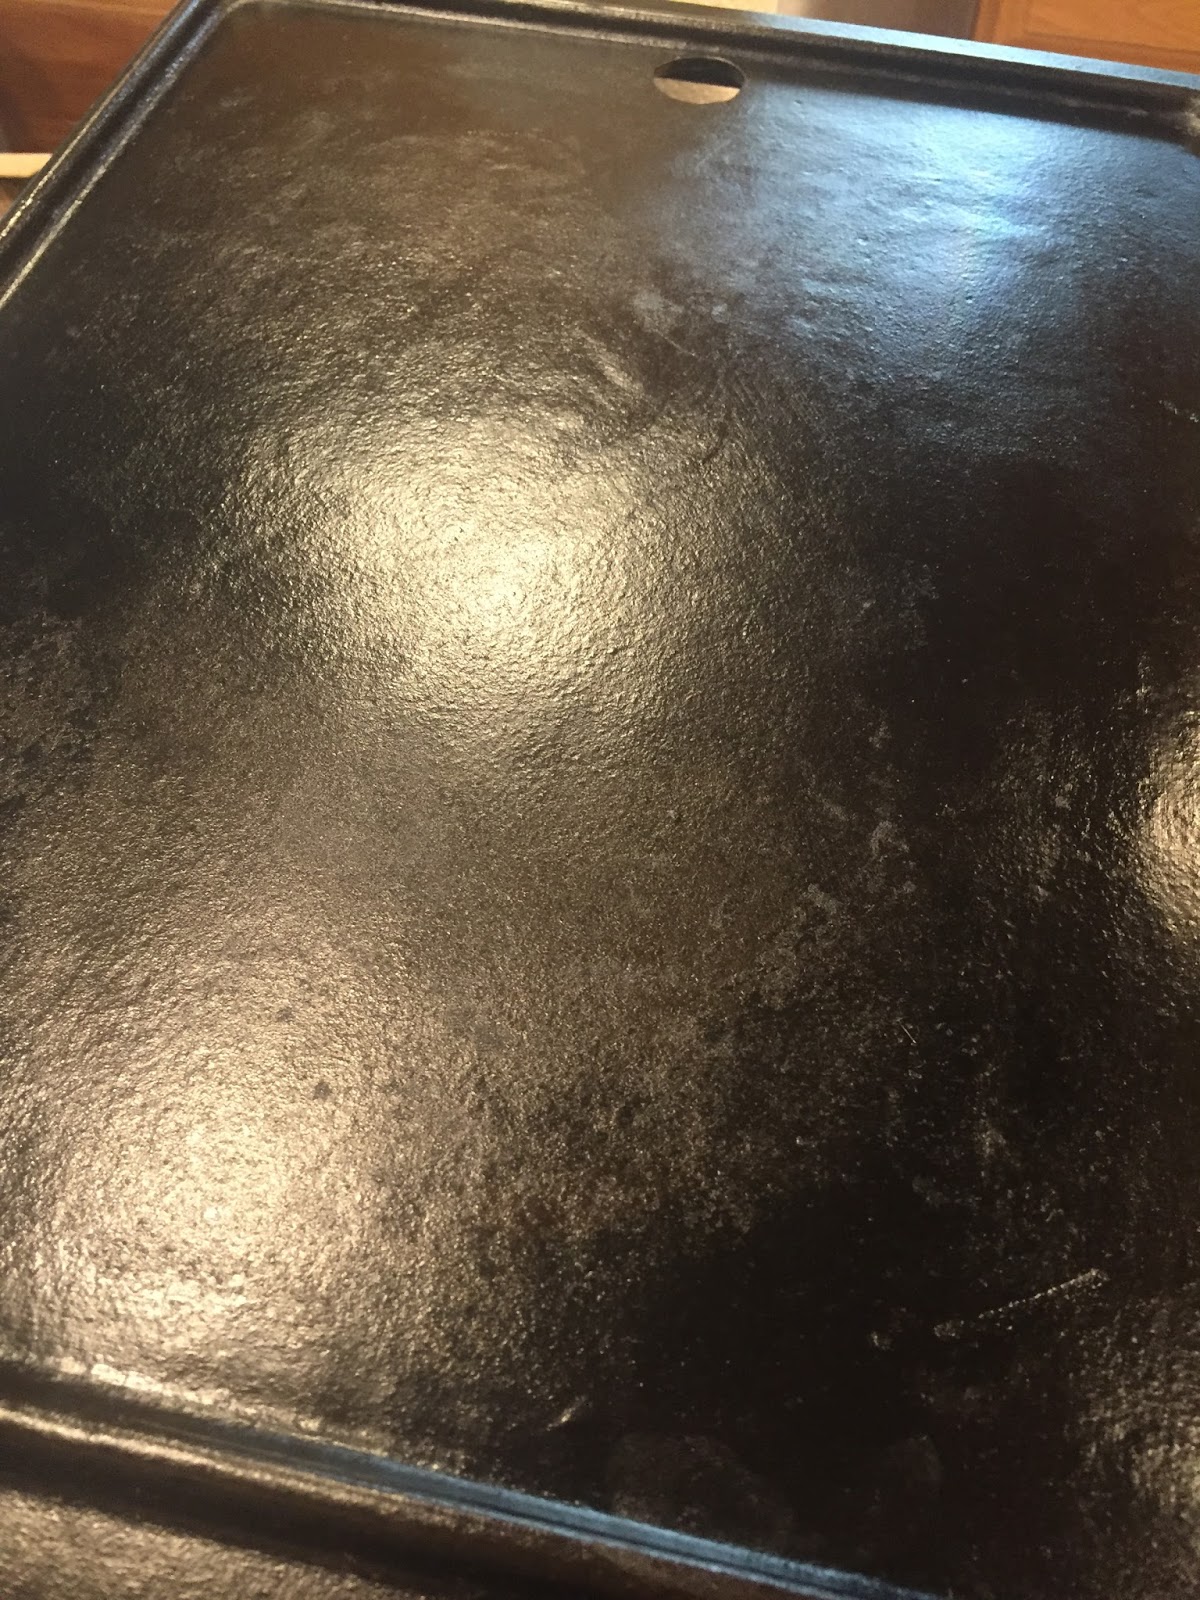
My other test piece of cast iron is a rectangular griddle we use over coals or a gas stove. This has been seasoned and well used. The seasoning in the center looks rather porous and worn (too many pancakes flipped from those spots). I am not removing any old seasoning on this piece. A new layer using the Crisbee product will be baked on. The true test is putting this to an egg and pancake “stick” test after a new layer or two. I am looking for this griddle to come out glossy black since the original cast iron surface is extremely smooth.
Categories to be rated:
Ease of application
Smoking
Can we get black colored seasoning by the second coat?
Slickness of the finished seasoning
Cook Surface rating
The products No “Rancid” claim can not be compared and evaluated by us.
I followed the Crisbee’s directions when seasoning the first piece. Used 400°F heat. The finish was a dark caramel brown. Not quite black. Same results I get on a first coat with my own choice of shortening seasoning material. I let the cast iron cool until just warm to the touch. I applied a second layer at this time in preparation of the second coat. I do like the way it adheres in this stage. I was able to rub it in as the iron cooled down. I give the product high marks for this. The piece was completely cooled.
On the second test piece (the Griddle) I upped the temperature to 450°F. That is the same temp I use for my standard seasoning choice. I wanted to compare to what I am familiar with. The Crisbee product handled the higher temperature very well. I didn’t experience any smoking to note. The first coat, covering existing seasoning, came out nice and black. The smooth surface of the griddle is about 75% slick at this point. But remember this griddle had prior seasoning on it. I am impressed with the color and the slickness obtained. I also rubbed this down with a very thin coat of Crisbee when it was nearly cooled. Prepping for a second coat. It was cooled completely.
Both pieces now have had two coats of Crisbee seasoning applied.
Ease of Application: I do like that “waxy” consistency it has when handling. I feel the bee’s wax may fill cast iron pores at a quicker rate. (Some call it pores. a.k.a rough surface). The product liquefies instantly on pre-warmed cast iron. A little goes a long way. As with other methods avoid using paper towels. Paper towels tend to leave little particles that end up in your finished seasoning. I learned this years ago with shortening and even oil products. For superior results use a lint free absorbent cloth. A horse hair/natural bristle brush can be used to work the liquefied product under handles and hard to wipe spots.
Smoking: Even at 450°F it did not set off the smoke detectors in the house with any noticeable smoking. Some oil products will cause issues not seen with the Crisbee product. High marks given for this.
Can we get black colored seasoning by the second coat? Both the cast iron pieces were a dark black at the end of the second coating. The oven temperature had been upped to 450°F. It could just be the difference in ovens though? I was not using a secondary thermometer in the oven to be more scientific. Just the setting on the oven. The product gets rated high for obtaining dark color quickly, since some methods take longer to progress from the golden dark brown stage to black.
Slickness of the finished seasoning Texsport Dutch Oven is a pretty rough cast pot. The Crisbee seasoning did do an excellent job of filling the pores/smoothing roughness. It appears to have a similar appearing seasoned surface, I tend to see when using Crisco. It could be superior as more layers are built up?
There is excellent slickness on the griddle. At least eye balling it. The true test to come, is frying some eggs. Also pouring out a couple pancakes onto the surface.
Summary of the Seasoning process: From testing the opinion is this product gives very similar results to vegetable shortening (Crisco). Application and the pore/roughness filling ability slightly better than vegetable shortening. The product can handle higher seasoning temperatures than stated in its directions without excessive smoking. The amount of coats to achieve the black finish is pretty much the same as the vegetable shortening method, though Crisbee appears to have a slight advantage in this category too.
Cook Surface rating: Follow-up evaluation will be done and added on.
The Texsport Dutch Oven has a rough surface from its foundry casting. The Crisbee seasoning has filled the pores/roughness. and the surface looks real good. The test will be baking a sticky Dump Cake in the DO, then seeing how easy or not it cleans up.
The griddle came out with a smooth looking slick surface. Eggs and pancakes will give it a real world test. We hope to cook on the griddle this coming week.
Griddle with some old seasoning left on – 2 coats of Crisbee re-seasoning
Check back in a week or so after we have attended our Ghost Town Dutch Oven cooking event and see our final comments.
The cost factor verses other products was not a consideration or an objective of this testing.
I have never experienced problems with a pot going “rancid” during storage. So I will not be able to rate the products claim that this will not happen using the Crisbee product. If others have experience with Crisbee in this regard, please send us your opinions.
The “rancid” issue I have only read about. There may be 4 factors while I never have had this experience
1. My opinion and the most important reason I have never experienced the “rancid” issue is I never just “wipe” my cast iron with a product. I always use a complete “heat seasoning” cycle before storing my cast iron for any length of time.
2. I live in a very arid climate in the desert southwest/USA
3. My cookware gets used continuously year round. Either over charcoal or in my kitchen oven.
4. I learned a tip from a friend some time back. Drape an old but clean cotton sock over the edge of your Dutch Ovens before putting the lid on. In the toe of that sock place one new charcoal briquette. The Charcoal toe end is draped in the pot. The leg end draped over the outside. The lid placed on top of the sock. The charcoal keeps things fresh, and the sock provides an air gap between the pot and lid.
Follow-up comments:
This evaluation is all very un-scientific. Only opinions based on lots of experience, and a wide variety products used on my cast iron over several decades.
Our week long camping and cooking event is over. I am happy to report the Crisbee seasoned pieces performed very well. Both pieces of Crisbee seasoned cast iron performed as well as any seasoned surface created using my go to product, vegetable shortening (Crisco). I can not report any issue that rates this Crisbee product lower. Cost may be the only factor that differs negatively. But we did not use cost as a determining factor.
Food did not stick any more or less. One Dutch Oven recipe was scalloped potatoes and ham that was cooked with charcoal for about 3 hours in the Dutch Oven. Nice browned top with some stuck on baked food especially around the top edge. The pot cleaned up easily with hot water. There was no noticeable effect on the seasoning.
A loaf of bread was also baked in the Dutch Oven and the bottom came out golden brown. The bread lifted right out and did not stick.
Eggs and pancakes came off the flat rectangular griddle with the ease of any well seasoned piece of cast iron.
In summary. I feel this product has real value as a cast iron seasoning product. People new to seasoning might find it easier to obtain quick results? But be sure to wipe off any excess product with a lint free cloth before baking the seasoning on. You do not want the product to drip or pool during the baking process.
This Blog article welcomes your add on opinions and comments should you try the product. Please email us your info, opinions, and photos.
We promised a follow-up to our original test of October 2015. Here it is.
Both our Texsport Dutch Oven and the griddle have had no negative issues concerning the seasoning. Both have several more layers of seasoning, than they did back a year ago. Since our test in 2015 we have only used Crisbee product on these two pieces. Both have only been used over hot charcoal and never open wood fires. The griddle at times has been used with direct contact laying on hot charcoal coals.
For the most part the pieces have had thin layers of Crisbee applied immediately after cooking, cleaning, and drying.
Both pieces of cast iron maintain a glossy slick black finish. No de-lamination or any evidence of flaking. No rancid smells or “off” taste.
We certainly can recommend this product if you are in the market for a seasoning product.
Update 2 years Later (October 2017)
As with our one year follow-up we can say “ditto” for sure. We have maintained these two pieces of cast iron with Crisbee only. Even with lots of use they maintain a slick black appearance. No de-lamination or any evidence of flaking. No rancid smells or “off” taste.
12 inch Dutch Oven with Casserole dish that fits inside (Preformed foil type works)
3 Tbsp Flour
1 Can Evaporated Milk
4 Eggs
1 tsp Cilantro (Dried Flakes)
Salt to taste
Pepper to taste
½ Tbsp Butter
2 Large Cans of whole green chili’s
1 lb Cheddar Cheese shredded
1 lb Monterey Jack Cheese shredded
Instructions
Perheat 12 inch Dutch Oven 325°
Separate Egg whites from yolks (Keep both)
In large bowl combine Egg Yolks, Flour, Couple dashes of Salt & Pepper. Beat Well.
In another bowl beat egg whites until stiff. Fold egg whites into the yolk mixture.
Use butter to grease a casserole dish that fits in your Dutch Oven. Lay out half the chili’s in the bottom of the casserole dish. Spread the Cheddar Cheese on the chili’s.
Lay out the other half of the chili’s on top of the Cheddar Cheese layer. Then spread the Monterey Jack Cheese on top of that second layer of Chili’s.
Pour the egg mixture on top.
Bake for 45 minutes @ 325° or until an inserted knife comes out clean.
2 cups unbleached all-purpose flour, plus more for dusting the board ( if you can get White Lily flour, your biscuits will be even better)
1/4 teaspoon baking soda 1 tablespoon baking powder ( use one without aluminum) 1 teaspoon kosher salt or 1 teaspoon salt 6 tablespoons unsalted butter, very cold 1 cup buttermilk ( approx)
Directions
Preheat your oven to 450°F.
Combine the dry ingredients in a bowl, or in the bowl of a food processor.
Cut the butter into chunks and cut into the flour until it resembles course meal.
If using a food processor, just pulse a few times until this consistency is achieved.
Add the buttermilk and mix JUST until combined.
If it appears on the dry side, add a bit more buttermilk. It should be very wet.
Turn the dough out onto a floured board.
Gently, gently PAT (do NOT roll with a rolling pin) the dough out until it’s about 1/2″ thick. Fold the dough about 5 times, gently press the dough down to a 1 inch thick.
Use a round cutter to cut into rounds.
You can gently knead the scraps together and make a few more, but they will not be anywhere near as good as the first ones.
Place the biscuits on a cookie sheet- if you like soft sides, put them touching each other.
If you like”crusty” sides, put them about 1 inch apart- these will not rise as high as the biscuits put close together.
Bake for about 10-12 minutes- the biscuits will be a beautiful light golden brown on top and bottom.
Do not over bake.
Note: The key to real biscuits is not in the ingredients, but in the handling of the dough.
The dough must be handled as little as possible or you will have tough biscuits.
I have found that a food processor produces superior biscuits, because the ingredients stay colder and there’s less chance of over mixing.
You also must pat the dough out with your hands, lightly.
Recipe and Photo’s submitted by: Bruce Tracy
Editor Note: From time to time we get recipes that even the name gets everyone's curiosity going. We believe this is going to be one of them!
This dish looks hard to do but it is really very easy. Just get all of the ingredients on the counter before you start. Then all you have to do is reach and add. Many versions of this recipe use seasoned sausage. I don’t think that is necessary.
Prep Time15 minutesmins
Cook Time1 hourhr30 minutesmins
Total Time2 hourshrs
Servings: 8Servings
Ingredients
1poundbaconthick cut divided apart
2poundsground pork
8ouncescream cheeseroom temperature
1medium onionsliced thin
1bell peppersliced or diced or both
Bottle of your favorite BBQ sauce
Cookie sheet
Cooling rack
Parchment paper
Instructions
Directions:
Cut four pieces of bacon into 1/2 inch pieces and fry to your preference. Set aside to drain.
Lay a sheet of parchment paper on your counter and place the ground pork in the middle.
Spread with your hands until you have about a 10 by 10 inch square about 1/2 inch thick.
Spread the cream cheese over half of the pork and add the bacon bits, onions and bell peppers. Gently roll it up from the cream cheese side. Set aside.
Make a 5 by 5 lattice with 10 pieces bacon. Googling bacon lattice will give you several “you tube” videos, it’s way easier than you might think. Place the pork roll with the seam toward you on the edge of the lattice closest to you. Roll it on the bacon, picking up the lattice as you go. Remember where the seam ends up.
Place cooling rack on a cookie sheet or inside a Dutch Oven. Place a piece of parchment paper on it. Place the bacon encased pork roll on the paper, seam side down. Brush liberally with bbq sauce.
Roast for about 75-90 minutes at 425 degrees. Check with a meat thermometer at 75 minutes.
When it reaches 155 brush one more time with bbq sauce and continue cooking for 10 more minutes.
When it’s done let it sit for 15-20 minutes so it can set up.
Notes
Bruce Tracy December 2013 Follow Bruce on Facebook at https://www.facebook.com/bruce.tracy.5 Interested in Bruce's hardcover Dutch Oven Cookbook? Just in time for Christmas? One of many sources to purchase "Dutch Oven Baking" by Bruce Tracy
This is a foundry/company I had never heard of until recently. It caught my attention since my last name is Beach. We did some genealogy on John H Beach and believe there may be some family connection. We hope anyone that reads our info will send us more info. Anything you know or have that we do not show here. Newspaper clippings, documents, etc. Especially on the man, but also on this company in general.
1838 to ?
Foundry in St Louis, Missouri – (Some records have it at 43 North Main and 120 North Main st
Old directories indicate clerks at 43 N Main. Perhaps that was offices and the foundry was at 120 N Main?
The Founder of the Company was Hudson Erastus Bridge (b.1810 d.1875) opened his foundry around 1838 in St Louis at the age of 28 or 29. The foundry at that time was called Empire Stove works. Not an inventor he used others patterns and patents.
1842 the name of the Company changed to Bridge and Brother after his brother Harrison became part owner.
1850 Harrison Bridge dies.
1857 John H. Beach became an associate and the name was changed to Bridge, Beach & Company.
1860 John H Beach was listed in the 1860 St Louis Directory:Beach John H(Bridge, Beach & Co) r.221 Chestnut
1860 Hudson E Bridge was listed in the 1860 St Louis Directory:Bridge Hudson E (Bridge, Beach & Co)r 32n, 8th.
1872 John H Beach retires
1875 Hudson E Bridge dies
1875-1876 Eliot Bridge becomes influential and then made president of the company.
1879 The name changed once again from “Bridge, Beach & Company” to “Bridge & Beach Manufacturing Company”.
1887 Sketch Drawing of Bridge & Beach Manufacturing Company after a large expansion, exists in archived records.
1888 Several Patents appear for Bridge and Beach Manufacturing
Please send us info on history and photos of items you have found bearing this foundry name. Email us your photos and info directly at info@toponautic.com
#187 Fajita Pan (oval 9 5/8x 7 1/8 excluding the handle)
#189 Reversible Griddle (12/12 inches the long way excluding the handles, 15 inches with handles)
Value used $14.00
We would appreciate any additional photos of some confirmed pieces including any types of markings you are willing to share. Also any additional information on the company that people might find unusual or interesting.