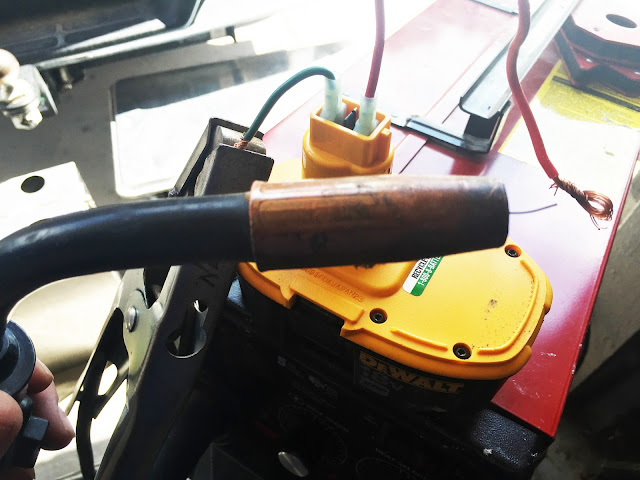
This is a simple effective means the restore the use of bad NiCad batteries you might otherwise be throwing out or dumping in the recycle bin. This is for the 18V Dewalt NiCad batteries. I do not know about any other types or voltage differences.
Let me state that as with any DIY project you assume full risk and responsibility of your own safety and of those around you…and any damage that may result. This could be risky or dangerous. Though it has not happened to me there is the potential of a battery exploding. At a very minimum make sure you are wearing safety glasses and that no one else is in the near vicinity. Safety should also apply to any pets.
I found this process on a youtube video after I went to a local HD store to replace the 18V XRP batteries I use in my cordless drill. When I saw the price tag of $89 each I thought I better investigate. Wow… they took a big price jump since I last bought one….I am beginning to think they were mis-marked? Amazon has them for $49 or a 2 pack for $70. No-name brands that fit for $27.
The high priced one was what spawned all of this.
I knew I had 2 batteries sitting on my workbench that would not charge. Read with a digital volt meter the bad batteries read 0 Volts. I reversed the leads. Nothing! The same nothing……0 Volts. I couldn’t even determine the polarity of the battery connectors. Luckily I had a third battery on hand that still worked.
While I saw there are several methods of rejuvenating the NiCad batteries, the method using a wire feed welder appealed to me. It was simple, easy to set up, and I had the welder. Best of all it worked. Though no one explained the theory I am assuming the various methods all use a higher DC voltage, and a way higher amp source to perform the magic. All methods pulse the voltage through the battery you are trying to restore.
You will need a couple slide on terminal connectors to fit the terminals of the battery. Crimp them on some short pieces of primary #10 copper wire. Strip the other end of the wires and twist a loop in the end of each. I used red for positive and green for negative/ground. Depending on your battery connector style you might have to get creative to make connections. Alligator Clips or something else might work?
Determine the polarity of your battery terminals using a volt meter. Mark them with a sharpie.
Open up your wire welder (you do need wire loaded in the machine and extending out through the welder nozzle handle tip).
Loosen and drop the wire tension knob inside the welder to prevent the wire from feeding
Dial the wire speed to “off” or to the lowest possible setting
Set for the highest heat.
Turn welder power on and click the weld/feed button on the nozzle handle and make sure wire DOES
NOT feed
Use a Volt meter between the welder ground clamp and the tip of the wire to check polarity
You will have to trigger the nozzle button to see voltage flow. Make sure you know your
meter lead polarity. If the meter goes negative, or reads negative, reverse meter leads.
In most cases the welders grounding cable clamp should be negative.
In most cases the wire sticking out of the welders nozzle handle will be positive.
But know for sure before proceeding because you have to connect with correct polarity
Plug the made up wires onto the battery.
Connect the welders ground cable clamp to the matching polarity on your battery. Let is hang there. In my case my welders ground cable clamp read negative with the volt meter. So I connect my welder ground cable clamp to the negatively connected wire of my battery.
Next you have to pulse the voltage through the battery. Depress and Hold the trigger on your welders nozzle handle. This energizes the wire sticking out the end of the nozzle you would normally weld with. If you are set up correctly the wire is not feeding out the tip. Make sure you do have about an inch of welding wire hanging out the end of the nozzle.
While still depressing the nozzle button so there is voltage, Tap or quickly drag the welding wire onto the other lead of your battery. In my case I am tapping this on the positive wire. You want to do this in such a way the welding wire does not start welding and bond to your battery wire. You will, and should, see a spark. Tap about 25 times rather quickly. Stop and feel the battery to make sure it is not hot. Repeat another 25 taps. Again feel the battery for any excessive heat. If not hot proceed with another 25 taps. At this time you would have tapped about 75 times total. Remove the welder cable clamped to the battery. Read the battery with you volt meter. If it worked you should be reading 16 to 18 volts.
If the battery reads lower you may need to tap it with the high amperage welder juice another set of 25 taps.
Once you have the battery in the 16 to 18 volt range, let is rest for 15 minutes.
Once that battery has rested for 15 minutes put your battery in its normal charger over night. You may find you brought your battery back to life. So far I am batting 100% on the restorals.
![]()


