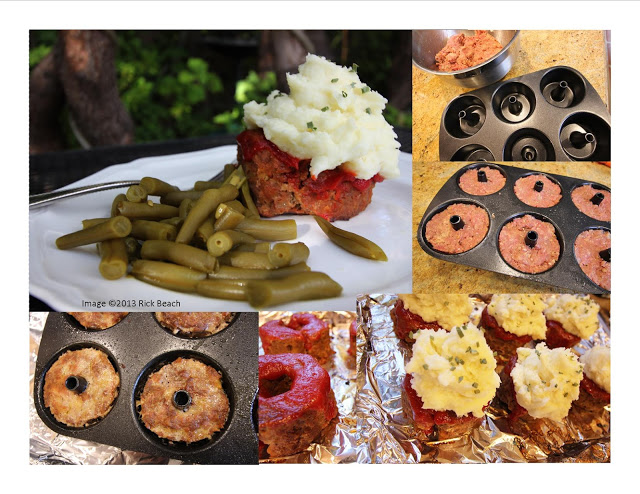
RECIPE MEATLOAF MINI BUNDT CAKE PAN

RECIPE MEATLOAF MINI BUNDT CAKE PAN

Great looking & tasting individual servings. Start your mashed potatoes right after you pop your meat mixture in the oven to bake. These will all come together while things are hot. Serve with a side of steamed vegetables, bread, etc. ~Rick Beach
Servings: 6 Servings

Ingredients

MEAT LOAF

  • 1 1/2 lb Ground Beef Lean or Sirlon
  • 2 Gloves garlic Minced
  • 1 Med Onion Diced
  • 3/4 Cup Celery Sliced/Chopped
  • 1 Cup Ketchup
  • 1 Cup Bread cubed
  • 1/4 Cup Milk
  • 1/2 tsp Mustard Yellow French's Hot Dog type
  • 1 Tbsp Worcestershire Sauce
  • 1 Tbsp Liquid Smoke Hickory Flavor
  • 2 Tbsp Cilantro dried flakes
  • 1/2 tsp Black Pepper ground
  • 1 tsp Salt
  • 2 Large Eggs

MEATLOAF TOPPING

  • 1/2 Cup Ketchup

MASHED POTATOES

  • 3 Large Russet Potatoes Peeled and cubed
  • 3 Cloves garlic Peeled
  • 1/2 Stick Butter
  • 1/2 Cup buttermilk
  • 1 tsp Salt
  • Bacon Crumbs and Chopped Chives Optional garnish

Instructions

MEATLOAF

  • Preheat oven to 350°F
  • Saute the Garlic, Onions, and Celery in a small amount of olive oil.
  • In a mixing bowl combine all ingredients and mix together by hand.
  • Divide the meat mixture into 6 equal parts. Press into a greased (6) mini bundt pan. [I use half of my 12 unit pan]
  • Bake 45 minutes. Turn out upside down on a foil lined cookie sheet. Pre Grease or spray oil the foil first. Add the topping and return to the oven to broil.

MEATLOAF TOPPING

  • Set Oven to High Broil. Spread the 1/2 cup ketchup topping on the exposed tops of the 6 upside down mini meatloaves. Dividing the ketchup equally and using it up. Immediately return the 6 mini's to the oven and broil the ketchup side up for 5 minutes. The topping ketchup should be broiled just enough to slightly dry it, but not brown or burn it. Remove from the oven and top with mashed potatoes before serving.

MASHED POTATOES

  • Cover cubed potatoes with water, salt and gloves. Cook at a low boil for 20 minutes. Test potatoes to see if close to done. Stir and continue to low boil about another 10 minutes or until the potatoes are tender.
  • Skim off the garlic (save it), then drain off the water. Crush the cooked garlic cloves with the back of a spoon. Return the drained cooked potatoes and the cooked crushed garlic to the still hot cooking pan. Add the Butter, Buttermilk, and salt. Allow the butter to melt.
  • First mash the potatoes with a potato masher, Then whip them using a mixer until they are fluffy. Adjust your milk to get the desired consistency. Be careful not to add too much liquid.
  • Use a piping bag and tip, or a spoon to top the baked mini meatloaves with whipped mashed potatoes. Garnish and serve.

Loading

NO BAKE CHOCOLATE PEANUT BUTTER CHEESE CAKE

This is another experimental (work in progress) recipe.  This time a dessert.  My twist on a more basic recipe I came across.  This is actually version number two.  The original recipe called for double the peanut butter and sugar now shown for the Peanut Butter Layer.  (Photo’s appearing here are from the original attempt with the double dose of peanut butter).  I love Peanut Butter but that amount was way over the top, even for me.  The recipe shown below has cut the peanut butter layer in half.

This is made in a 9 inch spring form pan.  No baking required.  Someday I am going to attempt this one while camping.  Using ice and a Cast Iron Dutch Oven to do the chilling.

No Bake Chocolate Peanut Butter Cheese Cake

Rick Beach

INGREDIENTS

Serves 8–10

10                    Graham crackers
7 Tbsp.            Melted butter
¼ tsp.              Cinnamon
2 pinch            Salt

24 ounces        Cream cheese (Room Temperature)
1½ Cups          Powdered sugar

2 pinch                        Salt
1 tsp.               Vanilla extract
1½ Cups          Chocolate chips, melted

1 Cups             Peanut butter, melted
1/2 Cup           Powdered sugar

1/16 tsp.                                Cayenne Pepper powder

1 1/2 Cup        Crushed Chocolate Cookies

PREPARATION

Crumb Crust Bottom Layer

  1. Line the bottom and sides of a 9 inch spring form pan with wax paper.
    2. Crush graham crackers.  In a bowl, whisk the Cinnamon and Salt into the crumbs
    3.  Pour the melted butter into the crumb mixture and mix until uniformly damp.
    4.  Press the graham cracker crumbs/butter mixture into the bottom of the 9-inch pan

Cover & Refrigerate while mixing the cheese layer.
Cream Cheese Chocolate Layer
5.  In a large bowl, mix together cream cheese until smooth.
6.  Add powdered sugar and salt, then mix until uniformly blended

  1. Add vanilla and continue to mix until blended in.
    8. Add the melted chocolate and mix until uniformly blended
  2. Spoon the mixture over the graham cracker crust in the spring form pan. Smooth out over the top of the cracker crust.
    Cover & Refrigerate while mixing the Peanut Butter layer.

Peanut Butter Top Layer

  1. In a large bowl, mix together melted peanut butter and confectioner’s sugar.
    11. Pour mixture over cheese/chocolate layer in the spring form pan. Spread it evenly over cheese layer.
  2. Refrigerate 2-4 hours

Crushed Cookie Topping
13. Prior to serving cover the Peanut Butter Layer with the Crushed Chocolate Cookie Topping

Remove from spring form pan. Pull off the wax paper sides.  Slide onto a serving plate.  Slice and serve while cold..  Keep cold/refrigerated.

Loading

RECIPE: VINTAGE ORANGE UPSIDE DOWN CAKE

VINTAGE ORANGE UPSIDE DOWN CAKE

(A variation of a 1944 Recipe)

Submitted by Kathleen LeBlanc

Kathleen is still experimenting with this recipe.  This was done in a cast iron skillet in her kitchen oven.  We are hoping to see this done in a Dutch Oven and need pictures if you are successful.

Ingredients 

3 Tablespoons unsalted butter
1/4 cup golden brown sugar (firmly packed)

1 large orange (for zest, slices)
1 cup all-purpose flour
1/4 teaspoon salt
1-1/2 teaspoons baking powder
1/4 cup unsalted butter (half cube)
1/2 cup sugar
1 large egg
1/4 cup milk (we used 2%)

Ingredients for Orange-Honey Soaker Sauce:
1/3 cup honey
1/3 cup fresh-squeezed orange juice (strained of seeds and pulp)

Prep the bottom of the baking dish:

Prepare a small round baking dish (we used an 8″ glass baking dish but you may also use an 8″ iron skillet or even an 8″ glass pie plate) with the following ingredients, smoothed in the plate with a spoon for even coverage over the bottom of the dish:
     3 Tablespoons unsalted butter, melted (microwave works here)

4 Tablespoons hard-packed and lump-free golden brown sugar 2. Prep the orange, and set aside:

Zest an orange with a zesting tool to achieve:

1 teaspoon finely zested (or finely minced) orange peel, somewhat packed into the spoon.

Peel the zested orange by cutting away all the skin and white parts.
Slice the zested orange into about 5 slices, removing any white parts that are showing.

Arrange the orange slices on the bottom of the dish over the brown sugar and butter. 3. Prep the dry ingredients, and set aside:

In a large bowl, whisk (or sift):

1 cup all-purpose flour

1/4 teaspoon salt

1-1/2 teaspoons baking powder

Prep the butter, sugar and eggs:

In a small to medium-sized bowl (or frosting bowl), use an electric mixer to beat on high-speed for about 2 minutes:

1/4 cup unsalted butter (half cube)

Beat into the creamed butter on high-speed for about 2 minutes:

1/2 cup sugar (we increased the amount of sugar from the original recipe)

Beat into the creamed butter-sugar on high-speed for about 2 minutes:

1 large egg 5. Mix it all up:

In the large mixing bowl with dry ingredients, add and beat on low-speed for about 1 minute until just thoroughly incorporated:

the prepared butter-sugar-egg mixture

1/4 cup milk (we used 2%)

the prepare orange zest 6. Spread the batter over the brown-sugar, butter and orange slices.

Using a spatula spread the thick batter carefully over the orange slices. Pretend like you’re frosting a cake and try not to get any “crumbs” of brown sugar into the batter.

Bake it up:

Place the baking dish on the center rack of your oven that has been pre-heated to 375 degrees and bake for about 25 to 30 minutes. The cake will be done when it is golden brown and a toothpick inserted into the center comes out clean.

Prepare a warm honey orange soaking sauce:

This sauce should be ready to pour over the cake as soon as the cake comes out of the oven so I suggest preparing it a few minutes before the cake is done.

In a small sauce pot, heat on low (simmer) for about 5 minutes:

1/3 cup honey (we used Tupelo honey ’cause it’s my favorite)

1/3 cup fresh-squeezed orange juice (strained of seeds and pulp)

Remove and flip it while it’s hot:

When the cake is hot from the oven, use a knife to cut around the rim of the cake to loosen the edges. Use oven mittens to carefully flip the cake onto your chosen serving dish being careful not to splash any hot bubbling sugar. I used a large 10-1/2″ shallow ceramic tart pan to hold the soaker sauce.

Pour warm soaker sauce over the cake:

Drizzle the warm sauce over the cake and let the soaking magic happen. You might poke some holes in the cake, though it seems soft enough to soak on its own. It can soak for 10 minutes or overnight.

Loading

WAFFLE DOG TIME

While many of you have been enjoying camping away the summer months, some of us have been getting “cabin fever”.

Most of the country gets “cabin fever” when cooped up during the winter months.  Ironically those of us that live and camp in the desert southwest mostly “hole” up the hot summer months.  Then start camping as the summer heat starts to wane into cooler temperature of the approaching Fall season.

So for some of us it is time to dust off the waffle dog maker, air out the sleeping bags and tents, and start prepping for prime camping season.

Does anyone have any tried and true recipes for use in a waffle dog maker?  I need one for Corn Dogs, and another for Waffles Sausages.

Email us at :  info@toponautic.com
We will list your recipe(s) and credit your name.

Loading

Recipe: Cake Cherry Bundt done in a Dutch Oven

 Recipe & Photos: Rick Beach
This is a box cake version.  I have a “scratch’ recipe too.

12 inch Dutch Oven and Bundt Cake pan that fits inside.  A deep Dutch Oven helps.

Hot Coals for 350°F

Ingredients

1   Chocolate Cake Mix (Devils Food that calls for 1/3 cup oil & 3 eggs)

Zest of 1 orange

Juice of 1 orange           Combine juice and water to equal liquid

Water                               called for on cake mix

1/3 Cup Oil  (amount of oil called for on cake mix box

3 eggs           (called for on cake mix box)

½ Can   Cherry Pie filling chopped coarsely

1 Can of your favorite icing ( or prepare your own homemade) (I use Cream cheese Vanilla)

½ Can Cherry Pie Filling – leave cherries whole

Prepare cake mix (The type that on the box it indicates 1 Cup water, 1/3 Cup Oil, and 3 eggs.  Do not use the total water indicated.  Fresh squeezed Orange Juice is used in place of some of the water.

Dump the cake mix in a mixing bowl.  Zest the orange peel into the mix.  Squeeze the juice from the orange you just grated the peel.  Squeeze the juice into a measuring cup.  Add enough water to the juice to equal 1 cup total liquid (or whatever the total liquid is on the cake mix.  Pour this into the mixing bowl with the cake mix and zest.  Add the oil and 3 eggs.

Chop ½ the can of cherry pie filling until the cherries are in course pieces.   Add the chopped cherries to the mix and using a mixer beat the cake batter per the instructions on the cake mix.

Reserve the other ½ of can of filling for topping after the cake is baked.

Spray oil the bundt cake pan, then pour in the beaten batter.

Pre-heat the Dutch Oven and lid with coals for 350°

Once the Dutch Oven is hot place the bundt pan in, cover and bake at 350°F for 30 minutes.  Gently raise the lid and test for doneness with a knife or tooth pick.  Mine normally take 35 minutes.  Bake and test every 5 minutes until tooth pick comes out clean.

Cool completely.  Ice the top and about ¼ the way down.  Spoon the remaining Cherry pie filling on top of the icing allowing it to ooze down the sides.  Serve

Loading

PUMPKIN MUFFINS

Recipe & Image by Rick Beach

This is an experimental recipe for a lower glycemic index version for diabetics out there.  Also no cholesterol.  White sugar was omitted completely and agave nectar used instead at a lesser quantity.  All eggs whites.

If done properly these are a soft muffin.  Not a hard crusty muffin.

The  plain version, or the basic recipe is the most healthy.  But there are many options such as adding chocolate chips, pumpkin seeds, blueberries, or other fruits and nuts.

I had the blueberry version with breakfast and it was great!


Ingredients

3/8 cup      Agave Nectar

1/4 Cup     Vegetable Oil

4                Egg Whites

1 1/4 Cup  White Flour

1/4 Cup     Almond Flour/meal

3/4 tsp       Baking Powder

1/2 tsp       Baking Soda

1/4 tsp       Ground Cloves

1/2 tsp       Ground Cinnamon

1/4 tsp       Salt  (Using a 1/2 tsp tastes better if you need not limit salt intake)

1/4 tsp       Ground Nutmeg

Options

1/2-1 Cup Chocolate Chips

1/2-1 Cup Fresh Blueberries

Combination of both

Sprinkle of roasted unsalted pumpkin seeds

Other fruits or nuts.

Preparation

Makes 12 Muffins

Preheat oven to 400°F

Line muffin tin will paper cups and spray the paper cups with Pam or spray oil

Use two bowls

Whisk all wet ingredients in the first bowl until well combined

Whisk all dry ingredients in the second bowl until well combined

Dump the mixed dry ingredients into the wet and fold in with rubber spatula until uniform

If adding nuts, chocolate chips, or fruit, fold them in last.

Spoon batter into the oiled paper liners in the muffin tin

Sprinkle with several roasted unsalted pumpkin seeds if you care to.

Bake 16 minutes until tooth pick test comes clean of batter.

The basic recipe Nutrition Facts  (Adding options will of course change these numbers)

Nutrition Facts

12 Servings

Amount Per Serving

  • Calories 143.5
  • Total Fat 6.0 g
  • Saturated Fat 0.5 g
  • Polyunsaturated Fat 1.4 g
  • Monounsaturated Fat 2.8 g
  • Cholesterol 0.0 mg
  • Sodium 149.9 mg
  • Potassium 63.3 mg
  • Total Carbohydrate 19.9 g
  • Dietary Fiber 1.1 g
  • Sugars 8.6 g
  • Protein 3.1 g
  • Vitamin A 47.7 %
  • Vitamin B-12 0.0 %
  • Vitamin B-6 0.7 %
  • Vitamin C

Loading

PIZZA LOW CARB FLOUR TORTILLA CRUST

Since I am still trying to abide by my New Years Resolution, that being to strive for better eating habits, this recipe developed.

This is great for dieting, or for those diabetics attempting to reduce carbs and sugar intake.  This could be for those that just want to eat lighter.  There is no need to pass on many peoples favorite.  That glorious pizza!

For the most part pizza ingredients are fairly healthy.  That is if you can reduce the heavy filled feeling and bloating from chowing down on too much crust.  This recipe uses an 8 inch Whole Wheat Low Carb tortilla.  I find them at Costco but they are available at many places.

Further I take a standard 24 oz size jar of meatless spaghetti sauce and doctor it up.  First to make it go further, reducing the sugars it contains per serving, and secondly to add some added nutrients.

Once the sauce has cooked down to thicken and remove excess water, I build a pizza with any of the favorite ingredients.  This can vary greatly as will the resulting carbs, sugar, and fat content.  Peppers, onions, mushrooms, olives, and sliced tomatoes (Roma preferably) can be heaped on with little negative effect.  If you are watching your weight or blood sugar levels skimp on cheese and meats.  But just getting rid of a thick crust, or even thin crust made with traditional pizza dough, will drastically cut down on calories, sugars, carbs, etc.

Limit yourself to one or less.  Serve with a salad and an iced tea.  It just doesn’t get much better.

The SAUCE

24 oz            Spaghetti Sauce (A quality meatless choice)

1 Cup           Fresh Spinach Leaves (Coarsely chopped)

1 Cup           Fresh Kale Leaves (Coarsely chopped)

1 Tbsp.         Garlic (Fresh minced)

Salt & Pepper to taste

In a sauce pan add all the ingredients.  Simmer until the spinach and kale are tender.  Continue to simmer until any excess water in the sauce has been cooked away.

Preheat Oven to 375°F.

Cover a cookie sheet with foil.  Spray the foil with PAM.  Sprinkle with a little corn meal.  Arrange a couple of tortilla’s on the cookie sheet.

Start building your pizza.

Spread a thin brushing of olive oil on the surface of the tortilla that is facing up.

Spread a thin layer of your prepared sauce.

Sprinkle the sauce with grated Parmesan spaghetti cheese.

Arrange whole fresh basil leaves on top of the sauce.

Layer your favorite toppings such as pepper slices, sliced fresh tomatoes, olives, mushrooms, pepperoni.

Bake for 12-15 minutes.  Top with shredded Mozzarella Cheese.  Return to the oven just long enough to melt the Mozzarella.  These are delicious and really assists on helping to cut down on some of the bad stuff.  But still enjoying life.

Loading

BREAD ARTISAN ALMOND BEER

I have been experimenting with Almond Flour to create a Bread with lower sugar, lower carbs, and lower calories, than traditional white bread.  The fact that I am diabetic I search for something I can make myself so I know what is in it.  But it also has to be acceptable for use with breakfast to accompany a nice egg white omelette.

Note: This is the first run of an experimental recipe. I wouldn’t call it a failure but it is not what I want, and think it could be.  The taste was quite satisfactory (Of course nothing like a bread with added sugars or sweeteners.)  Though the dough raised and doubled, the top of the loaf baked with a flat surface.  It did not create a domed loaf as I would have liked.  The baked bread is on the dense side, but that was very much expected.  As I adjust this recipe I hope to come back here and make adjustments to the recipe, notes, and photos.

I will next experiment with changing the White Flour and Almond Flour ratio, the amount of yeast, and I may even try the addition of Gluten.

The nutrition values are listed below the recipe.  Sugar=0, Calories=74, Carbs=9.  This is based on the assumption you make 24 servings out of one loaf made with the listed ingredients.  If you have to have 2 portions then double the nutritional values.

Ingredients

2 Cups       Flour  (White Bread making Flour)

1 Cup         Almond Flour (In my Health food store they call it Almond Meal)

1 1/2 tsp.    Salt

1 tsp.          Yeast  (I use Bread Machine Rapid Rise)

12 oz          Beer (I have been experimenting with Miller Lite.

Whisk all dry ingredients together

Pour in the beer and mix with a wooden spoon until it forms a wet sticky ball just a little more stiff than muffin batter.  Place in a well greased large bowl that will allow the dough to double in size.  Spray the top of the dough with oil (PAM).  Then cover the bowl top tightly with plastic wrap.

Set the bowl on the counter and allow the dough to “rise” a minimum of 8 hours (Overnight), up to 16 hours.

At this point the dough should be well doubled in size.

Turn the sticky dough out on a very well floured bread board or counter top.  Flour hands and the dough well.  Pat the dough out until about 1 1/2 inches thick.  Flour it well then turn the dough over in half on itself.  Repeat the floured pat and fold 5 times.  Form a ball and pinch the bottom seal shut.  Oil all surfaces of the ball and then place the dough into a well greased 8 inch Cast Iron Dutch Oven.  Cover loosely with a towel.

Allow the dough to rise a second time for 2 hours.

Preheat oven to 375°F.  Gently remove the towel from the dough taking care not to deflate the dough.  Place the Dutch Oven/Loaf into the hot oven.

Bake for 30-35  minutes or until golden brown.

Once baked shake out and place on a wire rack to cool.  For a soft crust, while still hot, rub all surfaces with butter.

Nutrition Facts
Serving Size 1 slice
Servings Per Recipe 24
Amount Per Serving
Calories 74

Calories from Fat 18 (24%)

% Daily Value *
Total Fat 2 g 3 %
Saturated Fat 0.2 g 1 %
Monounsaturated Fat 0 g
Polyunsaturated Fat 1.7 g
Trans Fat 0 g
Cholesterol 0 g 0 %
Sodium 147 mg 6 %
Potassium 18 mg 1 %
Total Carbohydrate 9 g 3 %
Dietary Fiber 0 g 0 %
Sugars 0 g NA
Protein 2 g 4 %
Vitamin A 0 %
Vitamin C 0 %
Calcium 0 %
Iron 0 %
* The Percent Daily Values are based on a 2,000 calorie diet, so your values may change depending on your calorie needs. The values here may not be 100% accurate because the recipes have not been professionally evaluated nor have they been evaluated by the U.S. FDA.
Almond flour or meal
All the dry ingredients
Adding the beer to the whisked dry ingredients
Just mixed.
Mixed and placed in large greased bowl
Mixed and covered with Plastic Wrap
Yeast is working.  Plastic wrap is being inflated with gases being produced
At the end of the second “rise”.  About 14 hours into the process

Loading

BREAD ARTISAN GREEN CHILI BEER

Artisan Green Chili Beer Bread  (Yeast style)
Mix the day before baking

3 1/2 Cups    Flour

1 ½ tsp          Salt

½  tsp            Instant Yeast (bread machine yeast)

7 oz Can        Diced Green Chiles – Drained (Macayo’s Diced Green Chiles Roasted & Peeled)

12 oz             Beer (Beer varieties change the flavor – Experiment)

*Whisk salt, yeast, into the Flour.
*Dump the drained green chili’s on top.

*Pour in the beer.

*Stir together and completely mixed into a rough ball.

*Cover with plastic wrap 8-18 hours and leave on the counter

*Sometime after 8 hrs (up to 18 hours), turn proofed dough out on floured board

*Pat dough flat.  Fold over on itself 4 or 5 times (no kneading required)
*In a well greased baking vessel (Dutch Oven) place the oiled dough inside.
*Cover with plastic wrap and reproof about 2 hours at room temperature.

*Preheat oven to 375°F

*Bake in covered Dutch Oven 30 minutes with the lid off. Or until golden brown.

* Shake it out and cool on rack.
*For soft crust rub all surfaces with butter.

Note: I use 3 1/2 Cups of flour in this recipe.  That is 1/2 Cup more than with other recipes I have posted.  That is to compensate for the added liquid that comes from the Green Chile’s even though they are drained.

For photo’s I used a 10 inch Cast Iron Chicken Fryer skillet with the lid off the entire time.   I think I would prefer a 8 inch Dutch Oven to get a higher loaf.


Loading

BREAD ARTISAN FLAX SEED

Mix the day before baking

Recipe and Images: Rick Beach

3 Cups    Flour

¼ Cup     Ground Flax Seed

1 ½ tsp   Salt

½ tsp      Instant Yeast (bread machine yeast)

12 oz      Beer (Beer varieties change the flavor – Experiment)

  • * Add salt, yeast, and Ground Flax Seed to the Flour.
  • *Add beer to the dry ingredients.
  • *Stir together and completely mixed into a rough ball.
  • *Cover with plastic wrap 8-18 hours on the counter
  • *Sometime after 8 hrs, turn proofed dough out on floured board
  • *Pat dough flat. Fold over on itself 4 or 5 times (no kneading required)
    *Oil a bowl.  Place dough in oiled bowl.  Cover and reproof 1 2/3-3 hours to raise
  • *Preheat oven to 450°F and an empty Dutch Oven for 30 minutes.
  • *Dump the proofed dough into the hot Dutch Oven that has just been well greased.
  • *Bake in covered Dutch Oven 30 minutes with the lid on, 3 minutes longer with lid off.

Or bake with lid off for a hard crustier bread.

  • I use a 8 inch Dutch Oven with the lid off the entire time. Mine is too low to use the lid.  If you have a deep 8 inch diameter perhaps the lid would work.
  • Shake it out and cool on rack.  For soft crust (As shown in photos) rub all surfaces with butter as soon as the loaf is shaken out of the cast iron.

Loading