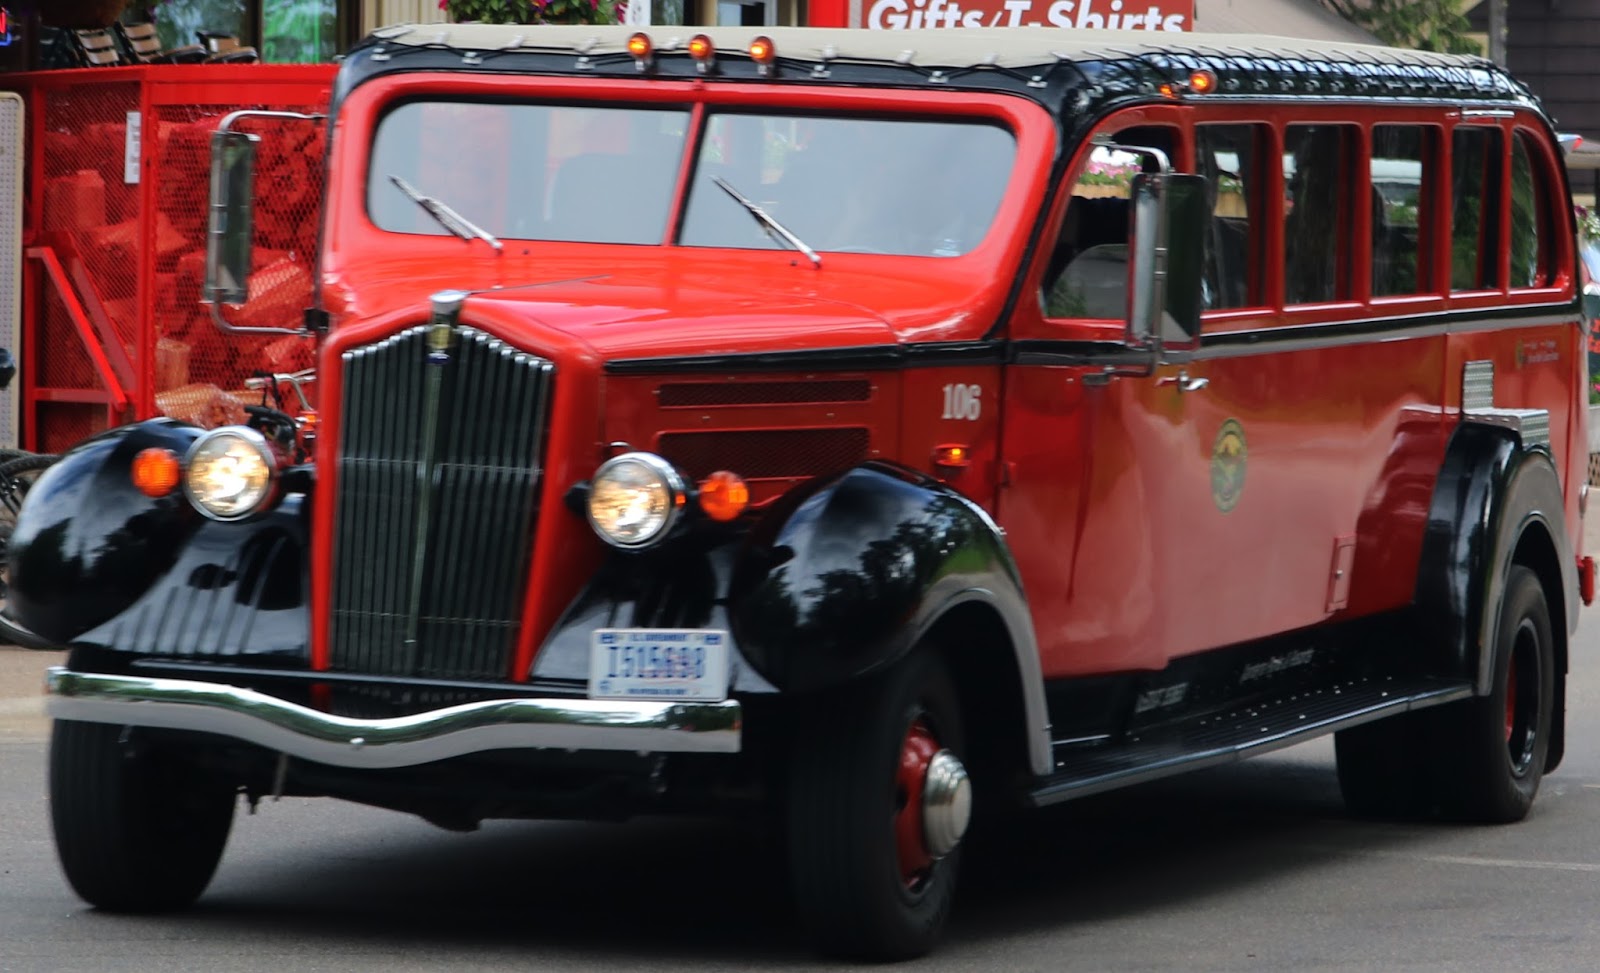
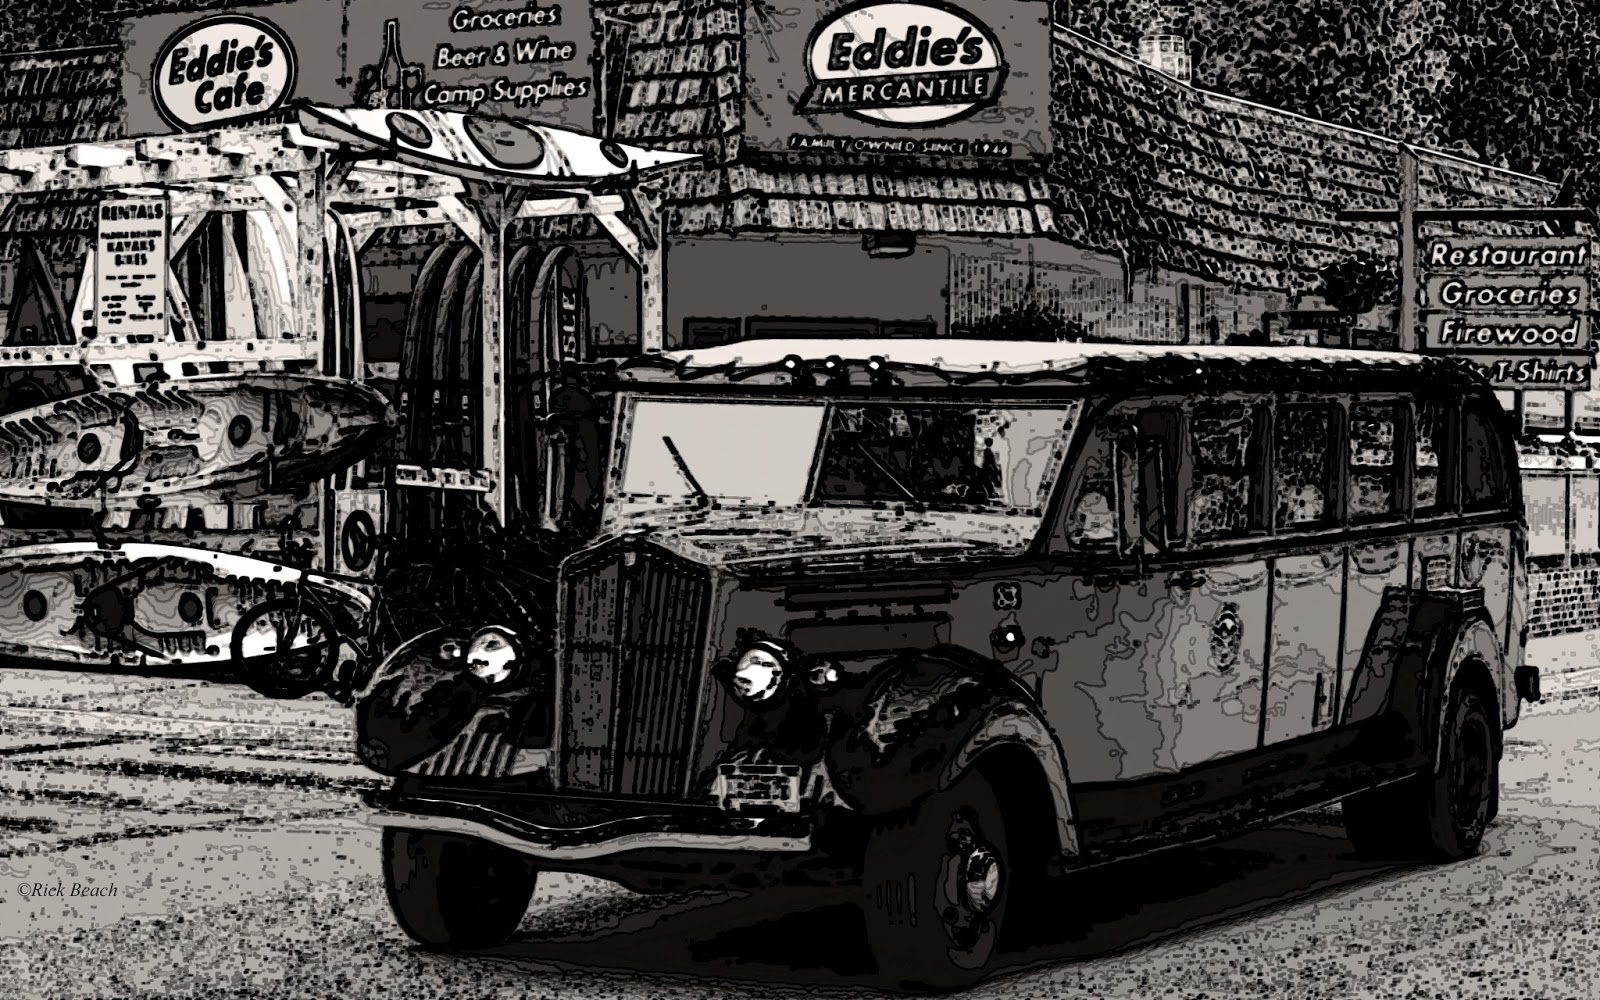
One of the few old White Company Red Buses (a.k.a Red Jammers) found in Glacier NP – Montana. Interestingly:
The “Jammer” name came from the sound the un-synchronized transmissions made when shifting gears.
The White Company at one time produced passenger cars that ran on steam. Around 1911 they converted to producing gasoline engine cars.
These old Red Buses were first introduced in Glacier NP back in the 1930’s.
Volvo ended up purchasing the assets of White, when White went out of business. Volvo is now part of the Ford Motor Company. Ford Motor Company a leader in alternative fuels took a special interest in renovating the vintage Glacier Park vehicles back in 2000.
The fleet of 33 Red Buses now run on clean burning LPG (Propane). The original carburetor gasoline engines were removed and replaced with fuel injected 5.4L bi-fuel engines capable of running on either gasoline or propane.
Transmissions changed out to modern automatics.
The chassis was removed and replaced with a modified E-450 chassis.
The original brake system was replaced with a production 4-wheel disc ABS system.
The windows were replaced with modern safety glass. The external lights were brought up to current standards.
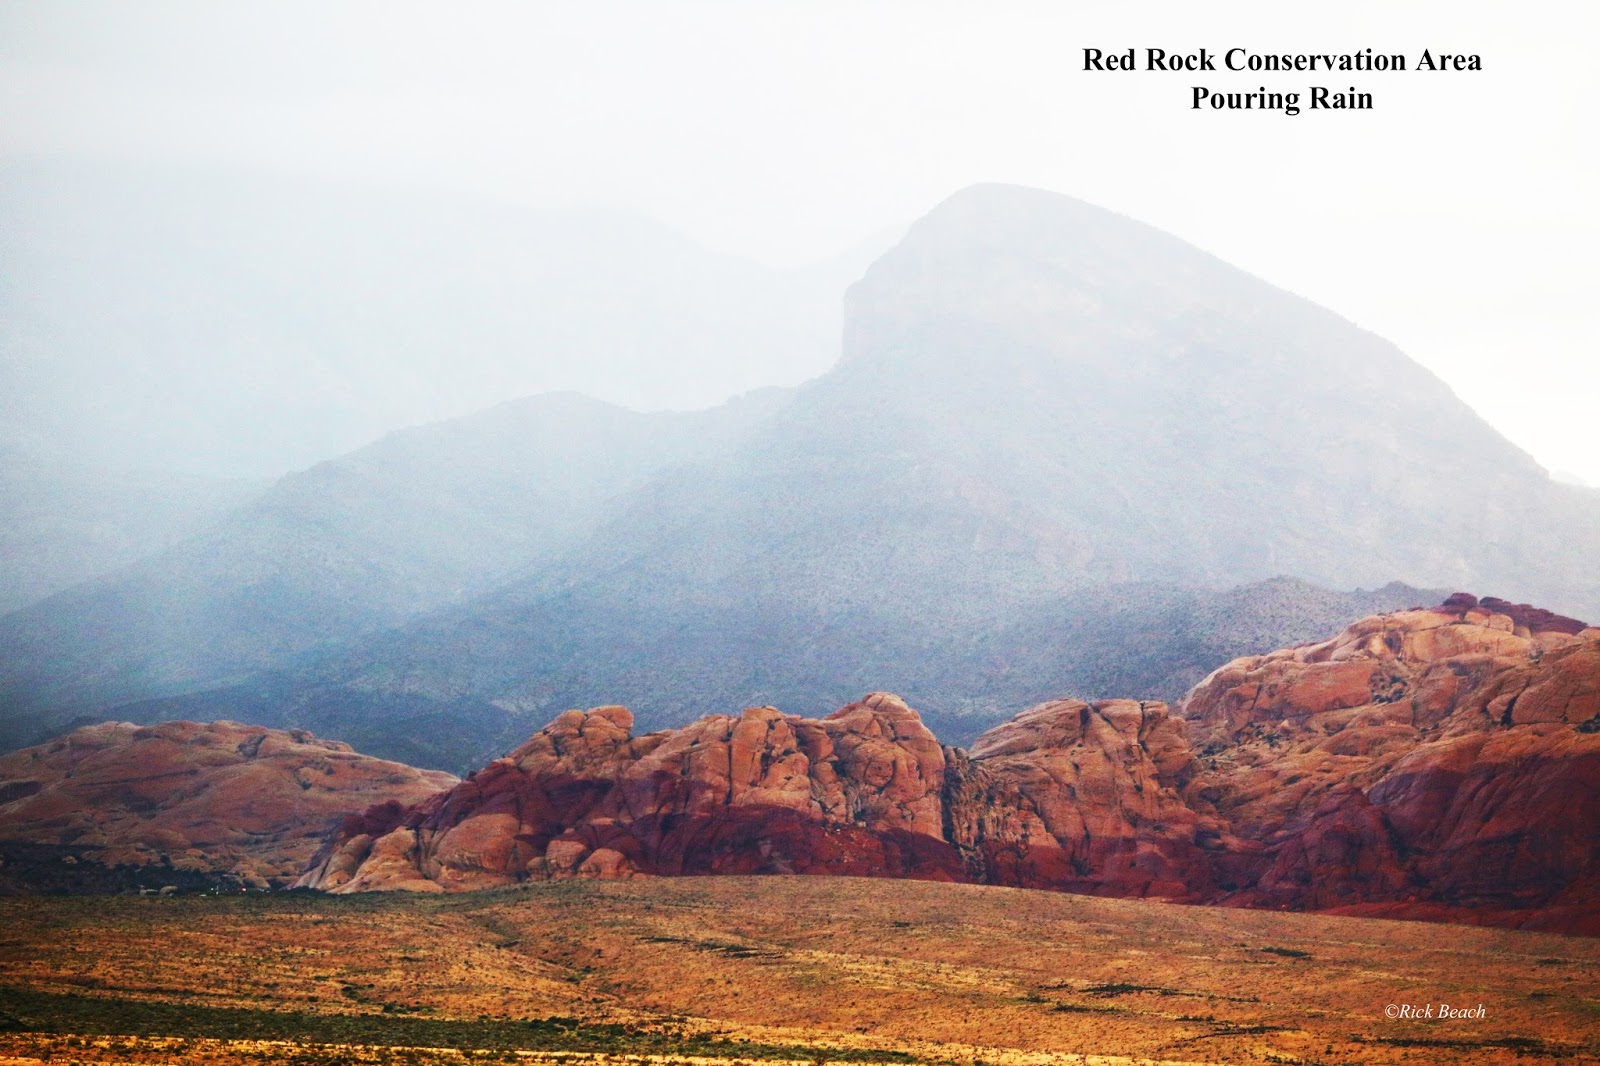
The Desert Southwest offers some diverse scenery. While most of the year that days are hot and sunny, there are cooler periods. On occasion we are blessed with delightful rain. While these rains can sometimes come down with such intensity they become deadly, they also transform the stark landscape into something of beauty.
I live on the western edge of Las Vegas, Nevada. Further west of us is a rugged mountain range with peaks that exceed 10,000 feet. At the foothills of this range is Red Rock Conservation Area. The lower levels are desert. From the desert floor there are giant clumps of sandstone jutting up hundreds of feet. Sandstone walls of the Keystone Thrust, rise up from the valley floor up to 3000 feet. Just behind them, the mountains.
I was watching the rain pouring on the mountains the other day and decided to drive up to Red Rock to enjoy a different kind of experience. One of the rain and water flowing, rather than the normal dry, and unforgiving terrain.
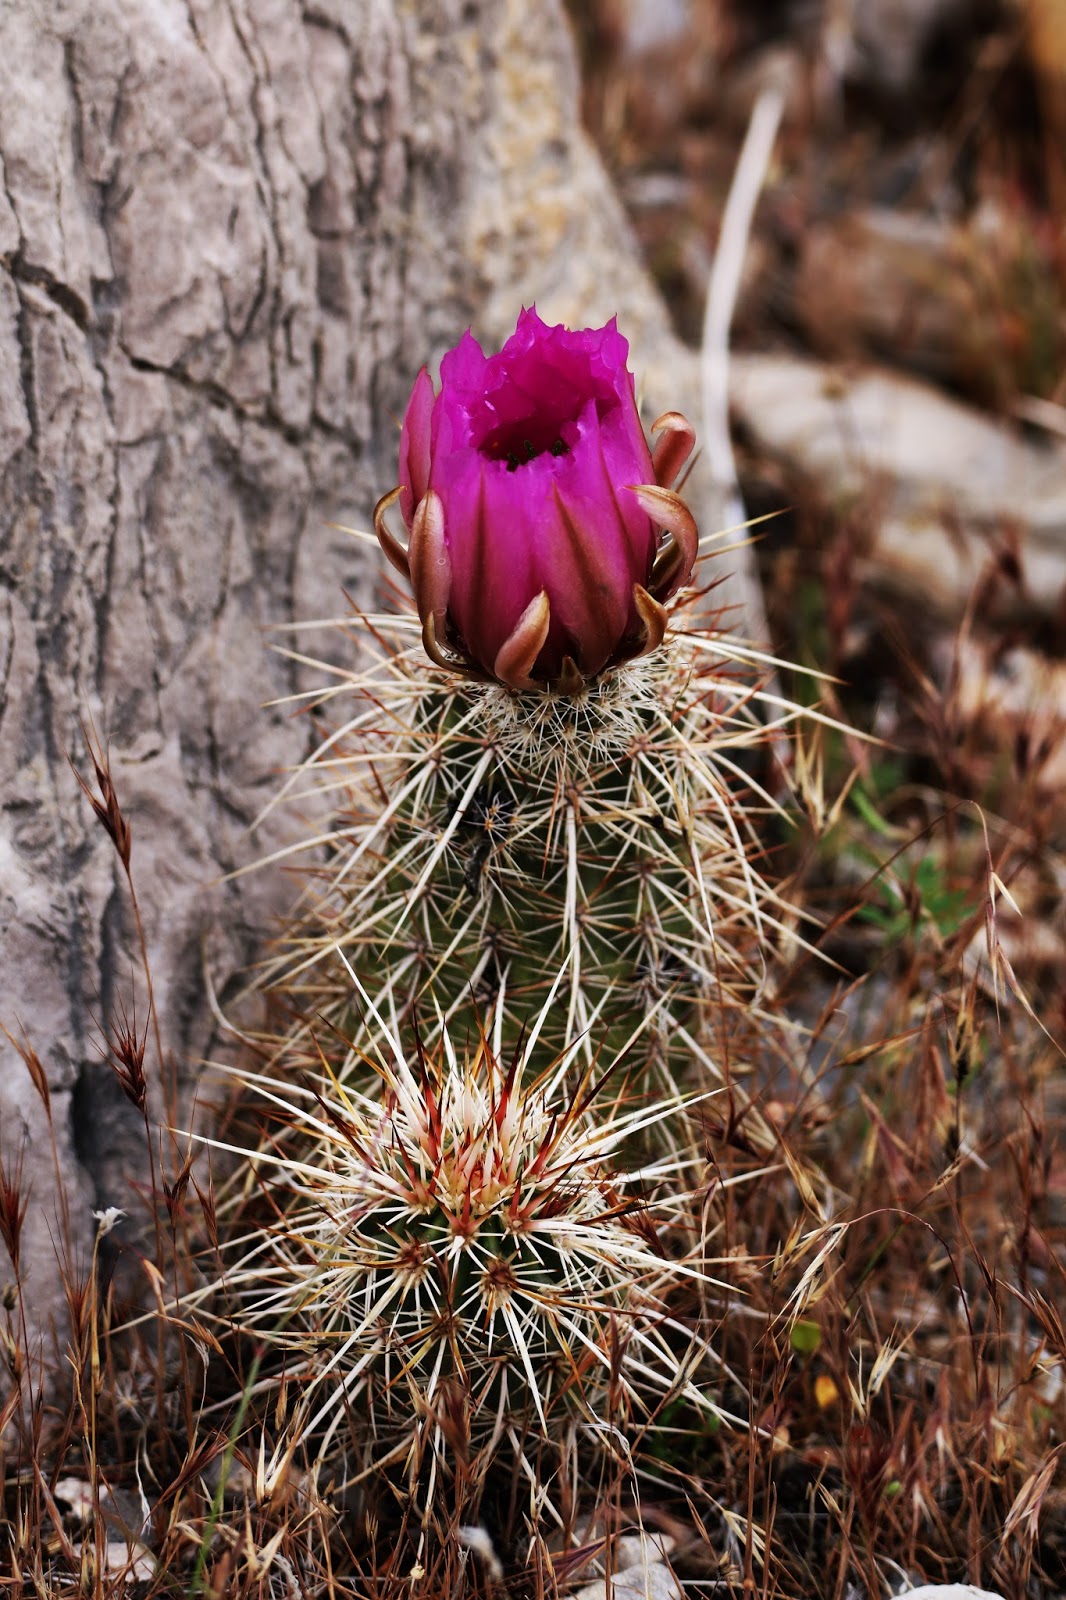
Since this was the early part of May and we have had rain more than the past many years, the cactus, plants and bushes were in full bloom.
While not the optimum conditions for photography everywhere I turned I saw different colors. The rain started again and I had to keep the gear dry. So I popped back in the vehicle and enjoyed it and the drive out of the park.
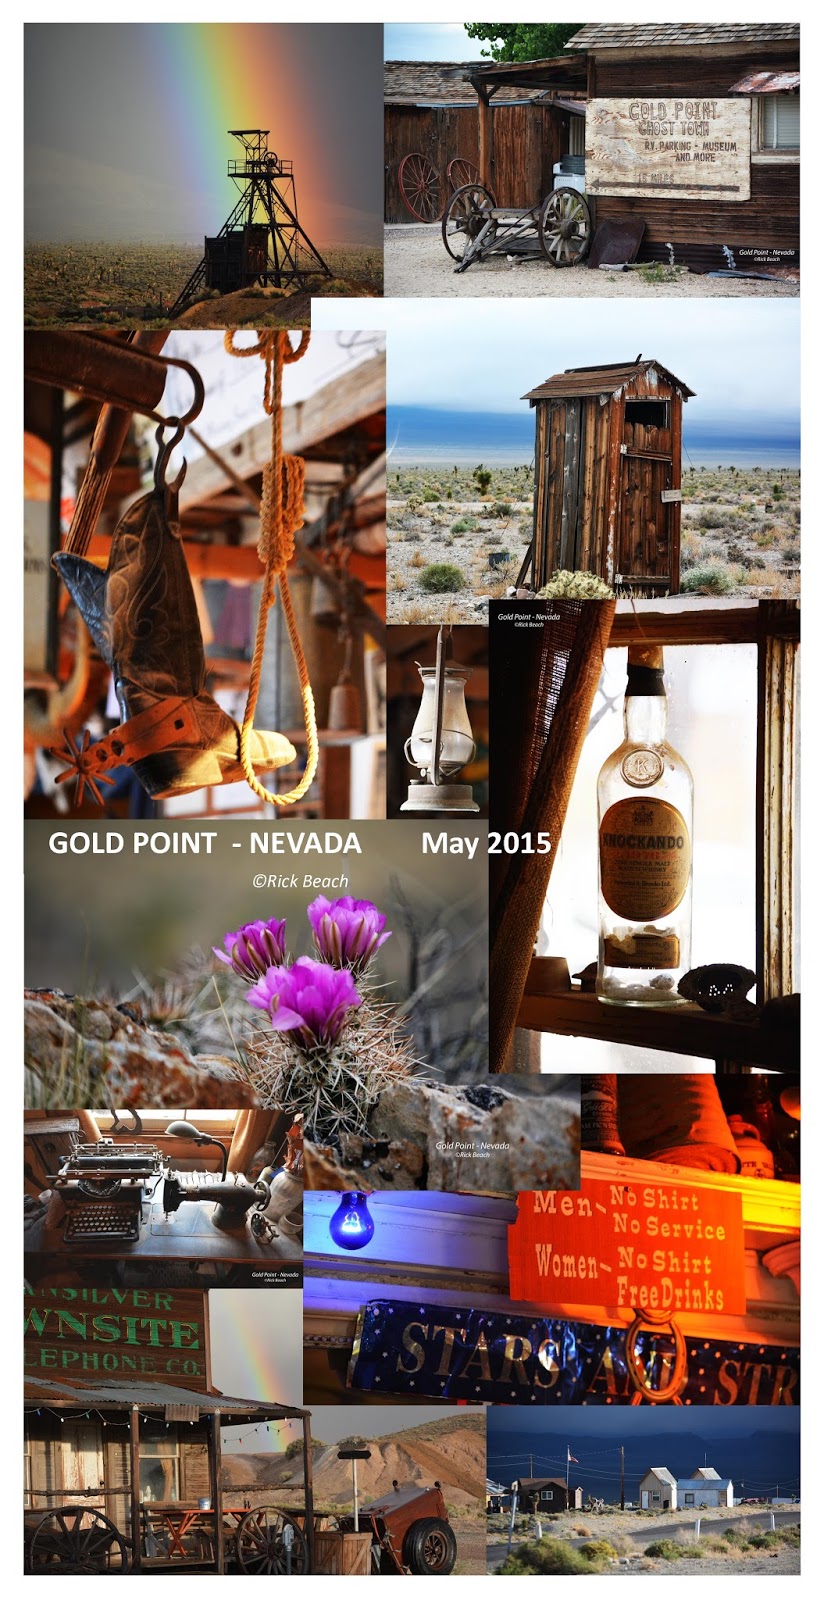
Twice a year we have a local group out of Las Vegas that camps at one of Nevada’s Ghost Towns. Our spring event will take place May 12 through the 15th, 2016. The core group camps with anything from RV’s, Teardrops, to Tents. RV spots are limited to 11 and normally all get reserved. There are also a limited amount of rustic cabins for rent. There is endless dry camping where you can camp out of your car and set up a tent.
We also have an October trip scheduled for October 13-16, 2016.
If you want the experience and car camping is your thing. This would be a unique opportunity to attach to your Havasu Falls trip if you are coming in through Las Vegas. Or just join us and have a fun weekend.
This is paved roads the entire way. You can travel here with the family car or a rental with no fear of needing an off-road vehicle.
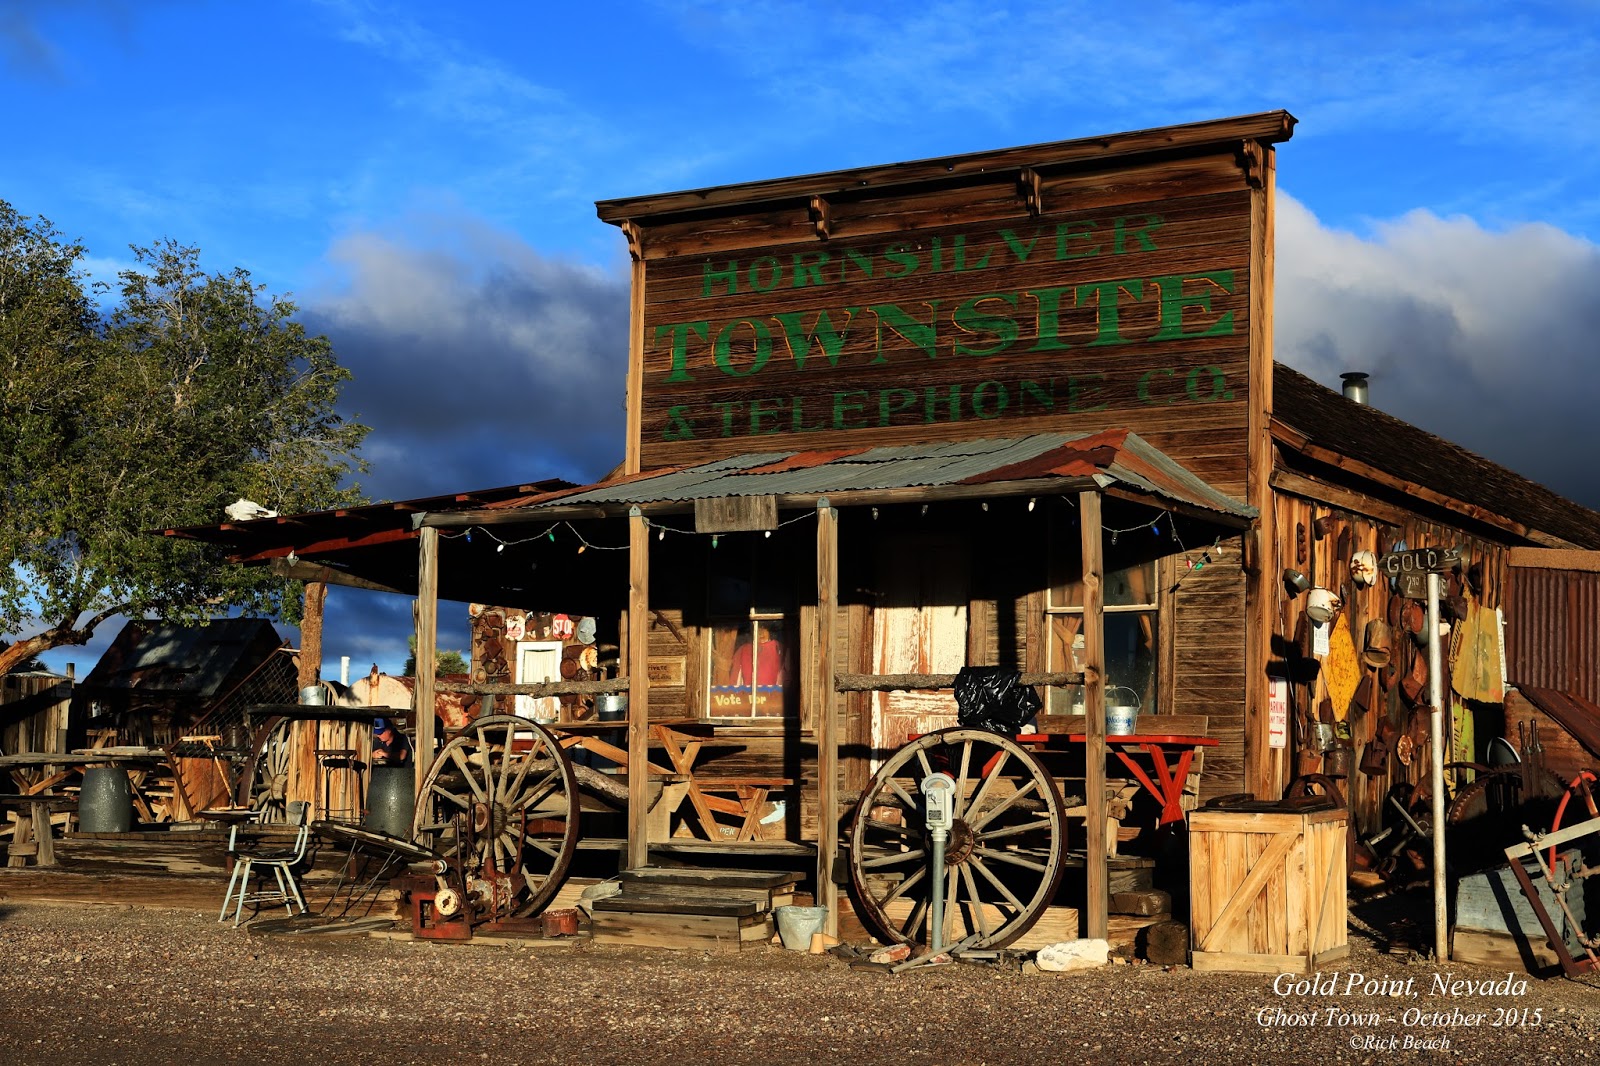
Gold Point, Nevada is about a 3 hour drive north out of Las Vegas. It is remote but offers a rewarding experience. The Saloon is opened for our group. There are also some prepared meals available for purchase, but head count must be given.
This is rustic camping for the most part. Pit toilets, but there is a shower. No tables. No tree’s. Don’t expect comforts and you won’t be disappointed. A shade/rain fly is recommended but not necessary. As is a folding table.
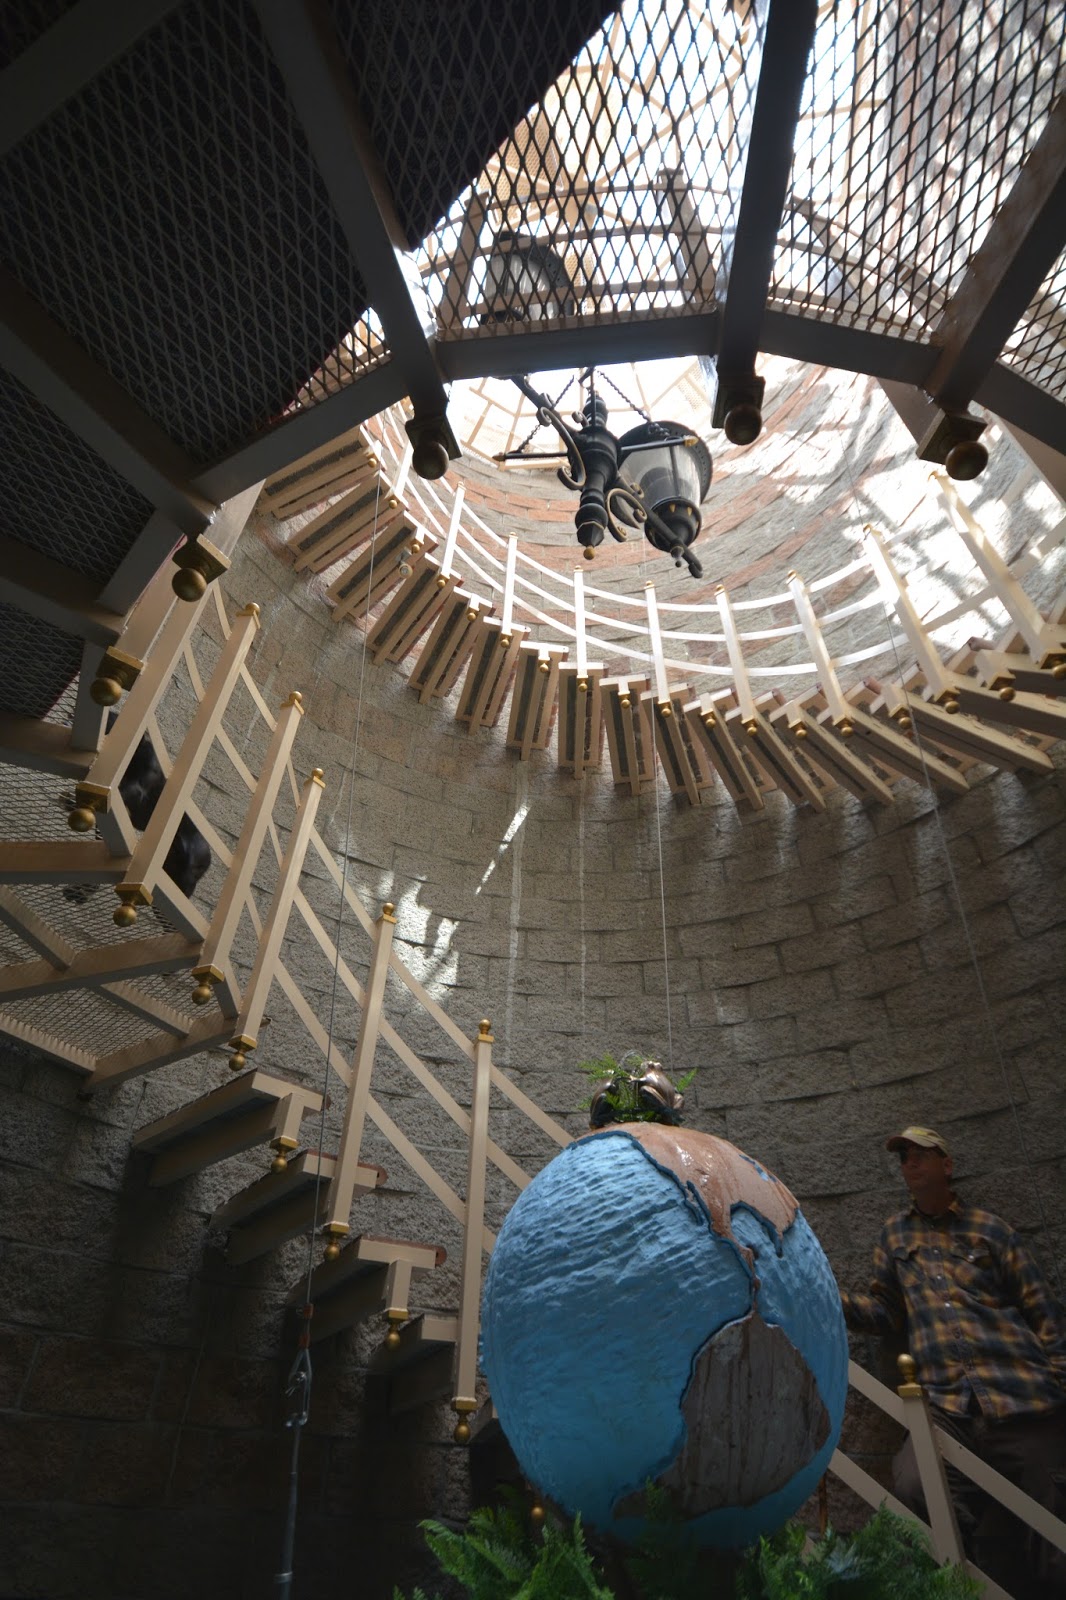
Hard Luck Mine Castle
There are no services or store. The nearest small town is about 40 miles away. Be sure to bring everything you need. Water is available.
The area is full of photogenic buildings, old iron, mining equipment, and machinery. A handful of people live in the town and are restoring buildings while maintaining the old dilapidated look.
The town sits at an altitude just above 5000 ft so during spring and fall expect chilly nights and pleasant days. Some years its rained and we spent the day in the saloon sitting around the wood stove with a roaring fire.
One of the Las Vegas Dutch Oven cooking groups does a Saturday Potluck. Cost of admission to the potluck meal is to bring a dish or food of some sort.
There are endless gravel roads going off into the mountains in all directions. One snakes over a hill to another Ghost Town called State Line…though 4 wheel drive may be required for that one.
Or head over to the Hard Luck Mine Castle. If you can get the owner to give you a tour (donations required) you will be amazed at what someone built in some very unforgiving terrain and on top of the old Hard Luck Mine shaft.
The Ghost Town of Rhyolite, Nevada is about a hour and a half drive one way from Gold Point (On paved roads). It is another photographers dream. Totally awesome at sunrise or sunset!
You are pretty much on your own as far as food. Though some meals can be arranged in advance. Sheriff Stone (one of the proprietors will do breakfast, lunch, and dinner if arranged for in advance)
Hackberry’s General Store is a trip destination in itself. If you have the time, travel an old section of Route 66 heading northeast out of Kingman, Arizona. This old Route 66 service station has featured photos appearing in numerous advertisements. It is known worldwide and is a favorite stop for many enjoying a trip on old Route 66.
This is a popular stop on any trip people are making to Havasu Falls for backpacking trips. Just allow yourself some extra time for this stop.
Stop in and browse the inside. The place has an old time staged soda fountain. The bathrooms are hilarious. There are dollar bills plastered on the ceiling and walls by travelers from all over the world.
Bring your camera because the building and all of the “old iron” scattered around, is a photographers dream.
Winter seems to put a damper on many traditionally summer-time enjoyed outdoors activities. Dutch Oven Cooking is one such activity. Though many of us do cook throughout the year. Perhaps on the Patio or in the shelter of an open garage? Others do not let anything get them down.
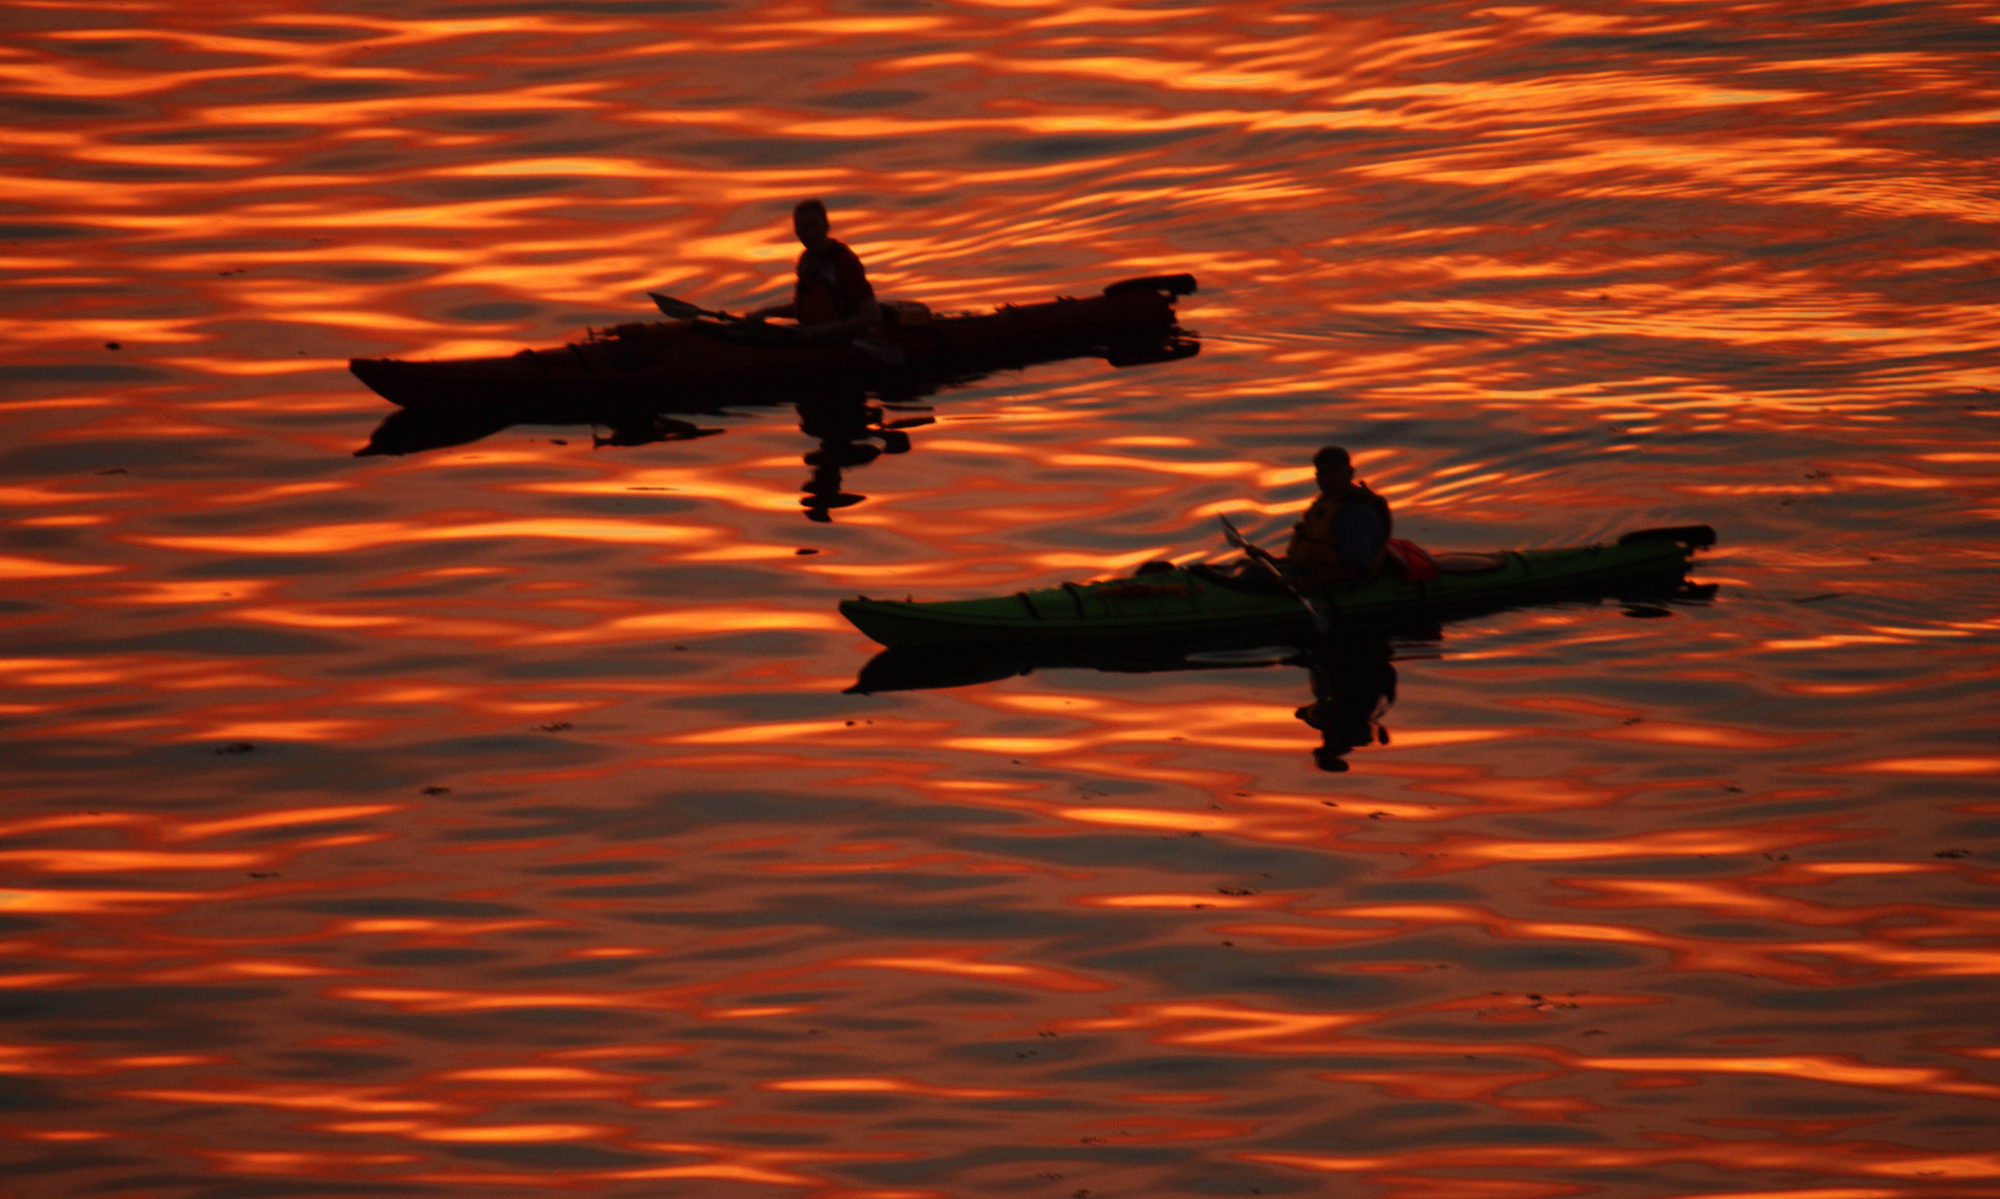
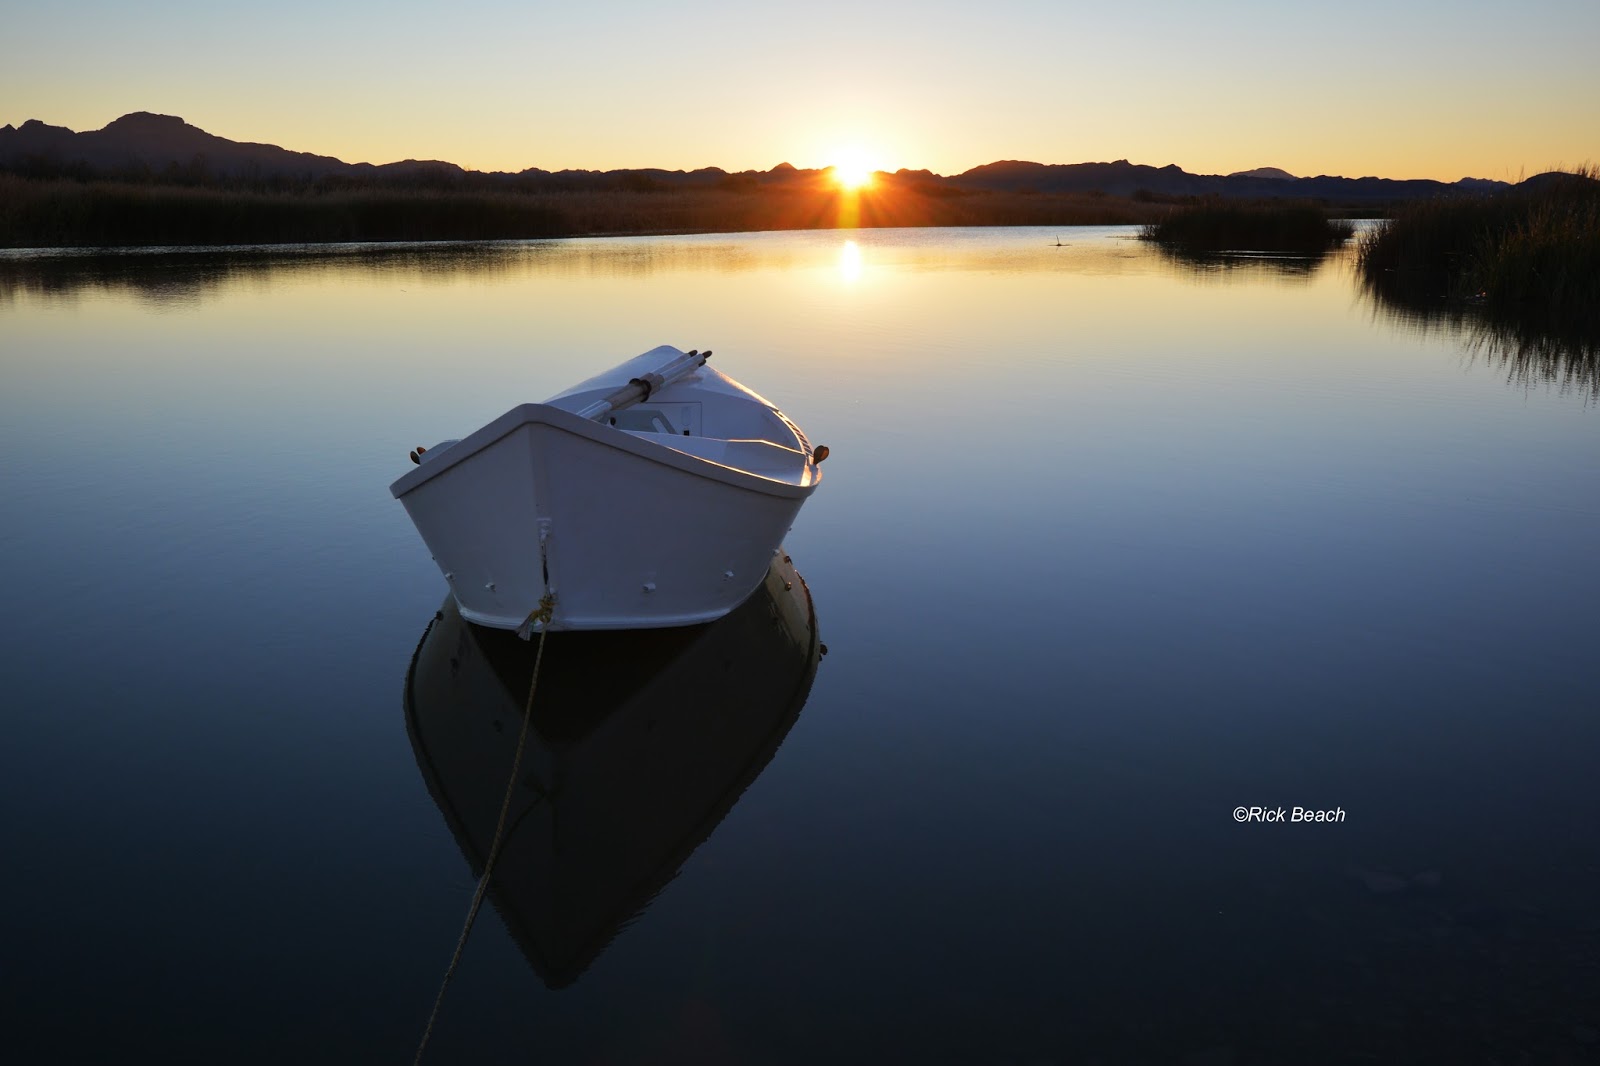
I get a personal annual invite to join in with about 30 other friends and acquaintances to make a 3 day Kayak/Canoe/Dory adventure that takes place the month of January. This is not one of my own organized events. This takes place on the lower Colorado River. Somewhere roughly in an area between Blythe California, and Yuma Arizona.
It is enjoyable to be a participant rather being than the person attending to the details. My many thanks to the person that puts this all together….and you know who you are! I would really like to put a plug in for the organizer of all this fun, but I am not sure all the details can go public?
You have to be a special breed to enjoy such an adventure. It can be cold. Almost guaranteed to have cold nights. Easily dropping in the twenty degree Fahrenheit range. Some years the days are delightfully warm. Other years its hard to squeeze 40°F out of the daytime highs. Winds can be unpredictable and brutal trying to paddle the miles to the take out point.
This is a lonely and for the most part, a very desolate stretch of country. Even 4-wheel drive type roads can be many miles away. So once you commit, you are pretty much on your own for 3 days. But the water, the waterfowl, birds of prey, and the reed lined banks of the river, pass by at such and enjoyable pace. It allows you to slow down and decompress from the stress we call the “normal” today.
It is definitely not all about the paddling, or enjoying the Colorado River. Or all the beauty nature offers along the way. Interestingly enough the river in this area is pretty much as it has always been. There are some additions a lifetime ago, perhaps several lifetimes ago, You can explore several old miners shacks up on the banks, and an old mining area/town that once was.
Cast Iron Dutch ovens are hauled along in any fashion that works. There is warm food, and warm friendship around the campfire. One evening is set aside for a “Trash Can” cooked turkey. That evenings feast comes with all the fixings. Foil-packed veggies and potatoes, are fire roasted in the coals. All the goodies a laid out Thanksgiving spread would have.
Often the campfire evening is enjoyed around the fire with someone picking a guitar, and all of us become the best singers you ever heard. Though I am not sure why that good singing gets the coyotes howling….hmmm.
The morning sunrises will knock your socks off. Though your thoughts might focus more on enjoying the warmth of your sleeping bag. The sunrises are something to have you jumping up for. Just put on the coffee and enjoy God’s gift as it unfolds in front of you. On a brisk morning the warming rays of the sun on your face is better than perhaps that cup of coffee. Having them both from the comfort of a folding camp chair, while the birds start singing….well it just doesn’t get much better than that!
Please check back for the follow-up article on the January 2016 trip. We will talk about some of the highlights and new memories created in 2016
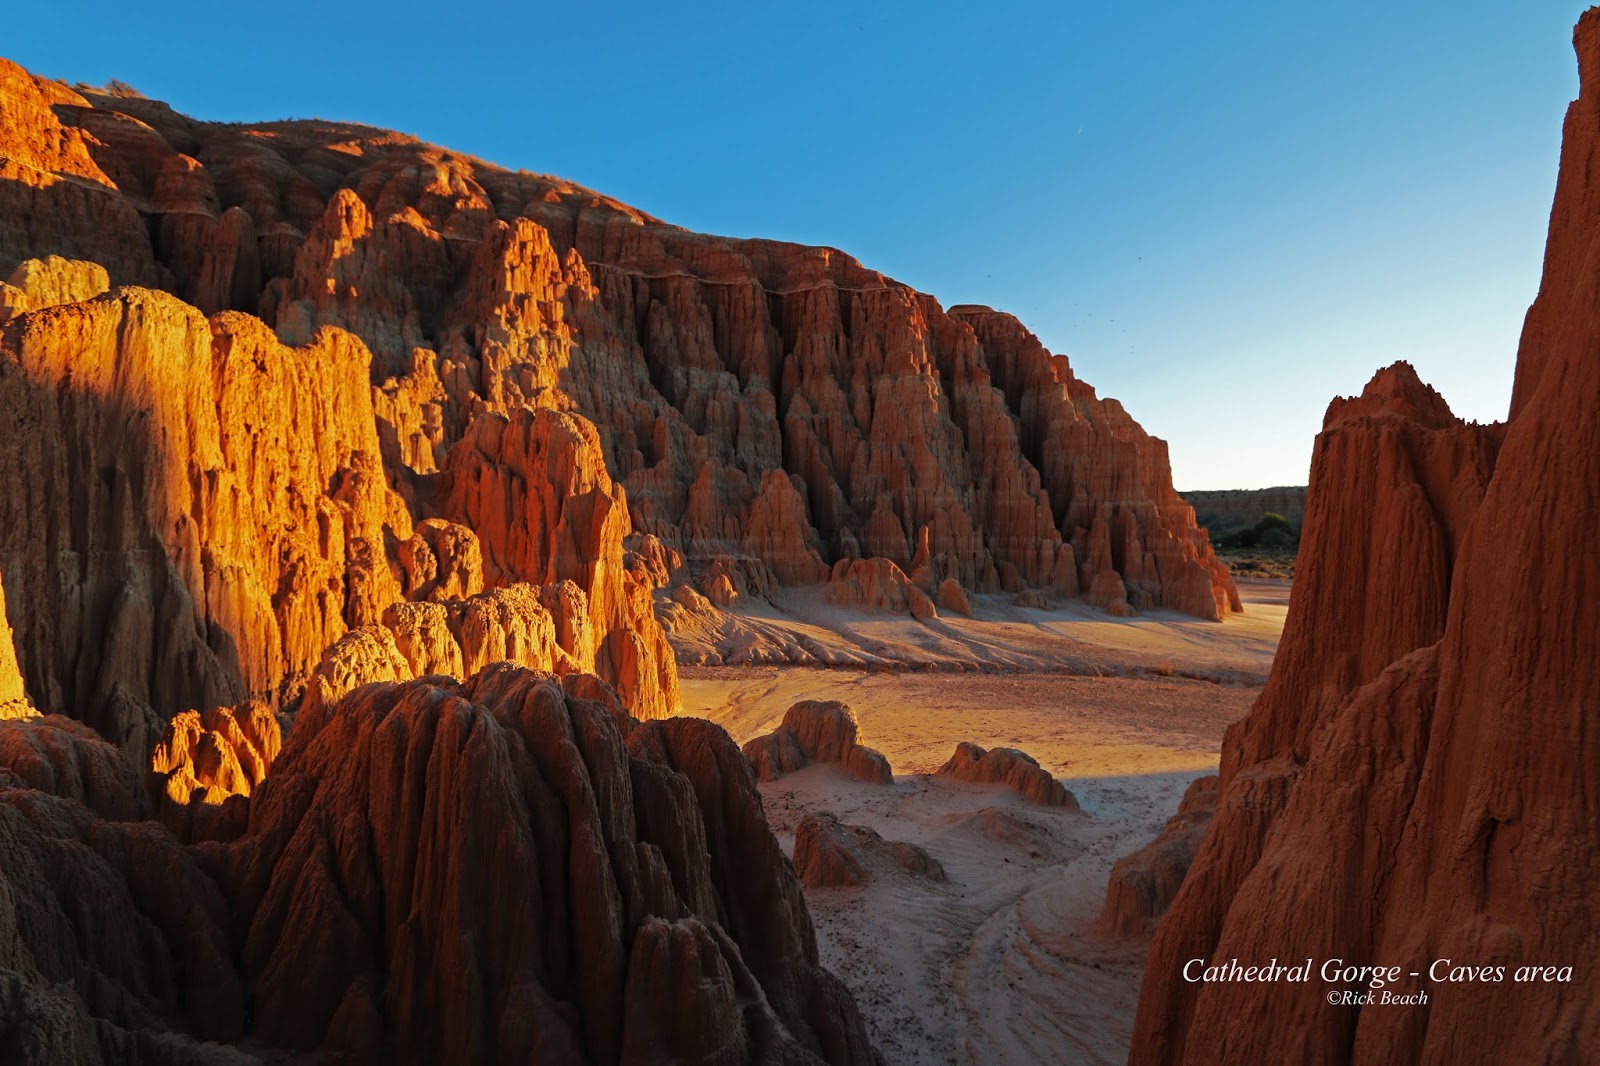
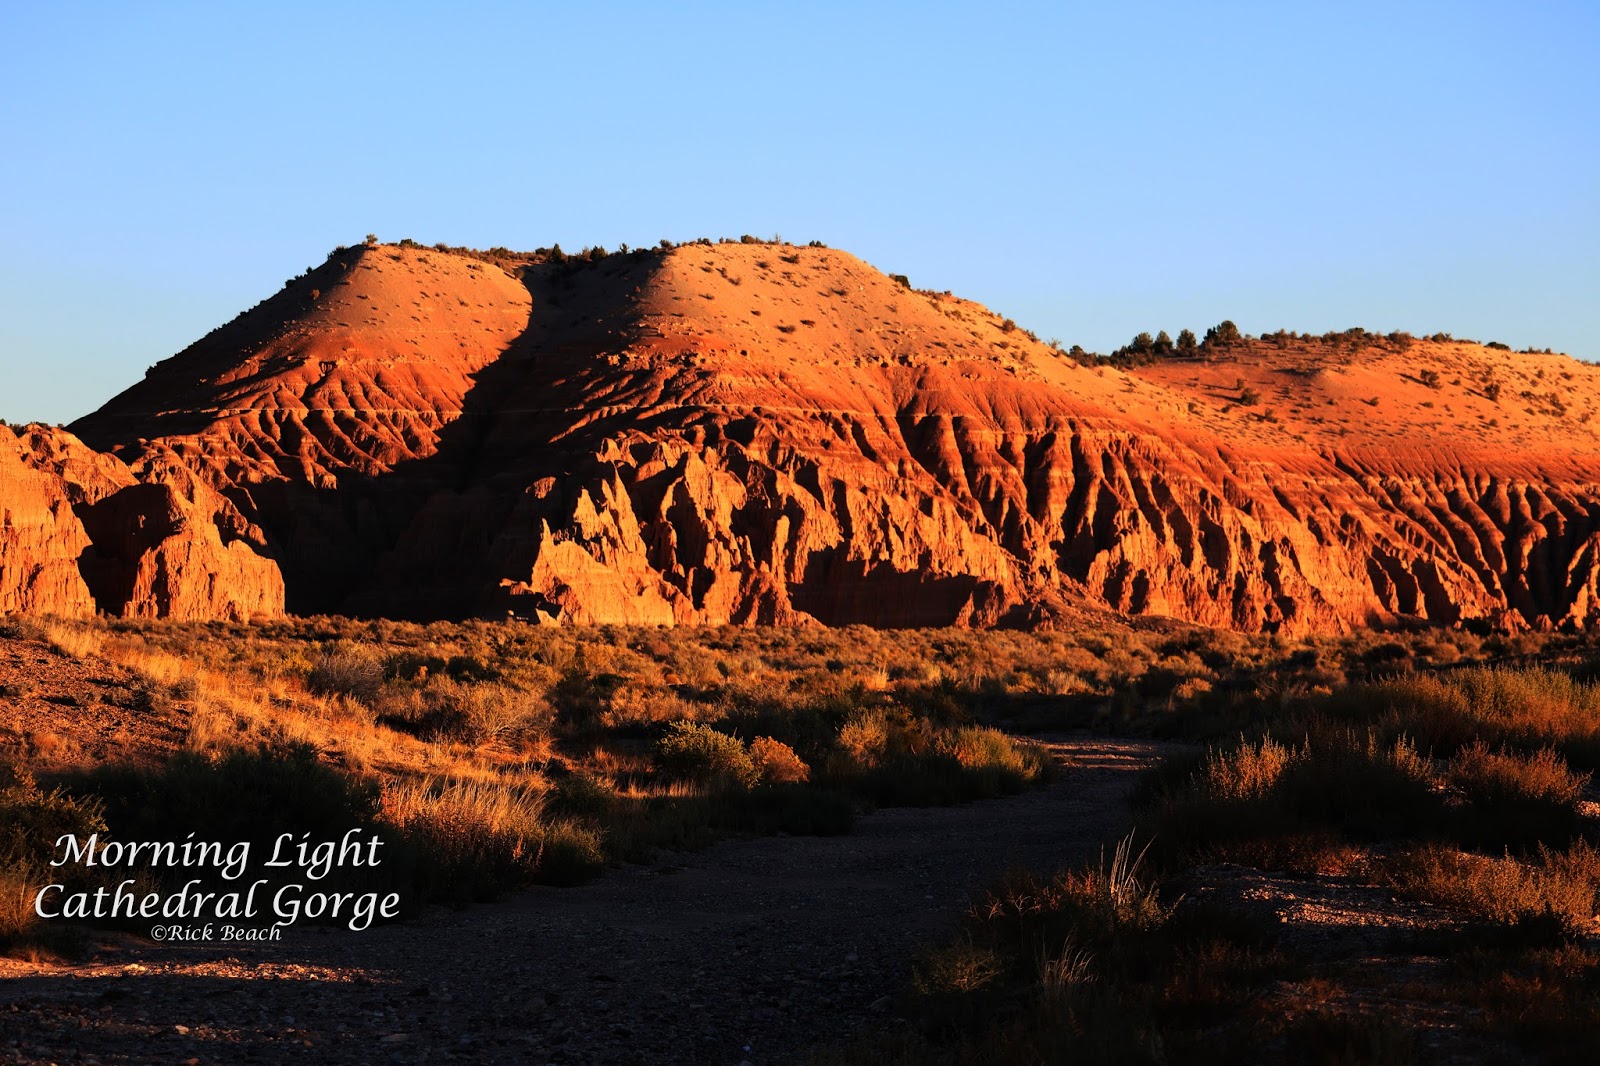
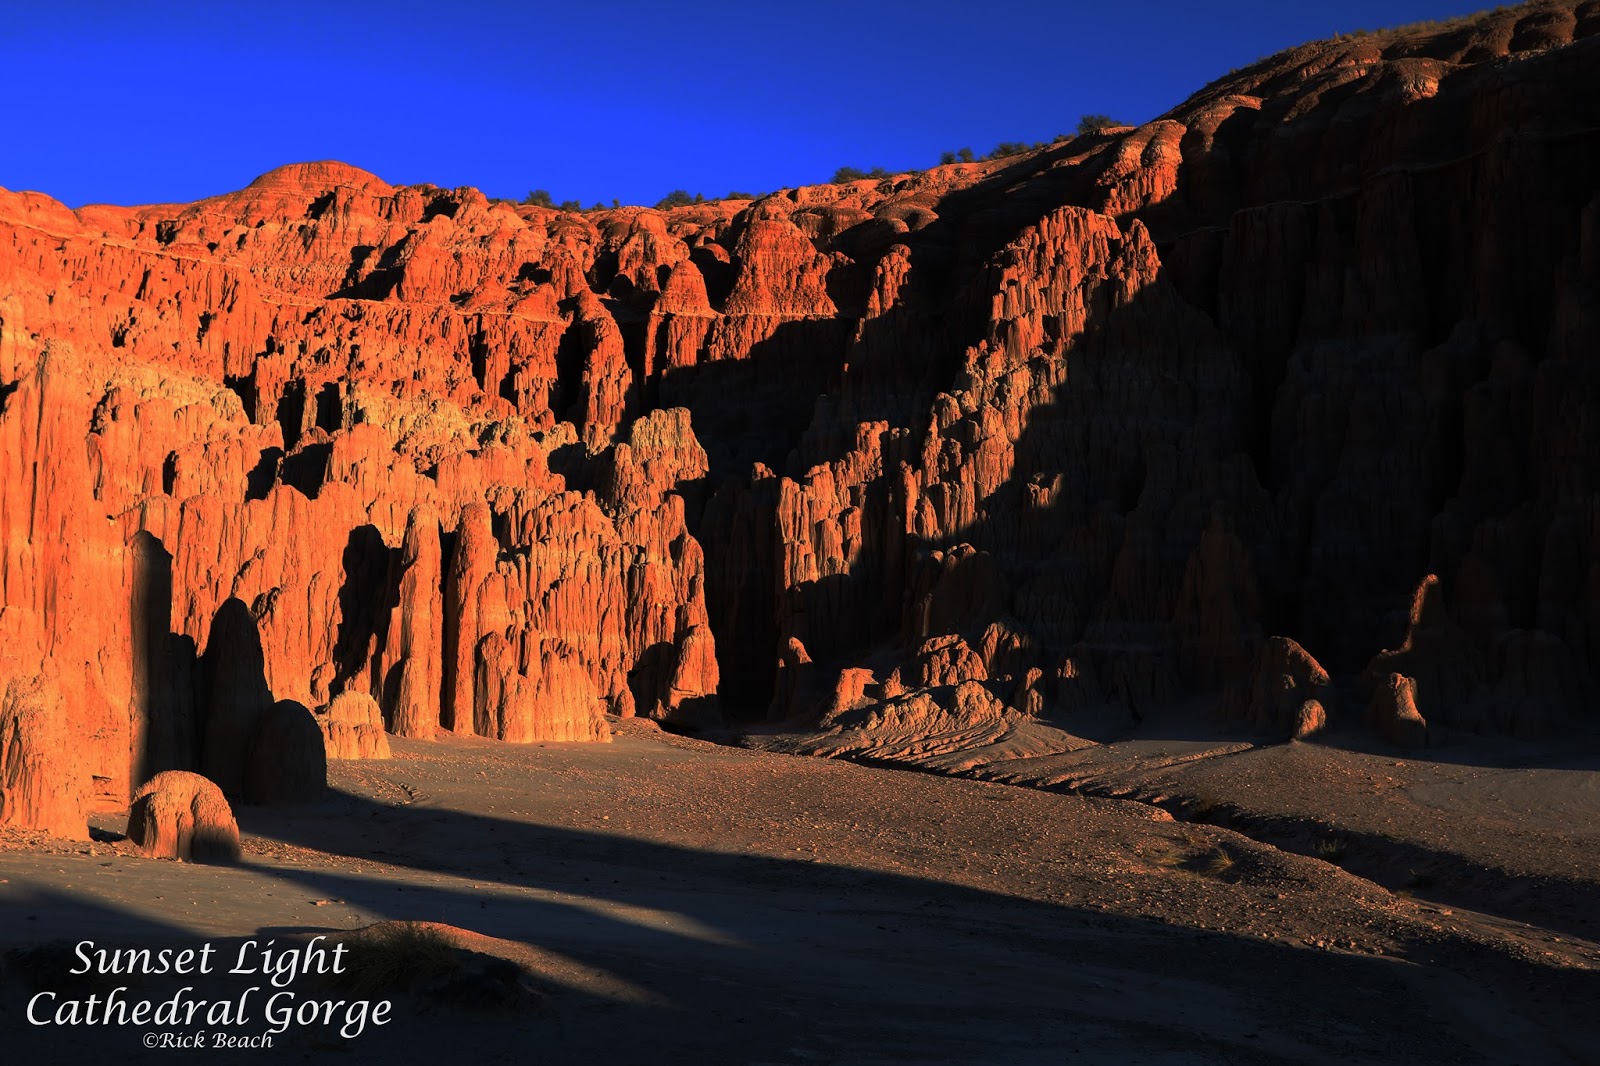
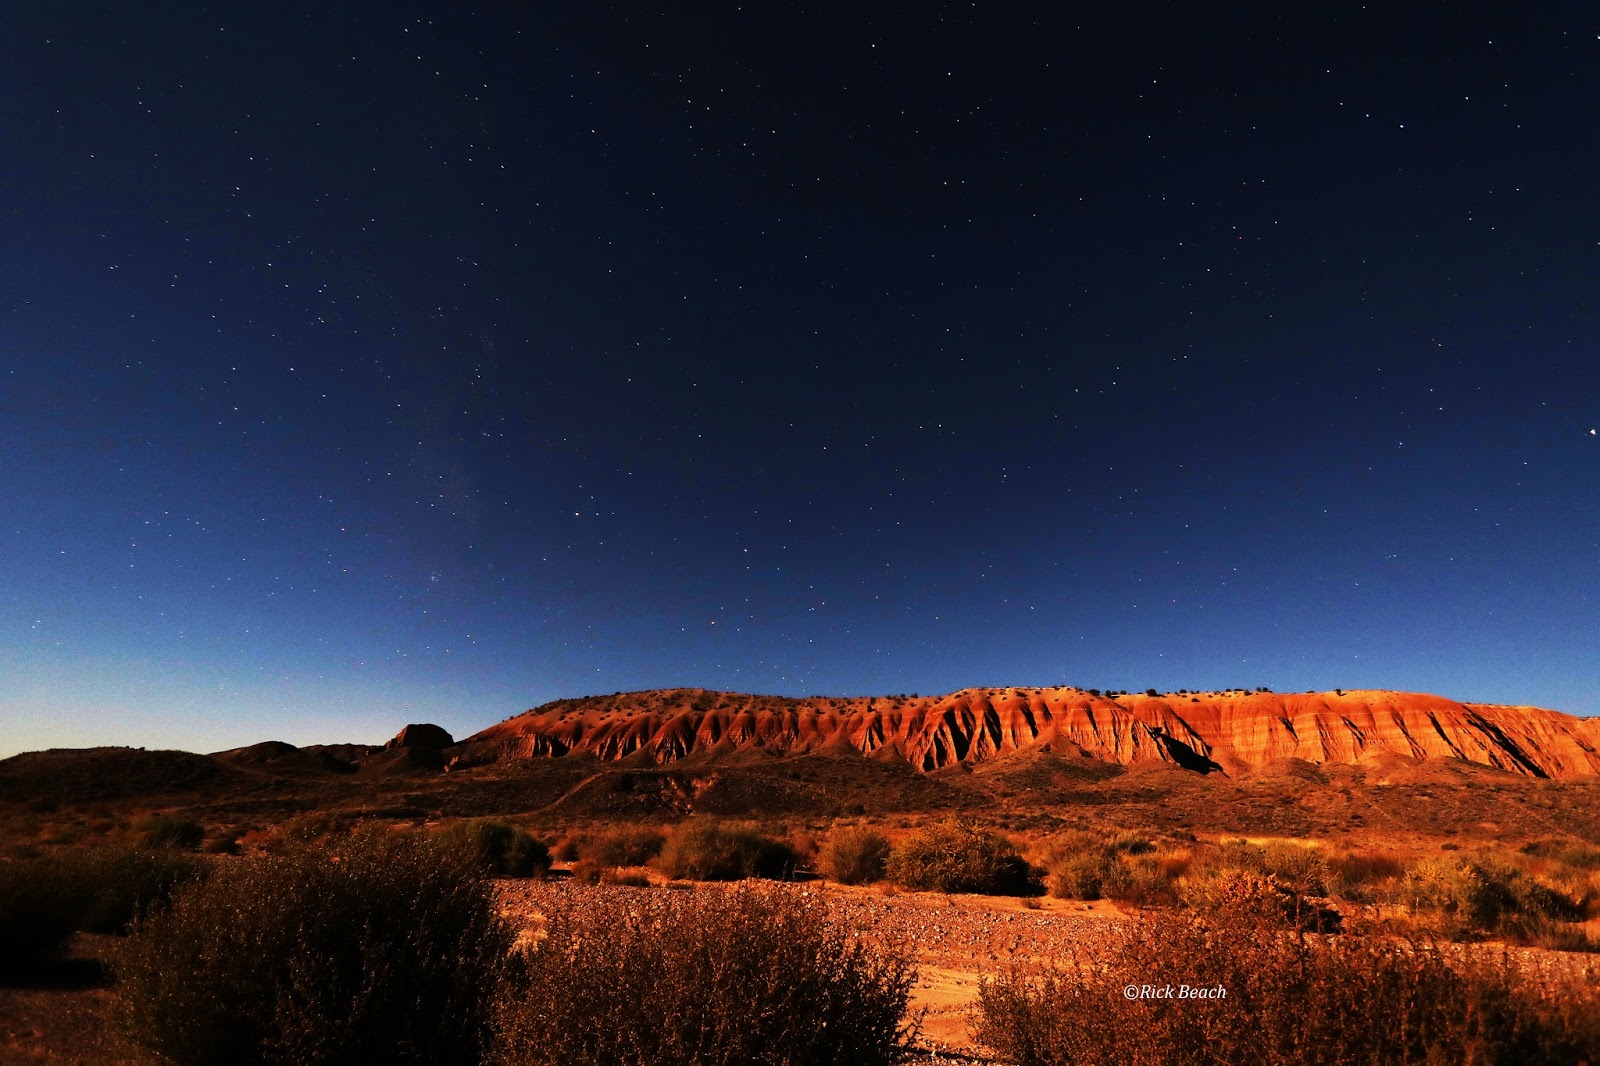
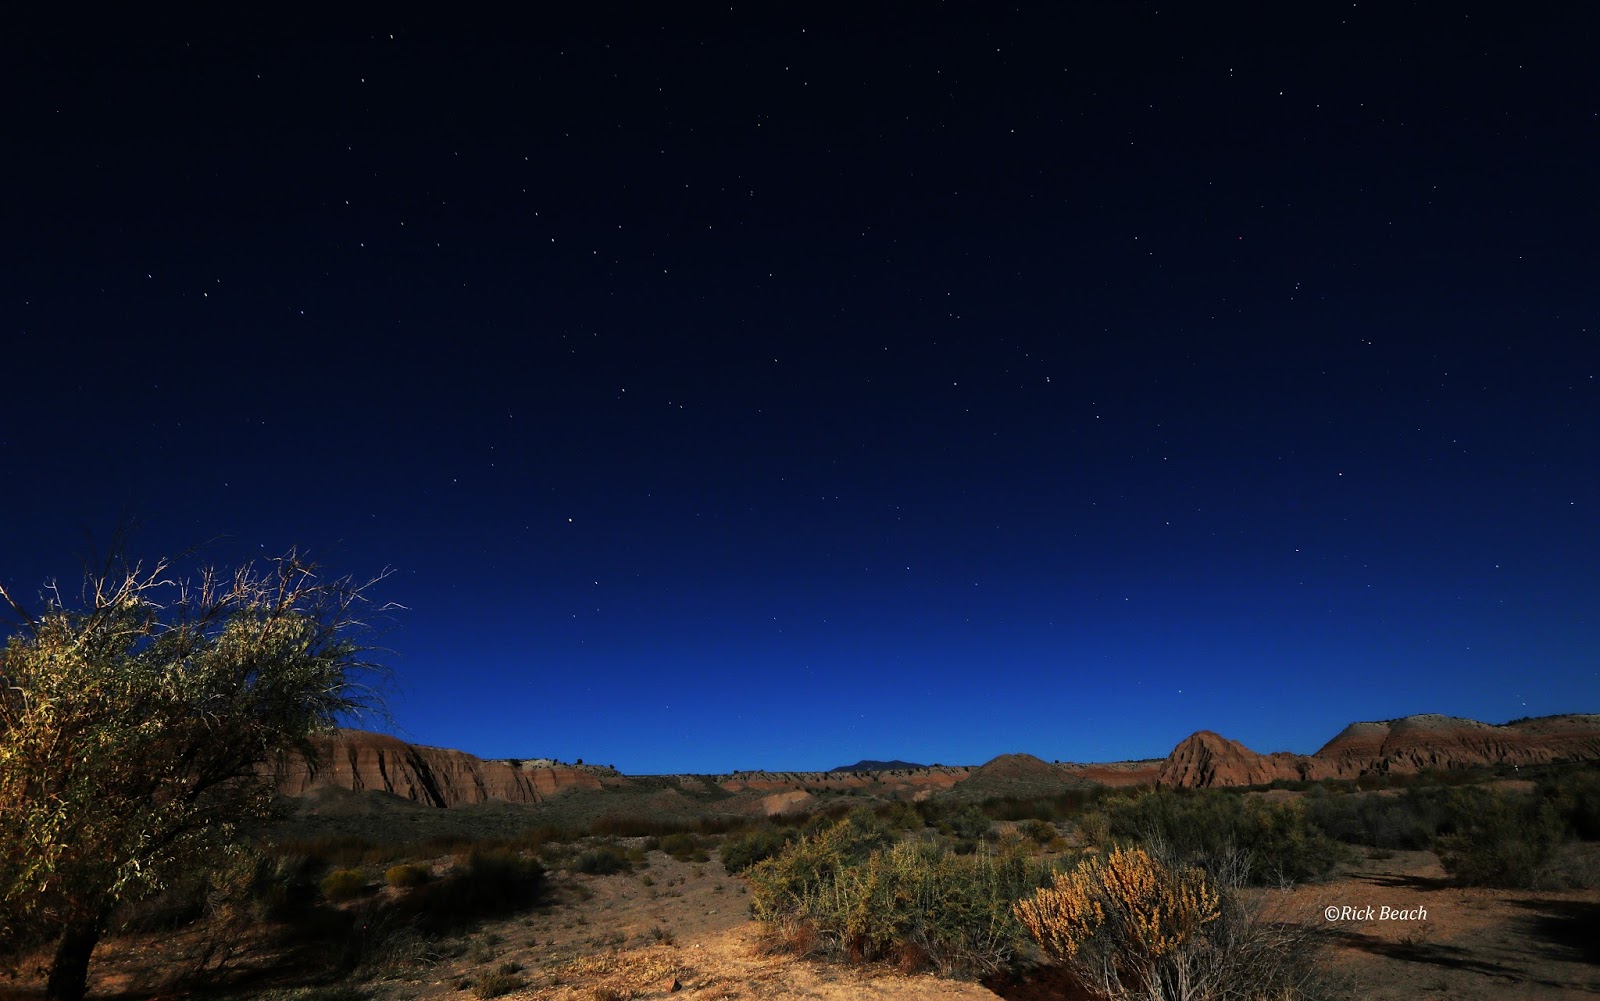
A group of Dutch Oven Cooking friends from Las Vegas spent a few days camping and cooking at Cathedral Gorge State Park, Nevada USA. This was mid September 2015 to attend their annual Dutch Oven Cooking Competition.
When I wasn’t relaxing around the campfire, prepping food, or cooking in competition I hiked the eroded slots called the Caves area. For all I knew I might have been stepping off a space craft on to another world. The video is a tranquil walk through the caves area. This was during sunset. The video comes to its conclusion when emerging from a slot and the landscape opens up. At this point I thought I might be standing on Mars.
Below are still photos of Sunrise and Sunset in the same area.
Cathedral Gorge – September 2016 – Photo taken at night. Lit up from the light of the Full Moon
Cathedral Gorge – September 2016 – Photo taken at night. Lit up from the light of the Full Moon
One of the most interesting old mine sites I have kicked around is the Techatticup Mine area, about 30 miles southeast of Las Vegas, Nevada. In current time it is host to endless settings of photo ops as well as a mine tour.
Prior to the late 1700’s this arid area near the Colorado River was home to several Native American tribes such as the Paiutes and Mojave. In the late 1700’s the Spanish came through in search of gold. The Spanish called the area Eldorado. They never found the gold and moved on.
Prospectors again returned to the area. Steamboat travel on the river had been established. Nelsons Landing became a stopping point. Nelsons Landing was a community on the Colorado River bank and would become one of the most active ports on the river. Up the huge dry wash several miles from Nelsons Landing, somewhere around the year 1861, gold was discovered. The Techatticup and Queen City mines sprung up. These along with some others, formed one of the richest mining districts prior to Nevada even becoming a State.
As you wander through old rusting vehicles and weather worn wood buildings you would never image this area as being one of the wildest western towns to ever spring up in the search for gold. Complete with double crossers, Civil War deserters, partner poisonings, gunfights, murder, and mayhem.
The area was also home to several notorious Native Americans that lived in this area. They also dealt in trouble and death. If interested, research Ahvote and Quehoe, or spelled Queho too.
There is a whole legend surrounding Queho. Along with Sheriff Frank Wait and posse attempting to find and capture him. The story would make a true western movie, but with a weird twisted ending. He eluded everyone. His mummified remains were to be found later by prospectors in 1940. In this strange tale, his remains where then put on public display until the 1950’s. He was finally laid to rest in 1975.
In today’s equivalent, billions of dollars’ worth of Gold, Silver, Copper, and lead were mined. There are miles of existing tunnels in the mountain at this site. Current owners, the Werly’s, purchased some of the area in 1994. They have restored many of the buildings and lead tours into the mine.
The area has been used as the setting for several Hollywood movies and TV shows.
If you are in or visiting the Las Vegas, Nevada area be sure to take at least a half a day and explore this area. If you have the time, follow the road down the hill to the gravel parking area at the base of the huge dry wash. Then hike a few hundred yards to the bank of the Colorado River.
At this location on the river, five large dry wash channels converge into a final small outlet where Nelson’s Landing once stood. In 1974 heavy downpours sent runoff water rushing down these channels. Some reports say the wall of water was 40 ft high. The entire landing and village were destroyed, washed into the river, killing 9 people.
Telephone Numbers and approximate fees and costs are listed at the bottom of the information.
Supai – Havasu Falls – and beyond
Supai Village and the Havasu Falls area is truly an oasis in the desert. Located in a remote canyon roughly in the area of the south Rim of the Grand Canyon. Arizona, USA
Supai Village is on Native American lands. The village is home to around 500 people. There are no roads to this area. All commerce, mail, and material is delivered by pack animals over an extremely harsh trail.
Walk the dirt streets of the village. Share the roads with pack animals, friendly dogs, many backpackers of all countries, and local people going about their normal day.
If you are like many that make your first trek, you will be beckoned to return over and over. Backpack the 9 miles or so to the Village, then continue another couple of miles to the campground. Stand in awe in front of numerous waterfalls. Soak in the beautiful turquoise waters that are formed into terraced pools by travertine deposited dams. Though be advised the water is pretty much a constant 70°F year around. The water source is somewhere upstream of the village where is comes flowing up from below the surface of the ground.
Camp in a narrow slot canyon with vertical walls towering thousands of feet above your head. You are camping just below Havasu Falls. The sun rarely casts direct sunlight into this area due to the nature of the canyon. The coolness is welcomed relief from the summertime desert temperatures that can exceed 115°F. You are under tall trees and within several yards of the steam that rushes through the campground on its way to plunge over Mooney Falls.
Expect Pit Toilets. The only source of water is the spring in the campground.
Follow the trail on a 200 ft cliff face at Mooney Falls. Scramble through a couple of hand chiseled tunnels that put you out on the last 75ft of vertical drop. Finish the final descent using chiseled foot and hand holds, hanging to life from chains pinned into the rock face…next to descend several breathtaking ladders that all seem not too safe. All the time catching your breath as well as the mist off the 200ft plunging waters of Mooney. Some people never complete this climb. Remember you have to go back up the same way. Oh…and I forgot to mention it is two way traffic at times.
You must have reservations (Camping Permits). Don’t hike down without them. Though I have heard some get in anyway and just end up paying more…their website says the fees are doubled without reservations. Me, I wouldn’t take the chance of getting turned away or having to pay double.
Make sure you have 1 to 2 gallons of water per person with you. There is no water available at the Trail head. The nearest source is 60+ miles back to Peach Springs. Don’t attempt the hike without water…you would die! If it is summer be prepared to hike early in the morning!
You can hike in. Ride a horse. Have your gear packed in and or out on horseback, or fly in via helicopter service. With helicopter service your gear goes with you. All of this you should have arranged ahead of time.
Someone in reasonable shape, good broke in shoes, plenty of water, and a pack weight of 25lbs or less should have no trouble hiking from Hilltop parking Trail head, to the campground in 4.5 hours.
Reservations and General info
There is limited lodging at the Lodge in the village of Supai. It fills fast and you definitely need to have prearranged reservations. The water falls are another 1 1/2 miles to New Navajo Falls, and 2 miles to Havasu Falls.
Camping is available by reservation. Camping is also limited. Be sure to be ready to make your reservations in February to lock in your permits. The campground is just a large area under the shade of trees with the stream flowing through a high slot canyon. During most of the day the canyon is in shade. During the summer months this is welcomed. During cooler months this means you better be dressed for cooler temps. The campground is not laid out in any organized manner. There is a safe drinking spring near the upstream entrance to the camping area. After that just find any open space next to your favorite rock, tree, or stream bank to call home for your stay. There are several high tech pit toilets in the camping area. My first priority picking my spot is being close to the drinking water source (Fern Spring), and in walking distance of one of the pit toilets. There is no electric, and no lights. No campfires are allowed.
My favorite times to go are March through May, then again Sept through Oct. I have gone in the July heat and found the hike miserable. Many go in early to mid June hoping to hit cooler nights, but hot days so they can enjoy swimming in all the pools.
Late July and August (desert monsoon season) can be hit and miss. For that matter anytime of the year a flash flood can sneak up on you. The camp area is in a narrow slot canyon just below Havasu Falls. There have been some treacherous flash flooding that has swept through and caused considerable damage and natural alteration the canyon and waterfalls. The area never remains the same.
Bringing your pets
The Havasupai website “Do and Don’t” States to please leave your pets at home. Even ignoring that, be aware there are numerous local dogs running loose. It is doubtful they have vaccinations of any sort. There are animal pack trains that pass on the trail quite often. There are also horses and mules that wonder through camp. Coyotes might make a meal of your Fido. Also you are under reservation law while in this area. Rules and reasoning may not be what you expect should your pet bite someone, or cause a pack animal to be injured and need to be put down, or taken out of service for a time. I would assume you would be responsible to cover medical costs and animal replacement. I guess you may be able to write us a section on what the jail is like down there, should something go wrong? We do see people ignoring the local’s requests. It is sad people don’t respect others wishes concerning their land. A pet would also hinder you from enjoying the descent below Mooney Falls through the tunnels and down the chains and ladders. That would also cut you off from hiking down the canyon further to Beaver Falls. This is snake & scorpion country. Be sure to watch where you walk. Also watch where you place your hands while climbing on rocks. There are rattlesnakes in the area. More people report seeing king snakes though.
Medical Emergency It can happen
Carry at least $100 cash in case you need to fly out via the helicopter. Keep this $100 in reserve at all times. If you are planning on buying meals, Gatorade, etc., take more with you. There is a clinic in the village, but I know nothing about it to pass along. Also carry enough cash for your fees, pack animal fees, snacks & food. You may need to buy gallons of water too. Numerous people end up with some type of foot, ankle, or leg injury and find it too painful to hike out. Blisters, popped off toenails, sprained ankles, or a tweaked knee are more common than you think. These injuries are more common for those not used to hiking with a pack, or those that fail to buy good footwear or socks, or choose not to break them in prior to the trip.
Pre-Conditioning
It is highly recommended you do many pre-conditioning hikes prior to your actual trip. I don’t care if you walk daily, jog, or bike. While these exercises will certainly help, nothing like that will properly prepare you. Most people exercise on relatively flat terrain. Wear the actual boots and clothing you will be using on your Havasu trip. Load a backpack up with about 30 to 35lbs of books or bags of rice or flour….or all of your gear if you are that prepared….be sure to include a gallon of water. Start doing stairs or steep inclines. If you have a natural hiking environment that offers steep trails and steps, the more the better. At least you will enjoy your “training” more. Start out small. 30 minutes or so with pack weight strapped on your back. You can even progress up to that weight if it helps. Work up to 4 hour sessions before you go. The terrain during the actual trip will most likely be more difficult, but those that prep will think it is a cake walk. Those that don’t will be nursing sore and stiff legs for a couple of days. Take your 800mg of Ibuprofen with you. Hiking out of the canyon is not bad either until those final 2 miles of switchbacks. I don’t think anything can really prepare you for that final ascent. Take your time and make sure you have plenty of water.
Equipment
Go ultralight. Read up on it. Change out heavier gear. Reduce, reduce, reduce until your total carry weight is less than 25 lbs. Most of us use titanium pots that serve as a coffee cup too. Saw off tooth brush handles, make tooth paste dots….count them out and don’t carry anything extra. This includes all your carry items in pockets, on your belts, cameras, etc. REI rents some high end backpacks, and other gear such as sleeping pads, etc,…. at some of their locations. If you don’t go often, or are just trying this out this might be an option for you? Carry a minimum of 1 Gallon of water…more if you go when it is hot. One gallon is going to increase your carry weight another 7.5 lbs. Use dehydrated meals and don’t carry extras. Ultralight stoves, or use all no cook foods. You can make the 9.5 miles to the village and buy there if you want to deal with pack weight for only the last 2.5 miles. But there are no backpack type foods available there. Just canned and boxed…heavy stuff.
Let me mention water shoes. Most people end up swimming or at least wadding steams to get to the other side to continue on hiking trails. Either scenario requires being prepared so you don’t end up with wet hiking boots. The water in this area has very high levels of dissolved calcium carbonate. This suspended mineral collects and solidifies rapidly forming travertine benches or dams. These benches create numerous terraced pools. Natural flash flooding occurs frequently and breaks these dams apart. These chunks are broken into sharp pieces. These pieces equate to crushed up pieces of tile that literally makes up the stream bed for miles. If you attempt to walk bare foot, or with thin bottom foot wear while swimming, or traversing the stream, you will most likely end up with lacerated feet. This is a painful thought knowing you have to hike back out of here. The water is a pretty constant 70°F year round. It can have a numbing effect on your feet so you might not realize damage is being done.
We usually have a group pack weighing get together the week before the trip. We start eliminating similar items the group can use. For example; as a group we always take a water filter. 5 or 6 of us do not need to each bring one. Someone is assigned to bring that item for group use. Does everyone need to bring a stove? No. Share them. Someone carries a stove, another carries the fuel. Smaller people may need to even trim their pack weight further….yes it is difficult. But in most cases you might be down there 3 nights? Don’t take anything but the bare minimum. Wear one pair of underwear, and pack only one extra. Wash the first pair the first night so it is dry for the next day. The same method is used for T shirts, and socks. I do carry extra socks to avoid ever hiking with wet or sweaty socks……fastest way to get blisters.
Crotch or inner leg rub is another common discomfort. Badly fitted pants or underwear are often the culprit. Or if you have upper legs that naturally touch while walking. First I would make every attempt to eliminate clothing that causes this. Sweating causes this to intensify. Salt coming out of your body builds up more in certain materials. This constant repeated abrasion will effectively sand through your skin. This can be a real trip killer. By the time you reach the campground you could be rubbed to the point of bleeding. You will not heal fast enough for the trip out. I have experienced this with an ill fitted pair of pants. There are several home remedies that may or may not help? One of which is using corn starch. Then there are commercial products to help prevent chaffing. One is a silicone product called SportShield. These too may or may not help. This goes back to conditioning yourself prior to this trip. Carry your pack weight and hike around with the boots and clothing you will be using on your trip. Don’t buy something new right before the trip to be looking good….but not wear tested.
Use high grade hiking boots that are fitted properly, and that are well broke in. Use good socks. There are socks specifically made for hiking. They wick moisture. Never hike in damp or wet socks. To avoid toenails popping off trim them 1 week to 10 days prior to your hike. Don’t let this go until the last minute. Cutting toe nails way too short right before the hike can result in a painful trip too…so perform this task carefully a week in advance. I am sure you will pass some ill prepared people that are doing this hike in everything from tennis shoes to flip-flops. I have seen them limping to get on the helicopter too.
Its best to not wear tank top styled tops if you are carrying a backpack with any weight to it. You will end up rubbed raw at the shoulders.
Sunscreen is a must. During warm months take some type of mosquito/bug repellant.
Indian Road #18- The drive in to the Trail Head
You eventually have to take #18, north off old RT66. There are no services for 65 miles (one way).
So that is a round trip of about 140 miles for gas. Gas up before you get close. Also make sure you have all the water you will need, including some to stash in your vehicle for the day you hike out. I suggest you gas /water up at Peach Springs or Seligman depending on which direction you are coming from. #18 is a lonely 2 lane blacktop road. It does have some severe rough spots in places. You will rarely see a building, the entire distance out to the dead end at Hilltop Parking Trail Head. There are no street lights. This is open range with animals walking on the roadway. Please take my advice…Do not to make this portion of the drive while it is dark. It isn’t worth ruining your trip. Come up on black cattle in the dark at 50 or 60 MPH, and you could be toast!
The Trail Head – Hilltop Parking lot
Many get to the trail head the night before or early morning. The trail head is a flat paved parking lot teetering on the edge of the canyon. There is a sheer vertical drop of several thousand feet off the west facing side.
The other side of the parking lot is a steep cut into the east canyon wall; complete with loose falling rocks…I wouldn’t park my vehicle along that rock face…many do. This area is often times filled and very busy. Many park off the edge of the road leading up the hill away from the parking area.
There is another gravel area about 1 mile back on the road. This secondary parking area is where some larger garbage dumpsters are located. Don’t block them in if you park there. I had to park back there one time. It added nearly a mile to my hike….each way.
The end of this road is right on the edge of the canyon at times. In some places there it not enough room to pull off the road to park on the canyon side edge. The road, eventually dead ends at the trail head parking lot. You can circle the parking lots and head back up the hill.
This parking lot is not really ideal for attempting to camp out the night before. Its usually filled up and you would have to sleep in your vehicle. Some do sleep in their cars so I am not saying it can’t be done. It is also a tough area to come into if you are pulling a trailer. You may not be able to make the tight turns to circle around to head back out. It is often hard to squeeze a car into some of the places people are parking just off the pavement. I brought my trailer once but knew to park in the gravel area a mile from the Trail Head parking lot. I worried about a break in but my fears never came to be.
There is a pit toilet at the trail head parking lot, but that is it. There is not a water source for drinking or filling water. During the busy season there are enterprising native people selling bottled water, soda, and snacks. But I have hit it when they are not around, so don’t depend on that. I always stash extra bottled water in my vehicle for my return.
On some earlier trips I started the hike down to the village at dusk and camped in the rocks below the switchbacks (At least several hundred feet off the trail). We usually select a ridge up several hundred feet above the trail so we have a view). But you have to pack all waste out and no fires allowed. Leave no trace……and I am not sure if it is truly acceptable to do this? We asked some of the local guys that handle the horses. The ones we talked too seemed OK with it. Its kind of a hassle to set and break camp just to bivouac the night. But it does have its joys of complete solitude and a incredible view of the stars and moon (we try to do the trip during the full moon). But after doing this several times, my recommendation for most people is to stay close (motels or campground about 65 miles away), grab your water before making the drive, then drive to the trail head early morning at first light.
I am sure camping along the trail like this will become a no-no after some slobs leave their trash behind. So be respectful. When you leave make sure you can’t tell you were there.
Make the hike down fast in the cool of the early morning. You can be in the village in 4 hours. It may not be worth it too many, to set up tents and break camp in the early morning somewhere along the trail. If you do bivouac along the trail ….This is snake area…I make sure I have a tent that zips up. I wouldn’t trail camp in just a sleeping bag to save time trying to bivouac overnight.
The Switchbacks
The trail from the Trail Head (Hilltop Parking area) takes switchbacks down the east canyon wall. This is steep downhill hiking in loose gravel and dirt.
There are numerous railroad tie steps along the way. Sometimes going downhill is just as hard on your feet, ankles, and knees, as climbing back up when you leave.
You will share the trail with horses and mules carrying loads. You have to watch at all times. Don’t get hit in the head by a cooler strapped to a pack animal that comes trotting by…and yes it happens. Not a place to have ear buds in drowning out your surroundings.
The switch backs are about 2 miles down until you reach a wide dry wash. The rest of the trip to the village is relatively gradual; though walking in loose gravel and rocks makes it more difficult than walking on hard pack. It is suggested you wear well broke in high quality hiking boots.
Change your socks if they get sweaty to avoid blisters. Trim toenails prior to starting, preferably a week ahead. Blisters and popped off toenails are the most frequent injuries. Painful feet make for a miserable experience. The Village center (Supai) is 9.5 GPS walking miles from the Trail head parking lot.
Getting Close
About 2 miles before the Village you will come to a narrow spot in the canyon. Most times of the year a trickle of water will be at this location. The trail will cross from the left to the right of the stream bed and the path will drop quickly downhill for several hundred feet. You will be walking in some larger than usual stones. Round river type stones. The canyon will widen out and actually Y off. Going downhill you will want to veer to your left. At times there is a sign in this area pointing you toward the village. Once you are at the Y of the canyons, you have about 1.5 miles to go to reach the edge of the village.
After you veer to the left at the Y and walk a short distance you will walk into a treed area. A clear sign there is permanent water in the area. Clear rushing water will soon be on your right. This is the stream that flows through the village, and over the waterfalls you will visit.
Shortly after the trails starts following the stream you come to a foot bridge that will allow you to cross the stream. This is a pleasant part of the hike. For those that have made the trip before, we always get excited at this point knowing the village is just up over a few more rises in the trail. The trees are a welcome relief providing cool shade. For now we walk and enjoy the oasis of vegetation, in stark contrast from the red rocks and sparse vegetation of the past 7 miles or so.
The Village (Supai)
You will eventually come down a small rise in the trail and hit the southern edge of the village. You will continue on a dirt path that meanders through houses, to village center.
Main trail coming into the southern edge of the village of Supai
There are numerous fenced off plots on both sides. A small rodeo arena will come up on your left. Shortly after the small arena, you will come to a T in the path… you need to bear to your right. The path will go a short distance then a 90° curve to the left. After you make it through the 90° curve you will be heading generally north at this point (down canyon direction) through a few more homes on either side.
Soon a larger building will come up on your left (west side of path). Look for the Camper Check in office. You should have made reservations, so you need to stop in here and pick up your camping passes (Some years it has been a wrist band, other years a tag that goes on your pack or tent). If that is all that is needed you can be on your way after checking in. I have gotten so I like to backpack in with all my gear. But I have it packed out on horseback from the campground the day I leave. On the hike out I only carry my camera and water. Before leaving the Camper Check in office you can arrange and pay for pack animals if you choose to have your gear packed out. It is best to do this when checking in to avoid having to backtrack later. Remember the Camper Check In Office is about 2.5 miles from the Campground.
You can’t arrange pack animals and pay at the campground. So take care of that before you leave the village. The Camper Check in office (In the Village not at the Campground) must issue you a tag you must affix to your pack the day you leave. If you are using a pack animal on the day you leave, drop your tagged pack at the entrance to the campground and it will be picked up and delivered to the trail head for you. I have had my gear arrive up to the Hilltop parking area, anywhere from 10AM to 1PM. I always tip the wrangler $10 or $20 if the bag is in good condition and everything is there. (I have never had anything come up missing, but damage can occur if you leave loose straps dangling) Carry some zip ties to secure loose ends.
While checking in at the Camper Check in building purchase a few post cards and stamps (or take stamps with you). You will want to mail these for the unique postmark.
Supai Village Center looking south toward trail head trail
Just beyond the Camper Check in building (still on the west side) there is an open field and helicopter landing pad. Beyond the helicopter pad is the Cafe. Across the street (the east side) from the cafe is the Store and Post Office.
Mail post cards in the post office. Be sure to mail one to yourself. The post mark is very unique and will be a memento of your trip, you will cherish.
Supai postmark
Post Office
The Post Office is attached to the store on the east side of the village center. On all trips I mail post cards to my friends and family and also one back to myself.
Sometimes the office is closed so be sure to bring your own stamps if you don’t want to hang around waiting. There is a drop box on the outside if you have your own stamps.
Cafe
Check the opening/closing hours when you get down there. The cafe hours vary with the season. The Cafe is a good place for breakfast, lunch, and even dinner. But don’t expect much. Prices are high too. We have gotten so we sometimes hike back up from the campground early mornings just to enjoy breakfast. It’s a 45 minute hike with no pack. It gets the stiffness out of the legs from the previous hike in. You get to enjoy the early morning light and two waterfalls on the way. Then a leisurely $12 breakfast :-). By then the store opens and it’s a frozen Gatorade run. Then hike back past the two waterfalls, and the rest of the day ahead of you.
Store
We always joke there must be the locals price and the tourist price. But knowing the merchandise is shipped down via animal pack train it is understandable the prices are higher than you are used to paying. There is a pretty good variety to choose from. Mostly in smaller packages similar to a convenience store. Frozen Gatorade is my favorite treat. The have canned good, boxed food, and limited fruit and produce. You actually could outfit yourself from this point if you didn’t want to backpack the weight down from your vehicle. I normally buy a couple gallons of distilled water and replenish my drinking supply at this point.
The School
The school is on the north end of the village center. The trail to the campground will wind around the school to the west between the school and the cafe, then turn to the right (north) at the corner of the school property. You will wander past the school and see a church coming up in front of you.
Make a choice at Church
At the Church just north of the school, should you bear slightly to the right you would come to the Lodge. Again, you need reservations for lodging. Don’t expect to walk up and find a room available.
At the Church just north of the school, should you bear to the left and follow the trail you will be heading for the waterfalls and campground area. Heading off in this direction you will pass across a small dry wash, an irrigation ditch on the right, and an outcrop of rock right up to the right side of the trail. A couple houses and fenced in lots on your left then brush. The stream will come rushing up alongside the trail to your left (west) for a ways then veer off. You will hike up a couple rises and eventually start down a long grade into some trees and a steep hill rising up on your right. As you finish off this long downhill grade you should be hearing your first waterfalls off to your left.
New Navajo Falls
This first waterfalls area off to your left (west side of trail) is New Navajo Falls. “New” because a few years ago a flash flood completely altered this immediate area, including the structure of the falls.
The Bridge and the Burial Grounds
As you continue downstream you will be much higher than the stream. It will be in a canyon cut way deeper than the trail. This canyon will be off on your left (when facing downstream) You will make a sharp turn to the left and immediately start down a steep grade. At the bottom of the grade you will be more at level with the stream. Ahead you will cross a foot bridge over the stream…the water is rushing now to plunge over Havasu Falls which is not too much further ahead. After you cross the bridge there is a steep bank on your left. On a small plateau looking over the stream, the trail, and the bridge you just crossed. The small plateau is a burial ground. This is sacred ground. Do not enter or even take photos out of respect for the wishes of the tribe.
Havasu Falls
Shortly after crossing the footbridge and pass the burial grounds, you will start down another steep grade. You will now start hearing the roar of plunging water falling over Havasu Falls. The trail will break out near the top of the falls. From your trail vantage point you will be looking down at the pools below, the thunder falls in front of you….and also a trail that drops at about a 45° angle as it hugs a rock wall the entire way down.
The Fry Bread Lady
Just beyond Havasu Falls, as you follow the steep trail downhill to the campground area, there is often times someone making fresh fry bread.
This is in the location where the trail abruptly levels out to some shade of trees and large house size rocks. This is the general area of the campground entrance and area the pack horses unload. You will see a fenced area to prevent the pack animals from entering the campground. There is a people passageway to get through the fence. Some of the native people will often times have a Coleman stove going and frying the bread in a hot cast iron skillet sizzling with hot oil. They also sell a variety of frozen and unfrozen Gatorade. It’s like the local Starbucks some mornings. Expect a line. It is a great treat if they are set up and cooking.
Campground Area
You will be in the fenced off area where the pack animals drop or pick up camping gear. If you look closely you will see the large rocks in this area are actually old sections of the waterfalls and travertine pools that once existed before the stream was diverted by some natural event. A few cactus and prickly pear seem to dominate the vegetation in this area. A passageway through the fence is off to your left. The treed area, the campground guard house/building/shack just beyond that. Sometimes there is someone there to check your pass. Other times not.
If your packs were packed down on a pack animal it will arrive in this fenced in area. Incidentally, if you made arrangements for your pack to be picked up on departure day, you drop them off to the right of the passageway through the fence. Lay them along the fence with your payment/name tag securely attached. (Word of warning put your pack on high ground just on the other side of the barbed wire. The horses are tied to the fence posts and have a tendency to drain their radiator on the packs that are in their way.) ….ask me how I know!! At this point you are about 2.5 GPS walking miles from the center of the village of Supai.
Just inside the fence you will see the big trees and the first pit toilet building. This is the start of the camping area. The pit toilets are two story units. Raised up high, you must ascend the steps. I think each has about 3 to 4 individual doors. No water even for washing hands. The camp ground is not organized spots….just find a place. I like high ground for obvious reasons in case of an unexpected flash flood. This camping area extends from here, all the way down stream to the top of Mooney Falls which I am guessing is 1/2- 3/4 from the fenced entrance area. At several places in the camping area there are logs or narrow foot bridges to the other side of the stream. You can camp and explore this area on both sides of the stream
Fern Spring
The only source of safe drinking water downstream of the village is Fern Spring. Fern Spring is in the Camping Area. It is found along the (west) left wall (facing downstream). It is a short distance inside the camping area. Look for a small wooden sign…or people carrying bottles to refill.
Please don’t be stupid and start washing your hands, body, or cooking utensils in or around the spring. On all trips it has been safe to drink. Supposedly the spring is tested by the parks service. But I always carry a filter and sterilizing cartridge just in case it should be contaminated or I have to use stream water. The canyon has flash floods nearly every year so it is possible that spring might not be available. The other reason our group makes sure it has at least one functioning water filter with us.
Mooney Falls
The camp ground is a narrow oasis in a high steep walled slot canyon. I venture to guess it extends close to 3/4 mile from Havasu Falls to Mooney Falls. So Mooney is just downstream of the end of the camping area. Trees get a little sparser down at that end too. Mooney Falls is about 200 ft. high. There is no alternate route to descend to the base of Mooney without taking one scary footpath on the face of some rocks, going through 2 hand chiseled short low tunnels, then descending the final 75ft vertical cliff face using chiseled footholds, chains, and a couple of vertical ladders chained to the rock. The final 75ft is also bathed in the mist and spray from the falls. To top that all off there is traffic going up and down at the same time. Anything you carry to descend Mooney you will want in a pack to protect it and to have both hands free. Don’t even think about trying it carrying a pet. And by rights you have no business bringing a pet into this area at all. The locals have it posted on their website to leave your pets at home. I mention this because there are always those that have no respect for other people and choose to center on themselves. Someone attempting to descend Mooney with a pet to contend with would have a good chance of getting killed. Worse, killing someone else that was following the rules and being respectful. (This section was written by a dog owner/lover)
Beaver Falls
Beaver Falls, for the normal person, is another day hike from the Camping Area. Take a day pack, swim suit, towel, lunch and water.
Wear water shoes. Much of your trip will be walking in knee deep water either walking the stream, or crossing it many times. The trail is less traveled, but fairly easy to follow…though some say they lose the trail and give up. There are a couple wood ladders you must use to scale some small cliffs or large rocks. If you made it down Mooney, the rest of the way including the wood ladders, is is a piece of cake. Enjoy Beaver, have lunch. Make sure you leave on this trip early in the morning, and start back giving yourself ample time. You don’t want to get back and attempt scaling Mooney Falls, chains, ladders, and that cliff trail after dark. If I didn’t make it back in time I would hunker down below Mooney until daylight…..and that might be a cold night. If you get caught in such a situation, get back away from the mist of the falls that will really lower the air temperature during the night.
Colorado River Beyond
Below Beaver the canyon continues to merge with the Colorado River. I have never made this section. I understand it is about a 16 hour round trip for a normal hiker, from the normal camping area. Round trip, from the Camp area to the Colorado, then back to the camp area again. The trail is less defined since most people never attempt that section. It is a slot canyon and you shouldn’t get lost but I am told you might have to make your own way in places. The merging of the Turquoise waters of the stream with the Colorado’s more muddy water is supposed to be a spectacular sight.
The Hike out
After doing the full pack both down and back up several times I opt out of packing it out now. I do still pack all my gear down to the campground. I now arrange for a pack animal to haul my gear out. I prearrange at the Camp Office (down in the village) on my way in. Get my paid pack tag then drop my pack the day of departure. Your tagged pack is left at the campground entrance where the horses are tied to unload and load. Tie up any loose straps. Most of the time my pack weight is 20-25 lbs. We try to share an animal and split the cost. If you carry heavier packs you may only get 2 on one animal. Drop your pack near the fence on a piece of high ground. The horses get tied here. They tend to “drain their radiators” (if you know what I mean) while standing around. If your pack is in the paddle or drainage area it is not going to smell good when you pick up topside at the parking area. Ask me how I got that piece of education!
I carry a camel-back water bladder that goes with me on the trip back up. That and a couple power bars, and my camera gear. I can usually make it from the campground back up to the Trail head parking lot in 4 hours….and I am 62 years old and not in the best of shape.
I fill my water the night before so you aren’t delayed filling water. During early morning there is sometimes a line to fill water. The last couple trips I tried to be up and on the trail before 4am. My objective is to be up the switchbacks before the sun comes far enough from the east to take the switchbacks out of the shade. That starts happening around 9 to 9:30 am. I am usually up at the top by 8 to 8:30.
Prices below are subject to change
Havasu Falls Area/Supai Camping at the Falls 1-928-448-2121, 1-928-448-2141, 1-928-448-2172, 1-928-448-2180 Camping Office Hours 7am to 7 pm- Seasons Reservations open up the first of February each year. These same numbers can be used to arrange saddle and pack horses.
Another Motel and Campground we know of before driving to the Hilltop Trail Head and hiking in; Grand Canyon Caverns (about 60 miles from the Trail Head)