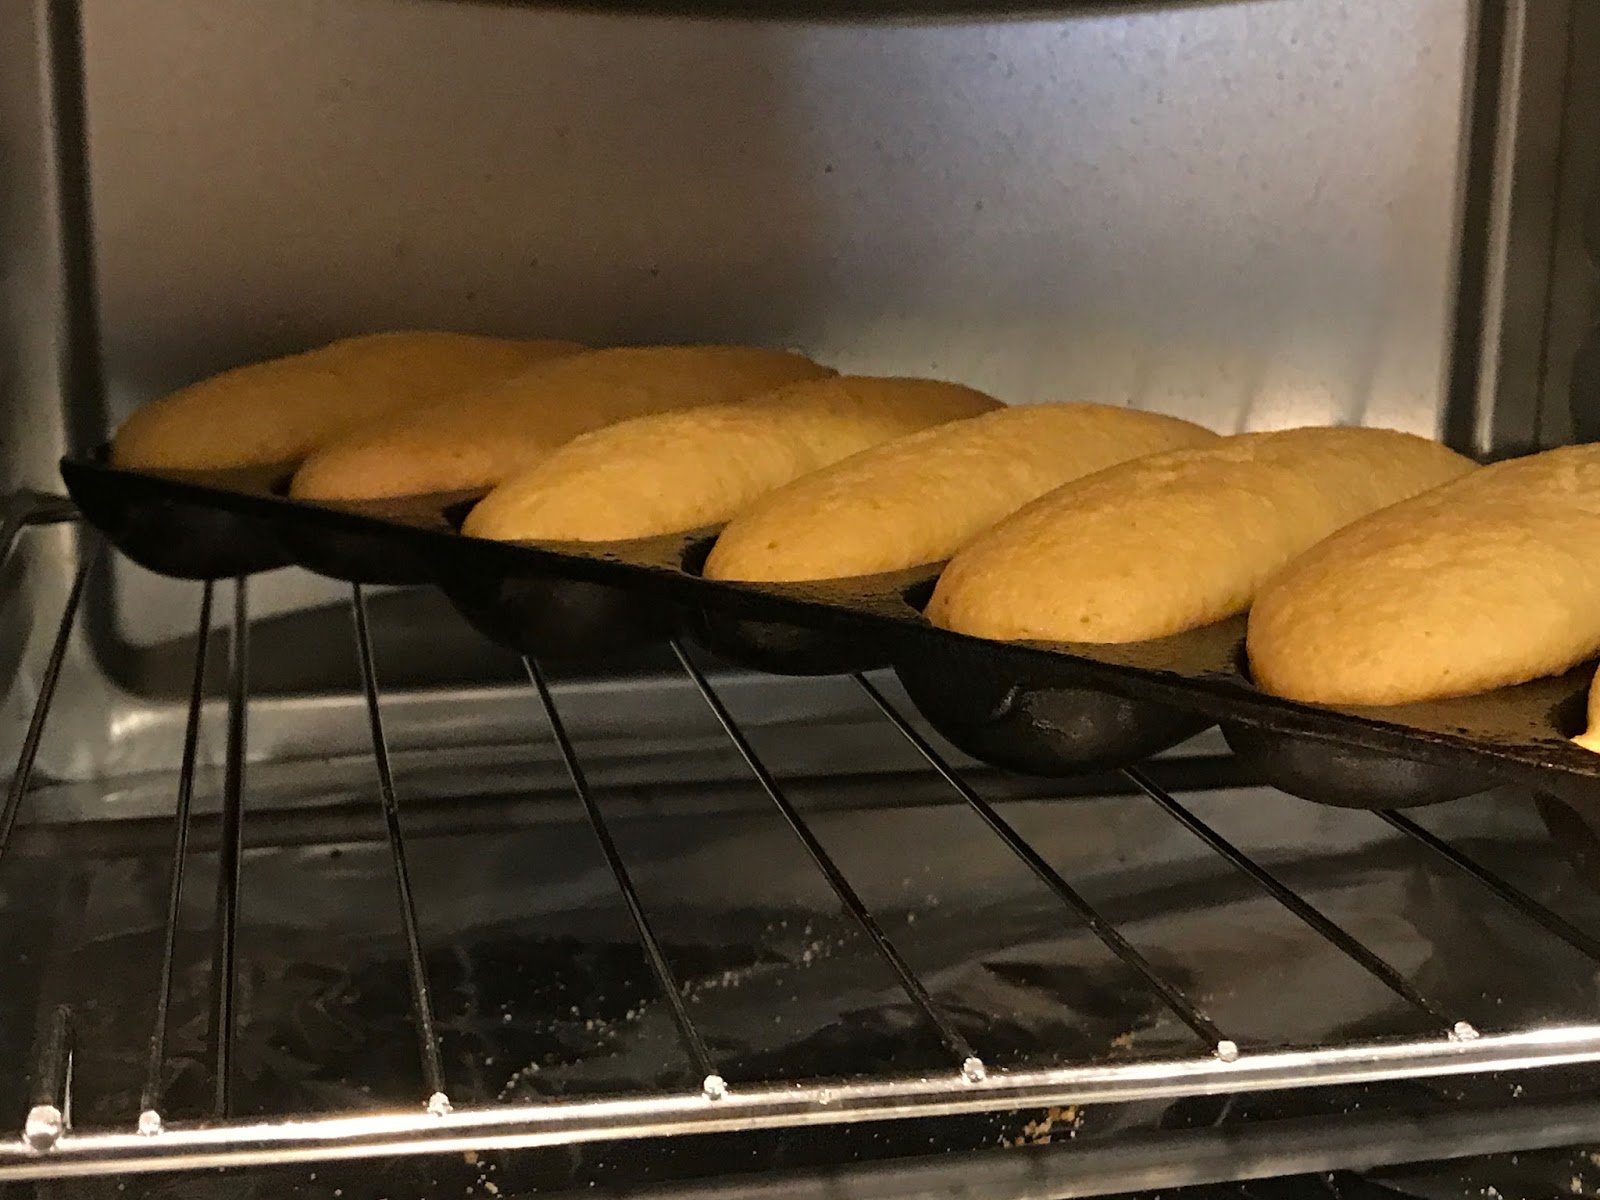
Las Vegas in the middle of summer is easily hitting 110°F daytime temperatures. For some that is not conducive for enjoying a hot bowl of Chili. Many reserve that cuisine for chilling winter days.
Not me. I enjoy Chili year round. Chili isn’t at it’s best unless you have cornbread, as a side to accompany it.
On a hot day outside I often drag out the crock-pot to make a batch without heating up the kitchen. While I am a cast iron connoisseur, I am certainly not firing up some charcoal and Dutch Oven cooking when it is a scorching +110°F outside either. Thinking about getting the kitchen oven up to 425°F for a batch of cornbread doesn’t sound too appealing either. The heats the whole house up.
This is where vintage Cast Iron meets the modern Counter-top Convection Oven. The combination works well together and doesn’t kick my air conditioner on more than normal.
Now I am sitting back enjoying a bowl of Chili. Dipping my hot buttered corn sticks in some maple syrup. What a killer combination. Both in the cooking technique, as well as the food paring.
Posted for New Years celebration. Combining pork & Sauerkraut to bring you a year filled with good luck.
Sauerkraut Balls
I grew up in NE Ohio and these are favorite in that area
Rick Beach
1lb Sausage (bulk ground)
½ Onion Sweet type chopped
1 Cup Sauerkraut (drained)
4 oz Cream Cheese
1 Egg, Beaten slightly
1 Tbsp Flour
1 tsp Dry Mustard
1 tsp Cilantro (Dried Flakes)
¼ tsp Celery Seed
Salt
Ground Black Pepper
2 Cups Milk
3 Eggs beaten slightly
2 Cups Dried Bread Crumbs
Oil for frying
In a skillet Brown the sausage and onions breaking up the sausage as it cooks.
Drain any grease. Add Sauerkraut, Cream Cheese, Egg, Flour, Mustard, Celery Seed, Salt & Pepper. Combine well.
Roll in 1 inch balls. Place on cookie sheet and place in freezer until partially frozen
In a bowl combine the milk and eggs. In a second bowl place the dry Bread Crumbs. Dip each ball into the milk/egg liquid mixture, and then roll in the bread crumbs to coat.
Deep Fry or skillet fry, in oil, the balls about 5 minutes.
Serve skewered with a toothpick as an appetizer, with your favorite dipping sauce.
Gear Review: Dutch Oven Cooking table from Chuckwagon Supply
We love gear reviews that our readers submit or allow us to share with you. Tom from 1960HikerDude graciously allowed me to re-post his video. If you are in the market for a Dutch Oven Cooking table this certainly needs your review. This table has options you won’t find on others. I particularly like the high wind screen and the collapsible side tables.
(Idea from Kathleen Leblanc but this is my version ~Rick Beach)
Greased Glass baking dish (1) 6X8 & (1) 6X10 Or (1) Greased 12 0r 14 inch Dutch Oven
Filling
8 oz Uncooked White Fish, Shrimp, Crab, Crawdad tails, etc (Chopped or shredded)
2 Cups Cooked White Rice
10 ½ oz Can Use half the can Campbell’s Cream of Shrimp Soup (Do not add water) (Save 1/2 Can)
15 oz Can Use half the can Green Chili Enchilada Sauce (Mild) (Save 1/2 the can for the topping)
14.5 oz Can Fire Roasted Chopped Tomatoes (Drain and save the liquid)
¼ Bunch Fresh Cilantro chopped
¼ tsp Sea Salt
¼ tsp Black Pepper fresh ground
½ tsp Onion Powder
½ tsp Garlic Powder
Juice of 1 Lime
½ Cup Mex Blend Cheese Shredded (Cheddar could be used)
½ Cup Parmesan Cheese Shredded
14 6 inch soft flour tortillas
Topping Sauce
½ the above can of Cream of Shrimp Soup
½ the above can of Enchilada sauce
Part of the reserved/drained tomato liquid
Topping Cheese
¼ Parmesan Cheese Shredded
½ Cup Mex Blend Cheese shredded (Cheddar could be used)
In a mixing bowl combine the Filling ingredients and fold and mix together with a rubber spatula.
Use a 1/3 cup measuring cup and place a 1/3 scoop of the mixed filling in the tortilla. Roll the tortilla and place seam side down in a greased glass baking dish or greased Dutch Oven.
Pack the filled and rolled tortilla’s in the bottom to create a full layer.
Make the topping sauce by adding the ½ can of Cream of Shrimp soup to the ½ can of the remaining Enchilada sauce. This won’t quite fill the 15 oz Enchilada Sauce can all the way up. Top the can off with the reserved/drained tomato liquid. Stir the Soup, Enchilada sauce, and tomato liquid until combined and a uniform color. This should fill the 15 oz can. Pour and spread this sauce over the tops of the filled and rolled tortillas.
Bake Covered (Foil or glass top cover for kitchen oven) for 45-60 minutes in a 350°F oven or Dutch Oven. When checked at the ending cook time they should be stemming hot.
In the case of a foil cover, remove the foil. Sprinkle with the topping Parmesan Cheese, then the topping Mex blend cheese. Return to the heat until the cheese melts. Serve immediately.
Variation: In place of seafood, cubed or ground chicken or turkey could be used.
This is a southern style sweet BBQ that is not spicy hot.
Recipe & Images by Rick Beach
Award winning recipe by Rick Beach. Took First Place “Main Dish” in the “Old Mormon Fort Dutch Oven Cook-off Competition”, held in Las Vegas, Nevada (March 2017)
Ingredients
3 ½ lbs Pork Loin trimmed and cubed to 1 ½ inch chunks
(Could use a combination of pork and beef stew meat)
Optional ingredients such as Sriracha Sauce, or various peppers, could be added to the basic sauce to spice this up. Add in very small amounts and cook at least 30 minutes then taste test before adding more. Hot spices tend to intensify as cooked. It is easy to overdo hot spices and ruin a batch for the majority of your guests. The basic sauce has always been the most popular in large groups. Spicy is not. You can multiply this recipe based on the group you are serving. The BBQ can be made ahead and put in the freezer for later use. This is served on hamburger buns. A stack of coleslaw on the BBQ before adding the top bun makes for a killer BBQ sandwich. This recipe makes approximately 24 standard hamburger sized bun servings. Shown in the photos is a double batch (7lbs of meat) being done in a 12 inch Lodge Dutch Oven.
Place the chunked up Meat, Bay Leaves, Onion, Celery, and Garlic, in a greased heavy pot with lid for baking. Preferably a Cast Iron Dutch oven is used. Meat is slow cooked with lid on. If using a Dutch Oven, and coals, use coals for 325°F heat. If using your kitchen oven use 325°F also. Use a pot sized to be at least half filled to avoid burning.
Bake for 2 hours then stir the meat chunks to rotate the bottom pieces to avoid burning. There should be plenty of liquid remaining at this point and the meat just starting to shred apart. If liquid is completely gone add 1 cup of very hot water, cover, and bake for 1 more hour. Stir again and check for liquid. If the meat is falling apart it should be ready to shred. If not, bake an additional hour but make sure there is some liquid. I have never had to go more than 4 hours baking. Remove lid and keep on heat or in kitchen oven just until all liquid is absorbed or evaporated. Check and stir often during this process…don’t burn it.
Once the meat is falling apart easily, remove the bay leaves and discard the leaves. Use 2 forks to shred the meat….I like to use a potato masher to speed up the shredding. Break apart the meat until it is all completely shredded.
In a large mixing bowl place the remaining ingredients. Add the Soup, Water, Worcestershire Sauce, Liquid Smoke, Vinegar, Brown Sugar, Mustard, and Ketchup. Whisk until combined. Then pour liquid mixture into the baked & shredded meat mixture. Then stir and fold to combine.
Cover and bake for 1 more hour. Ideally the finished mixture is a sloppy joe consistency that doesn’t run. If you’re finished BBQ is too thin/watery, cook/bake with lid off, stirring occasionally to avoid burning. Cook/Bake uncovered until it reaches your desired consistency.
My ARB 82qt Fridge Freezer unit arrived about 3 days ago and I was able to put it through some initial testing. I had a Dutch Oven competition event out in the heat, that provided some initial “real world” testing. My intent is to provide some initial feedback to other people that are doing research before buying a 12 volt powered “Fridge”
I want to apologize in advance if I seem to be harping on the fact there is a whole range of 12Volt “Coolers”, not “Fridge” units, out there that are just plain useless for normal camping. I have bought and attempted to use such units. My frank opinion…..don’t waster your money. If you want to listen to those claiming they work then don’t waste your time reading through this material. I am just trying to help you avoid falling into pitfalls I have encountered.
Currently there is not a magic bullet that will provide safe refrigeration cheap. Nothing in the range of $100 -$200 dollars. If someone convinces you there is, keep dreaming. Running off 12VDC you better plan on something over $500. $500 will get you a dinky unit that most people won’t consider large enough to store camping food supplies.
These actual “refrigerator” units, and comparable units of other brands are not cheap. For the size I purchased (82qt), expect to pay over $1300 by the time you get into tax and any shipping. This factor alone makes doing your own investigation very important. It is a sizable investment that makes buying ice, seem like a more economical alternative.
With decades of camping under my belt, I can assure you I have wasted my money on nearly everything out there. Trying to keep food cold is no exception. If you are considering a 12VDC food “Cooler” that seems cheap in price, you really need to read through this material. Otherwise you will only be throwing away at least $100 and perhaps more. There are only 2 or three brands out there that can effectively “refrigerate” your food. Be prepared. As I said they aren’t cheap in price.
12VDC Refrigerator or 12VDC Cooler
I put these devices into two categories. “12VDC Refrigerators” or “12VDC Coolers”. Both of these in many models will also work off 110VAC.
The people using the inferior “12VDC Cooler” types. Those rated for only cooling 30-40°F below ambient temperatures. Then saying they work great. Aren’t using them in conditions I camp in. To me these are not “refrigerators“, but simple “coolers“.
But in the past I followed some peoples advice and tried the “Cooler” type. Yep….wasted my money. To me, ice chests actually perform better than the 12VDC Coolers. Ice Chests are actually more safe since they have a visual indicator (the melting ice) of when temps are getting to the point of affecting your food quality and safety.
Then I love the people that say “add ice” and it works great. Hmmm….why would I buy it in the first place? I learned to shut up on that one.
If you want safe, and for all conditions, you need to step up to a 12VDC Refrigerator.
People that recommend using these “12VDC Coolers” must have them stashed in the air conditioned car while driving down the road? Or in cooler outside air temperatures. In situations they might maintain their spec ratings of internal temperature of 30-40°F below ambient. Turn the air conditioning off, or park the vehicle in the sun to do some sight seeing, and cooling capacity could easily go into an unsafe range.
You may not even realize its in an unsafe range. A situation were you are away from the vehicle a length of time, jump back in and start driving again, then the food is re-chilled. Re-chilled bad food at this point. I have tried several of these units. All a waste of money in my opinion. The hard way to find out about these is to buy several models and find out for yourself. But some people learn by doing trial and error, rather than listening to someones actual experience.
Power consumption on these “12VDC Coolers” is also high. Stay away from a vehicle too long, while the 12VDC Cooler is running in an attempt to cool in a hot vehicle….expect to come back to a battery that won’t start your vehicle. Attempting to boondock a weekend strictly off a battery? Forget about it.
Why Buy a 12VDC Refrigerator?
I spent most of the winter researching specs, reading reviews, and analyzing pros and cons. I had narrowed it down to several brands on the market. I was tired of the junk I had tried.
I really wanted a portable 3-way (110V AC-12VDC-LP Gas). There are a few on the market but they did not pass the review tests I looked at, nor my spec requirements.
I actually considered buying a 48 inch RV 3-way unit and building a fiberglass housing with wheels to accomplish what I wanted. If you can do a permanent installation the 3 way absorption fridge is really the route to go. But I wanted portable. At least semi-portable.
My objectives were to have a unit that was able to have a set “cold” temperature. Capable of getting to 0°F if necessary. Also maintain that set temp regardless of outside ambient air temperature. There are many units out there making lots of claims, and reviews supporting some claims. But when you start reading the actual specs, many units spec aren’t capable of living up to what some people claim they will do. In actual use, I found those less inexpensive “Coolers”, do not adequately perform either.
The simple math of their listed cooling capacity has to add up. Almost all of the inferior units will list in their specs they drop the internal temperature 30°F to 40°F below ambient air temperatures. Read the fine print before you shell out several hundred dollars. How can subtracting 40 from 100°, 90°, or even 80°”s be safe food temperatures?
I also wanted to run my device off of solar in the very near future. So amp/hour power consumption was important.
I even considered buying a kit and building my own. I have seen some super efficient fridge/freezers on sailboats. There are kits available from Marine suppliers. If you consider this option, look for the kits that have a Danfloss Compressor. After thinking through creating a watertight unit, the fiberglassing work involved, size issues, and lid issues, I thought my better option would be the largest commercially pre-built unit I could find.
I live in a desert and camp nearly all year off and on. Often times I am traveling or camping in heat well over 100°F. Coolers closed up in a trailer while driving down the road, or parked in a parking lot, could be sitting temps well over 100°F. More like 150°F. Or what happens if your cooler is sitting outside while you are off hiking and it ends up in the sun for an hour or more?
So the units that indicate they can only maintain temps 30 to 40°F below ambient temperatures were crossed off my list. I wasn’t buying another worthless box. I consider these convenience “coolers” for use while on a road trip. Great to keep keep your bottled drinks cold. Great if sitting inside an air conditioned vehicle that the ambient air temperature is in the 70’s° F range. (70-40=30°) That’s if it operates at the max of its specs.
They have their place and use for some people. But it doesn’t do me any good to have food sitting at an internal temperatures that could inch up to 60°F or 70°F…. or perhaps higher, given time. It is not worth getting sick or worse. If I have to add ice as some suggest, then I might as well stick with an old fashioned ice chest.
My preference would have been for a high end LP 3-way portable. But I could not find any that met my specs. The very few out there were not of my size requirement, or complaints were many.
So I opted for several higher end 2-way 110VAC – 12VDC models. There are only about 3 brands that met my specs concerning cooling capacity. ARB, Engle, and Whynter. Once I started looking at amp draw at 12VDC, the ARB brand was the only one to survive the cut.
Specs, good reviews and a couple personal recommendations led me to go to the ARB brand. I contemplated size for a while after that. I ended up selecting the largest, the 82qt. I nearly went with the next size down. I was apprehensive the whole time waiting for it to be shipped and delivered. When it arrived and I saw the unit up close and personal, I was very pleased with the internal capacity. It is just what I wanted and needed. I consider it a semi-permanent installation since empty this unit tops 70lbs. I intend to mount mine on a hand dolly so I can roll it up and down the rear ramp of my trailer. Full of food, two of us were able to move it around with the units end handles. I wouldn’t even attempt to lift it by my self, if full of food.
What about Plugs and Wiring?
I had pre-installed weatherproof 12V cigarette type outlets in my trailer. The type of outlet/socket found at auto parts stores and some large box stores. I had intentions of using the unit as soon as it arrived. It came a day before an important event. If you are reading this, STOP before buying outlets or wire and making several of the mistakes I did. Read on through this article.
Standard 12V cigarette lighter type outlets, regardless of how heavy duty, are not the route to go. Secondly I suggest you use #8 wiring that is fused at the source connection. #8 on both the +Positive power lead, and the -Negative ground conductor.
The cigarette lighter type outlets may or may not work. Mine wouldn’t. Plus even if they make electrical connection your fridge cord male connector may vibrate loose if used in a moving vehicle. The Fridge does come with a cord that has a conversion adapter plug on the end for use in the standard cigarette lighter type of outlet. So your vehicle outlet might work. But also check your wire gauge.
Factory vehicle outlets are often wired with 16ga. I suggest you use the ARB type mini 2 prong outlets, and the #8 wire.
You can unscrew the 12V cord male plug adapter and remove the cigarette type plug. This reveals a mini 2 prong plug. You do need the special 2 prong outlet from ARB. The outlet 2 prong female base is also threaded. The Male 2 prong plug on the end of the cord has a threaded sleeve that matches up with the base inside the outlet. Once the 2 prongs are inserted in the outlet the sleeve is screwed on to lock the plug into the outlet. There is no way this is going to vibrate loose.
The outlets are about $9 each. Better yet you can get a 20ft length, two conductor, #8 wire, with fuse holder, plus the outlet…all for about $43 for the kit.
P/N 10900028 Surface Mount Single Mini 2 prong Female Outlet $9.00
P/N 10900027 Kit with 20ft #8 wire, fuse holder & includes the Mini 2 prong Female Outlet $43.00
This all leads to a couple negatives I encountered. Not with ARB but with other outlets or parts I used. My 12V standard cigarette lighter type outlets (auto parts store/non ARB) are made for a very small diameter end pin on the plug that is inserted. The ARB plug with the standard adapter attached has a very large diameter tip as shown in the image below. That tip bottomed out on a plastic ridge inside my female outlet (Auto Parts Supply Outlet). That ridge prevents the plug and outlet from making an electrical connection on the positive+ voltage. I can’t remove the ridge of plastic because it retains the metal contact inside my outlet. As a quick fix I drilled and drove a small screw into the bottom/center of the outlet. The head of the screw made contact with the ARB cord adapter plug. That was a temporary measure. I have since removed and replaced the Auto Parts Supply outlet, with the ARB locking outlet.
Ironically the ARB plug does work in my vans factory cigarette lighter outlet….but that is on 16 gauge wire. This is all a mute point for me personally because I ended up buying and installing the ARB mini 2 prong type and re-running the wiring with the #8…. and ripped out the #12 wire I had installed. In my van I ran one of the kits to a more convenient location than my dash mounted factory cigarette lighter outlet. Just something to consider if you wish to add outlets ahead of time.
My auto supply 12V standard cigarette type weatherproof outlets – That did NOT work with the ARB adapter plug
The second part of the negative issue is I went to the 3 ARB authorized dealers in my city (called them rather than physically driving there). None of them stock the ARB mini 2 prong outlets, or the wire harnesses kit that come with the outlet included.
Retailers on-line seem to be gouging on price or shipping. I hope as this brand gets more popular, the range of local availability of parts and accessories increases. I would think in Las Vegas this would not have been an issue. Since they don’t stock accessories locally they missed out on another $200 of my business. They didn’t have the Fridge either. So the locals lost out on a good chunk of change. I purchased mine off Amazon. It was at my door in 2 days.
I have to say the negative of these outlets also turned to a positive for me. I immediately saw the potential of the standard cigarette lighter style plug vibrating out while traveling down the road. I wondered about this before I found out all this additional info. After contacting the ARB sales department I had some outlets with wire harness being shipped direct to me. The person I talked to was super knowledgeable and discussed at length solar connections and solar controllers for use with the ARB fridge/freezer too.
During this call I also found there is a new device on the market for the latest generation of ARB fridge/freezers, which I have. On the rear of the fridge there is a small connector in the plug-in cord area. This small connector is about the size of a USB port. I didn’t look close…it may even be a USB.
ARB is coming out with a wireless remote that displays the conditions of the Fridge/Freezer, temp, etc. So while purchasing 3 harness/outlet kits, I also purchased the wireless remote. That way I can monitor my fridge sitting in my trailer while I am driving down the road. I also wanted to test out the remote and give some honest feed-back here on the blog.
This should be an interesting test since my tow vehicle is a full size van. My trailer has a metal exterior. The wireless signal will have to send from the fridge in my trailer, to my dash area of my van. From where the cooler will ride in the trailer, the signal will need to travel about 30 ft.
The ARB specs shown on-line for this unit state that it provides 100ft line of sight transmitting technology. The interrupted transmitting capabilities is 50ft. As with myself I a betting most of use will fall in the “interrupted” category. I just hope these are over engineered, rather than under engineered.
Check further down this article to see if I have updates on how the remote works. I will be adding that info the first chance I get to see it in action.
When the Fridge/Freezer unit arrived I plugged it into 110V AC (standard house outlet) and set the unit for 27°F. At a little over 30 minutes the fridge was at that temp. The outside air temp was at 80°F. I was impressed. I loaded it up that evening for an outdoor event the next day. I couldn’t use my 12V DC outlet in my trailer due to the outlet incompatibility issue I stated above. So I ran it off the 12V DC port of a portable jump start unit. My power source was a charged up Schumacher XP2260 Jumper starter unit. These only have about 20 amp hours worth of juice. I was blown away it powered my ARB for 6 hours while sitting under my EZ Up tent/awning in 80-85°F air temps. The XP2260 meter read 60% at the point the ARB Fridge shut down.
This ARB fridge/freezer has 3 programmable battery monitor settings. To cover those settings first allow me to quote some battery tech stuff for those not knowing battery specs. This might help you wrap your brain around this info. A fully charged 12V battery (your car battery or marine deep cycle battery ….a new/good battery….normally has a “standing” voltage reading of 13.5V DC. “Standing” means what the voltage settles out to when there is no load drawing any current/voltage.
With normal batteries, and most likely the type you will be using, you never want to discharge them more than half way. Ideally not less than 60%. Otherwise damage and a very shortened life may be the result. Some might think 50% means half of 12 volts or half the full charge of 13.5 volts? Putting 50% in the neighborhood of 6 volts. That is incorrect. A battery that is 50% discharged will have a “standing” voltage reading of about 12 volts. 60% is at about 12.2 volts. This means discharging your battery below 12 volts will more than likely result in damage or reduced life.
What does all the battery spec info have to do with the ARB fridge/freezer monitor setting? ARB allows 3 user programmable settings on how much energy you withdraw from your battery before it shuts off the ARB fridge/freezer. Remember this is to protect your battery, not your food. The factory setting is Medium
LOW =Shuts off at 10.1 volts
MEDIUM =Shuts off at 11.4 volts
HIGH =Shuts off at 11.8 volts
The ARB LOW setting would run the fridge/freezer the longest. On most battery usage charts this would discharge the battery well into the danger zone of causing damage to your source voltage battery charge. But it will protect your food the longest. It could be a sacrifice of battery to protect a chest full of food?
The ARB Medium setting would run the fridge/freezer for less time than the low setting. On most battery usage charts this would discharge the battery into the marginal or caution zone of your source voltage battery charge. Well below what I feel comfortable discharging my batteries. But again a sacrifice might need to be made to protect your food.
The ARB HIGH setting would run the fridge/freezer for the least amount of time. On most battery usage charts this would discharge the battery right around 50%. To protect you battery life this is a better setting.
Update May 18, 2015 (Info on the Remote Monitor)
I finally had the chance to test out the ARB Remote Monitor. During a 5 day trip I used the Remote to monitor my fridge/freezer that was riding in my trailer. It performed flawlessly. Though I found installing the sending unit to be a bit difficult. Difficult being I was afraid of causing damage.
The system consists of a sending unit that is mounted on the fridge, and plugged into a port on the rear of the fridge. This sending unit has a short screw-on antenna. The receiving unit is plugged into a 12V electrical outlet (cigarette lighter) to power the receiver. While it would be nice not to have to plug this in, it does get the job done.
Let me address the sending unit installation. The unit comes with a short ribbon cable that is soldered to the remote sending unit. The ribbon cable is less than 2 inches long with a flat female multi-pin connector attached. This connector is about the size of a USB connector though it is not USB. The ARB fridge male connector is built into the fridge and is covered with a rubber cover.
The remote sending unit I received had extremely little slack to allow plugging in before mounting the remote to the fridge with the provided screws. The male connector pins on the fridge are very small and these could easily be bent over. I was so afraid I would damage these pins or pull the ribbon cable loose on the remote. I turned and tried over and over. There was not room to get my fingers in to line up the connector, then press it in. I don’t know if I happened to get an overly short cabled one or if this is the normal? This definitely needs addressed by ARB before people start damaging those pins.
I managed to get the connector plugged in and then I mounted the remote on the fridge. Even during mounting I could feel the pressure of the strain on the wire trying to get the remote lined up with the factory drilled holes on the rear of the fridge. Though things worked I have it in the back of my head this connector might eventually work loose?
Aside from the short ribbon cable everything worked. I have a full size van towing a 16ft trailer. With the tongue distance I estimate the remote sending unit was positioned about 30 to 35 ft away from the receiving unit.
I followed the instructions that came with the remote. Both for installing the sender, and also the set up procedure for selecting the channel, etc. The instructions are pretty straight forward and not complicated.
My van and trailer both have metal skin. The signal never failed. Though I found after the receiver was unplugged for a couple days I had to go through the setup procedure again for my return trip.
It was great to be driving down the road and have the ability to see the temperature of the fridge riding in the trailer behind me. I am happy with the remote unit and highly recommend making it an accessory you purchase when you buy your fridge.
Actual use Testimonial
June 2015. Wow….I just put solar on my trailer. It runs the ARB Fridge with no problems. If you are reading this because you are researching/shopping for a 12V Fridge that can function in the heat…..well let me give you a testimonial.
I tested my Solar set up for 7 days. Along with the solar I also ran the ARB 24/7 for seven days. Outside air temps reached 112F°. The air temp inside the closed trailer peaked at 108°F. Most of the time the ARB was set at 25°F. Even sitting in the hot trailer it had no trouble. So for 2 days (a 48 hour period) I set the ARB at 0°F. I wanted to see what it could really do. It maintained the 0 temp despite the fact the air temperature around it was over 100°F hotter. This ARB is no cheap unit. Read the fine print on the cheap units out there. Most specs on the cheap ones state only cooling 30°F below ambient air temperature. If I were using a cheap unit, my food would be at 80°F in this heat. Talk about food poisoning!
My ARB was dropping the internal temp at 100°F difference….talk about making ice in the desert heat. It can do it. Once the compressor gets up to speed after the few seconds of start up the amp draw on my batteries measured -1.1amp. It rarely runs half the time. Running all night only drew down my batteries by 4% on the worse day with the 0° setting. Most nights the drain was only 3%. These readings also included the drain from a CO detector as well as a Propane detector that are always on. So I rate the 82qt ARB as drawing 1 amp while running. 0.5 amp/hr consumption over all since it runs only half the time. Even these numbers are very conservative.
I intend to post more personal practical experiences after I use this unit more. So check back often.
Ever since covered wagons the Chuck Box has been a common term. Before that, I am sure migrating people had a means to transport some of their precious spice items that were not easily obtained foraging natures surrounding supplies.
If you have camped many years you have probably changed out your own method of carrying your own staples. Having your items with you, rather than being dependent on an inconvenient source to purchase (forage) your own items while camping.
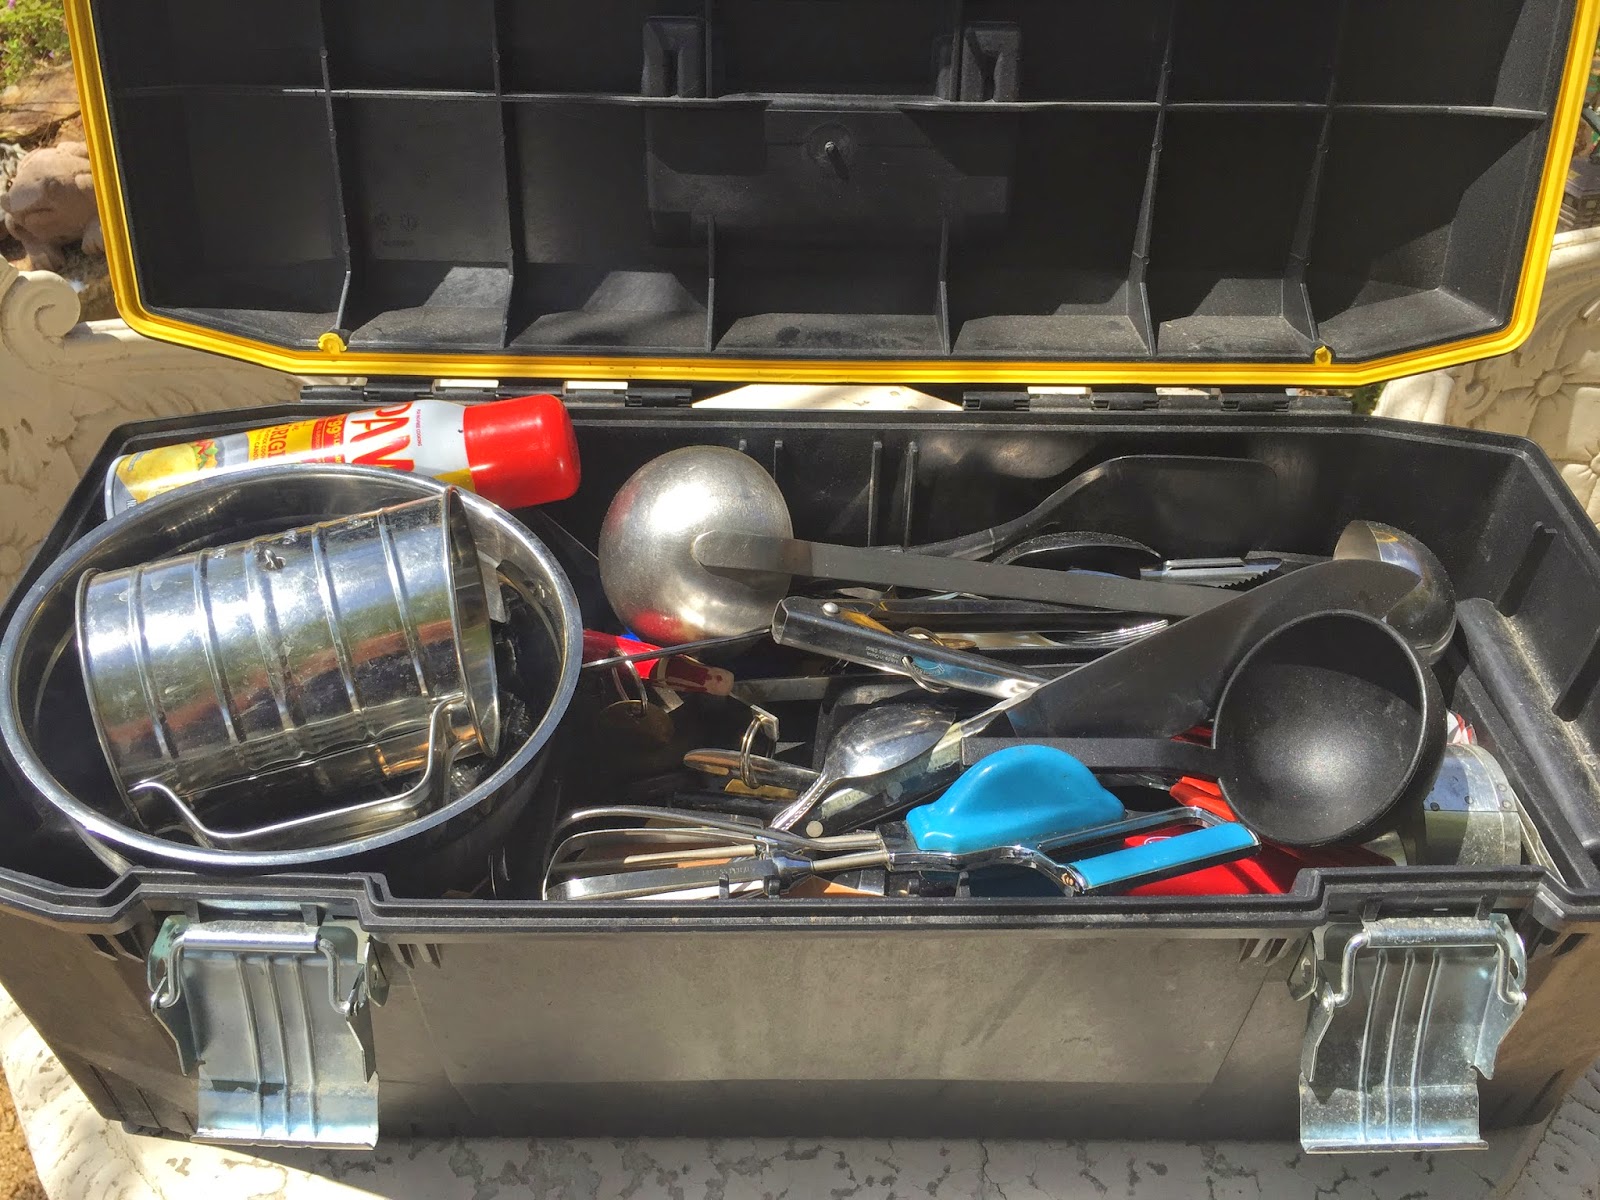
My current method is below. We hope people viewing our blog take the time to forward us photos of your own “tried and true” method. We want to add them to this article. So tell us a little about yours and about yourself. Ours does not have the “coolness ” factor of a handcrafted wood Chuck Box, but ours is highly functional. The boxes have been along on multi-day canoe trips, Dutch Oven Cooking events, and regular campground camping. We have ours loaded so we are not wanting of anything.
We use 2 Stanley Fat Max plastic tool boxes. They have a rubber seal, and latches. We leave them on the picnic table at all times (unless in bear country) and have never had the critters get in them. They also sit out getting rained on at times. When we return home the used items are replenished and kept inside so they are always ready to go for the next trip. Dry Ingredients such as flour, pancake mix, etc is rotated when we replenish. We dump the unused portion out on foil. Refill the used portion from new supply in the house, then dump the older ingredient now on the foil, back in on top to fill our camp container.
The cooking ingredient box has individual screw lid containers that contain flour, sugar, coffee, etc arranged in the bottom. Cheap containers found at your local dollar store. The tool tray sits on top of those and contains all the spices. The larger containers in the bottom have all their lids labeled with what is inside.
The utensil box holds all of our cooking tools. Knives, Sifters, Mini Cutting Board, Mixing Bowls, Whisks, Serving Spoons.
Here is a list of items in my two boxes. I cook with large groups and can cook or bake anything with what I carry.Adjust your items to suit your needs.
Spice/Flour Box
(2) Containers of Flour
Sugar
Coffee
Brown Sugar
Vanilla Coffee Powder
Buttermilk powder
Oatmeal
Cornmeal
(8) 1/4 Cup containers of Crisco
Spray oil
Salt
Pepper
Cilantro Flakes
Garlic Powder
Onion Powder
Italian Seasoning
Paprika
Corn Starch
Baking Soda
Baking Powder
Nutmeg
Cinnamon
Ginger ground/powder
Nutmeg ground/powder
Clove ground/powder
Burger Seasoning
Chili Powder
Cumin Powder
Vanilla Extract
Sage
Dry Milk
Cayenne Pepper
Bay Leaves
Vegetable Oil
Dry Yeast
Recipes on index cards in a small plastic zip lock bag
12 inch Dutch Oven with Casserole dish that fits inside (Preformed foil type works)
3 Tbsp Flour
1 Can Evaporated Milk
4 Eggs
1 tsp Cilantro (Dried Flakes)
Salt to taste
Pepper to taste
½ Tbsp Butter
2 Large Cans of whole green chili’s
1 lb Cheddar Cheese shredded
1 lb Monterey Jack Cheese shredded
Instructions
Perheat 12 inch Dutch Oven 325°
Separate Egg whites from yolks (Keep both)
In large bowl combine Egg Yolks, Flour, Couple dashes of Salt & Pepper. Beat Well.
In another bowl beat egg whites until stiff. Fold egg whites into the yolk mixture.
Use butter to grease a casserole dish that fits in your Dutch Oven. Lay out half the chili’s in the bottom of the casserole dish. Spread the Cheddar Cheese on the chili’s.
Lay out the other half of the chili’s on top of the Cheddar Cheese layer. Then spread the Monterey Jack Cheese on top of that second layer of Chili’s.
Pour the egg mixture on top.
Bake for 45 minutes @ 325° or until an inserted knife comes out clean.
Recipe and Photo’s submitted by: Bruce Tracy
Editor Note: From time to time we get recipes that even the name gets everyone's curiosity going. We believe this is going to be one of them!
This dish looks hard to do but it is really very easy. Just get all of the ingredients on the counter before you start. Then all you have to do is reach and add. Many versions of this recipe use seasoned sausage. I don’t think that is necessary.
Prep Time15 minutesmins
Cook Time1 hourhr30 minutesmins
Total Time2 hourshrs
Servings: 8Servings
Ingredients
1poundbaconthick cut divided apart
2poundsground pork
8ouncescream cheeseroom temperature
1medium onionsliced thin
1bell peppersliced or diced or both
Bottle of your favorite BBQ sauce
Cookie sheet
Cooling rack
Parchment paper
Instructions
Directions:
Cut four pieces of bacon into 1/2 inch pieces and fry to your preference. Set aside to drain.
Lay a sheet of parchment paper on your counter and place the ground pork in the middle.
Spread with your hands until you have about a 10 by 10 inch square about 1/2 inch thick.
Spread the cream cheese over half of the pork and add the bacon bits, onions and bell peppers. Gently roll it up from the cream cheese side. Set aside.
Make a 5 by 5 lattice with 10 pieces bacon. Googling bacon lattice will give you several “you tube” videos, it’s way easier than you might think. Place the pork roll with the seam toward you on the edge of the lattice closest to you. Roll it on the bacon, picking up the lattice as you go. Remember where the seam ends up.
Place cooling rack on a cookie sheet or inside a Dutch Oven. Place a piece of parchment paper on it. Place the bacon encased pork roll on the paper, seam side down. Brush liberally with bbq sauce.
Roast for about 75-90 minutes at 425 degrees. Check with a meat thermometer at 75 minutes.
When it reaches 155 brush one more time with bbq sauce and continue cooking for 10 more minutes.
When it’s done let it sit for 15-20 minutes so it can set up.
Notes
Bruce Tracy December 2013 Follow Bruce on Facebook at https://www.facebook.com/bruce.tracy.5 Interested in Bruce's hardcover Dutch Oven Cookbook? Just in time for Christmas? One of many sources to purchase "Dutch Oven Baking" by Bruce Tracy
I recently visited Home Depot and they had a clearance on a two piece adjustable cooking grate in their BBQ section. Originally these were just under $10. The grates were on sale for about $2.50. One section is about 6 inches by 10 inches. The other is about 6 inches by 12 ½ inches. I bought two sets. I wanted 2 of the short sections so that I could fit them inside the foil trays I found. This would allow fairly flat storage when not in use. The two grates overlap each other to form the larger cooking surface.
I also found a multi-pack of foil drip pans in the same section of Home Depot. These worked out to be about $1 each. These foil pans are 12X8X2 . I am sure you could find cheaper ones, and of a size to also use the longer section of the cooking grates.
So with tax each portable BBQ grill is under $4 including tax.
One layer of hot charcoal briquettes will do 2 to 4 hamburgers or 2 good sized steaks. It’s a perfect size for two people. I tested this out last night with 2 steaks. I forgot how much better a grilled steak tastes done over charcoal.