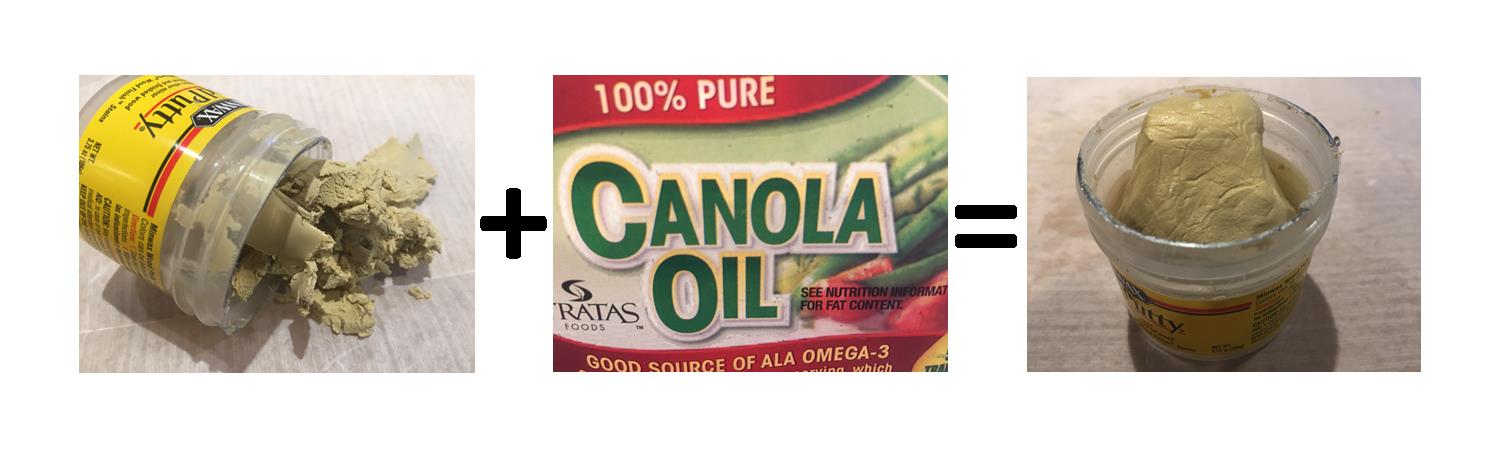
1CupsNestle’s® Chocolate ChipsOptional: Substitute Rasins or Dried Cranberries in place of the Chocolate Chips
Instructions
Preheat Oven 325°F
In large bowl, cream the butter, brown sugar, and white sugar, until smooth and just starts to fluff. Beat the eggs in one at a time. Then beat in the vanilla.
In another bowl combine the Flour, baking soda, cinnamon, cloves, cayenne, and salt. Whisk to combine.
Stir the flour & Spice mixture into the Creamed butter mixture.
Stir and fold in the quick oats
Fold in the Chocolate chips. Mix until evenly distributed.
Drop by heaping spoonfuls onto an un-greased cookie sheet.
Bake for 12 minutes. Allow to cool about 5 minutes then transfer them to a wire cooling rack.
Great looking & tasting individual servings. Start your mashed potatoes right after you pop your meat mixture in the oven to bake. These will all come together while things are hot. Serve with a side of steamed vegetables, bread, etc. ~Rick Beach
Saute the Garlic, Onions, and Celery in a small amount of olive oil.
In a mixing bowl combine all ingredients and mix together by hand.
Divide the meat mixture into 6 equal parts. Press into a greased (6) mini bundt pan. [I use half of my 12 unit pan]
Bake 45 minutes. Turn out upside down on a foil lined cookie sheet. Pre Grease or spray oil the foil first. Add the topping and return to the oven to broil.
MEATLOAF TOPPING
Set Oven to High Broil. Spread the 1/2 cup ketchup topping on the exposed tops of the 6 upside down mini meatloaves. Dividing the ketchup equally and using it up. Immediately return the 6 mini's to the oven and broil the ketchup side up for 5 minutes. The topping ketchup should be broiled just enough to slightly dry it, but not brown or burn it. Remove from the oven and top with mashed potatoes before serving.
MASHED POTATOES
Cover cubed potatoes with water, salt and gloves. Cook at a low boil for 20 minutes. Test potatoes to see if close to done. Stir and continue to low boil about another 10 minutes or until the potatoes are tender.
Skim off the garlic (save it), then drain off the water. Crush the cooked garlic cloves with the back of a spoon. Return the drained cooked potatoes and the cooked crushed garlic to the still hot cooking pan. Add the Butter, Buttermilk, and salt. Allow the butter to melt.
First mash the potatoes with a potato masher, Then whip them using a mixer until they are fluffy. Adjust your milk to get the desired consistency. Be careful not to add too much liquid.
Use a piping bag and tip, or a spoon to top the baked mini meatloaves with whipped mashed potatoes. Garnish and serve.
This is a "Sweet Lime" Pie recipe. For those unfamiliar with Sweet Limes, when ripe and at peak flavor, they appear more like a lemon. Yellow skin, and pale green on the interior. We grow these in our yard and start enjoying them the middle of December. Key Lime juice could be substituted if you have access to those instead.
Combine the beaten egg yokes, sweetened condensed milk, vanilla, salt, and lime juice. Whisk well until silky smooth. Dump into the unbaked graham cracker crust.
Bake in preheated oven for 15 minutes. Toothpick test should come out clean. Do no over bake.
This is the recipe right off Nestle’s® Chocolate Chip bag. Added to our recipe list to allow ease of printing it out. We love making a large batch of these around the Holidays. Baked and cut into "Bar" form. Sealed in freezer containers, then frozen. Great for last minute guests, gifts, Holiday house warming offerings, or dunked in a cup of coffee. Our recommendation is you don't skimp on the ingredients. Use real Nestle’s® Chocolate Chips, and real Vanilla. Don't use knock-off or imitation products. Then you can truly enjoy a quality cookie made with a recipe and ingredients that have stood the test of time.
Beat butter, sugar, brown sugar, and vanilla in a large mixing bowl until creamy. Then add eggs one at a time beating well after adding each egg.
In a second bowl, Combine the Flour, Baking Soda, and salt. Gradually beat the Flour mixture into the creamy butter mixture.
Stir/Fold in the Chocolate Chips and (Optional Nuts).
For Individual cookies: Drop by rounded Tbsp. onto an ungreased baking sheet.
For individual round cookies: Bake 9-11 minutes until golden brown. Cool on baking sheet 2 minutes then move to wire rack to cool completely.
For cookie bars: Preheat oven to 375°F. Grease 15x10 Jelly Roll Pan. Spread prepared cookie dough into the prepared pan.
Bake 20-25 minutes or until golden brown.
Cool on rack. Once cooled, cut and remove from pan.
(A Pizza wheeled rolling cutter works great for cutting the bars)
Using a cookie press you can create little shortbread type Holiday cookies [Spritz] that are typically decorated with icing, sprinkles, and colored sugars.
There are two separate recipes above. One for white cookies, Another for Chocolate cookies. Mix them separately. Bake them separately. If you make both recipes you will end up with about 90 cookies in total
Mixing/Baking the White/Plain/Vaniliia Cookies
Heat oven to 375°F
In large mixer bowl combine sugar, butter, egg, salt, and vanilla. Beat at medium speed, scraping bowl often, until mixture is light and fluffy, 2 to 3 minutes.
Add flour. Beat at low speed, scraping bowl often, until well mixed, 2 to 3 minutes.
Place dough in cookie press. Form desired shapes 1 inch apart on cookie sheets. Bake for 6 to 8 minutes or until edges are lightly browned.
Mixing/Baking the Chocolate Cookies
Preheat oven to 375 F
In a large mixing bowl with an electric mixer, beat butter and sugars, and vanilla, until light and fluffy. Beat in eggs, one at a time, beating well after each addition.
In another bowl, sift together flour, cocoa powder, baking soda and salt.
Gradually stir flour mixture into butter mixture. Shape dough into a log and place in your cookie press.
Press cookies out onto an ungreased baking sheet. Bake for 10 to 12 minutes. Remove to wire racks to cool completely.
Layered Vanilla & Chocolate Cookies
Used press with wide saw toothed die and lay out a long strip.
On top layer a long strip of white/vanilla
Variation use crushed candy, (Crushed candy canes work good) between the layers.
Cut the strips in bite sizes and bake at 350°F for about 10 minutes.
Decorate with white or colored icing and sprinkles.
To make pinwheels
Roll a Layer of the Vanilla dough out on wax paper. On a second piece of wax paper roll out a thin lay of the Chocolate dough. Flip the chocolate layer over on top of the white. Press dough together slightly. Peel off the top layer of wax paper. Roll the double layer of white and chocolate into a log removing the bottom wax paper. Cover the dough log with wax paper. Then cover in foil and chill in the fridge for about an hour. Then remove foil and wax paper, and slice disks off the log about 1/4 inch thick. Arrange on cookie sheet and bake as directed above.
Note: 2/3 Cups of Pumpkin is half of a 15 oz can of canned Pumpkin. So instead of wasting a partial can, plan on making a double batch (2 Rolls). The recipe above is for a single batch (1 Roll).
Heat Oven to 350°F. Prepare a greased 10x15 jelly roll pan (cookie sheet). Line the bottom with wax paper, then lightly spray the wax paper with a spray oil such as Pam.
Lay out on your counter, a thin towel, sized at least the size of your jelly roll pan. Sprinkle it liberally with powdered sugar.
In a large bowl lightly beat the eggs. Gradually beat in the sugar, beat until thick and light yellow. (4 to 5 minutes of beating). Add the pumpkin and lemon juice and beat on low until blended.
In a separate bowl, combine/sift the flour, baking powder, spices, and salt. Add the sifted dry ingredients to the egg mixture. Whisk until well combined. Spread the batter onto the prepare Jelly pan.
Bake in the preheated oven for 12 to 15 minutes. The cake should spring back when lightly touched with your finger. Start checking at 12 minutes, and at 1 minute intervals after that. Remove the cake from the oven and run a knife along side all edges to help release it from the pan. Immediately flip the cake/pan onto the powdered sugar covered towel. Gently lift the upside down pan away and the cake should remain behind on the towel. Gently peel away the wax paper and discard it.
Starting on the narrow end of the cake, roll the cake and the towel up together to form a log. Place this on a wire rack to cool.
Filling
While the cake is cooling prepare the filling. In a small bowl sift the powdered sugar and set it aside. Using a mixer, Beat together the cream cheese and butter until light and fluffy (about 4 minutes). Gradually beat in the sifted powdered sugar and vanilla. Beat until smooth.
The Filling & The Rolling
Once the cake roll is cool (needs to be cool to avoid melting the filling), carefully unroll the cake. Spread the cream cheese filling evenly over the entire surface of the cake. Then roll the cake and filling (not the towel this time) into a log, or roll. Wrap in plastic wrap and chill at least 1 hour in the refrigerator before serving. These can be made ahead and frozen.
Slice the cake and filling roll into 1 inch slices. Keep leftovers in the refrigerator.
Submitted by Rick Beach. Homemade All-Purpose Biscuit Mix. Make your own Bisquick or All-purpose mix. For use in any Dutch Oven Recipe calling for Bisquick or other similar commercially available product. Better because you make it homemade. You know what ingredients are in the mix. You can alter the Shortening to use Crisco or Butter, or a combination of the two based on your preference. Mix up a dry batch at home. Store for several days in zip lock bags. Great to prepare at home for camping trips.
Just add cold water, or cold milk for richer biscuits. To prepare to bake. Add small amounts of liquid until you reach your desired consistency. Never over mix any type of biscuit dough.
All-Purpose Biscuit Mix (Better than Store bought)
Stir together flour, baking powder, salt, and sugar. Sift together 2-3 times in a large bowl.
Cut in shortening with two knives or pastry cutter until the mixture is the consistency of cornmeal.
Add Powdered Buttermilk and Powdered milk and mix uniformly to create your dry All purpose mix. Store in a Zip Lock Bag and keep in the fridge for 2 weeks
Use in recipes that call for Bisquick or all-purpose mix. Add small amounts of cold water, cold milk, cold buttermilk, or other liquid required in your Dutch Oven Recipe.
For Regular Biscuits: To get your desired biscuit consistency, use cold milk, cold water, or cold buttermilk. Canned milk and reconstituted powder milk work too. (Milk makes richer biscuits) Don’t over mix.
Form biscuits. Cover and let stand at room temperature for 15 minutes to rise a little before baking.
Bake biscuits in a pre-heated “hot” oven at 450° for about 15 minutes or until golden brown
[Original Recipe by: Rick Beach] Serves 20-30 depending on how many side dishes are available. This is a great recipe for catering, receptions, parties, and large groups. It half fills a 1/2 size steamer tray. A stainless steel tray 12x10x4 inch size. A double batch with fill a 1/2 sized steamer tray. A stainless steel tray 12x10x4 inch size.
We suggest not substituting the Buttermilk with regular milk adding lemon juice or vinegar until you have mastered producing fluffy biscuits with this recipe. If yours seem dry or clunky increase the Buttermilk slightly until you know the perfect mix for your area and oven.
There is a definite knack to baking light and fluffy biscuits. A couple of secrets to good biscuits is very cold Butter and Buttermilk, not mixing the dough much, and folding and patting the dough several times.
Properly mixed biscuit dough almost looks like it hasn't been mixed all the way. The other secret is a very moist mix.
Never use an electric mixer or dough machine when mixing up biscuits. Use a fork, and use it as little as possible.
Also old stale Baking Powder (opened and on the shelf for awhile) looses its ability to create the bubbles required to raise good light biscuits. Pitch the old stuff and use fresh.
Mix your dry ingredients together with a wire whisk.
Shave the cold butter with a potato peeler or other type of cutter. Then stick it in the freezer while prepping. When cold or frozen, break up the shavings. Keep very cold until ready to mix in.
Then stir in the cold shaved butter into the mixed dry ingredients. Alternatively to shaving the butter, you can "cut" it into the dry ingredients using a tool made for that, or two knives. All pieces should be pea size or less.
The buttermilk in this recipe is part of the leavening (makes the bubbles) The acidity of the Buttermilk reacts with the Baking Powder & Soda. Don't substitute the buttermilk with something else for this ingredient if you are new to making biscuits.
If you don't have buttermilk on hand I suggest you use a different recipe known to work with the ingredients you have. In a pinch, lemon juice, lime juice, or vinegar can be added to regular milk. The acid in vinegar or the citrus juice sours the milk and works as the leavening with the baking powder and soda. Stir the milk and vinegar/juice together and allow it to sit a few minutes before adding it to the dry ingredients. But know the formula. I recommend Buttermilk if you want killer biscuits. But I often use a concoction of regular milk, sour cream, feta cheese and lemon juice in place of buttermilk. It depends on what is in the fridge. Start experimenting after you master getting fluffy biscuits that raise well.
The dough should be sticky. Probably more sticky than you think. Mixing the ingredients too much, or too dry is the killer of soft and fluffy biscuits. Plop the sticky dough out on an extremely well floured bread board.
Flour your hands. Don't roll dough out, but pat or gently flatten with your well floured hands (about 1 1/2 inch thick. Fold the dough in half over on itself and gently pat the dough to 1 1/2 inch thick. Repeat the fold and pat two more times.
Cut biscuit rounds and place them on a baking sheet or in a Dutch Oven. Cover with a towel and let the biscuits rest for 10 to 15 minutes before putting them in the oven, or putting the heat to the Dutch Oven. Biscuits placed next to each other will rise much higher than those placed with gaps between them. The closely placed biscuits will also be much more moist when done.
Preheat oven to 400 degrees. (Dutch Oven Coals for 400°F-Don't pre-heat the Dutch Oven)
Stir dry ingredients together. Whisk or sift
Cut in Butter (broken up frozen shavings)
Mix in the first 1 1/2 cup of Buttermilk gently (Do not over mix) using a fork. If dry add more in small amounts until dough is almost too sticky to handle (flour your hands)
Dough Mixture should be almost sticky and mixed so little it looks roughly combined. Don't keep mixing
Turn out on floured board and pat gently to 1 1/2 inch thick (Do not roll or pound down with hands)
Fold dough over and pat to 1 1/2 inches thick, three times.
Cut rounds with biscuit cutter or top of a small drinking glass, can, etc.
Place rounds on cookie sheet or into the bottom of the Dutch Oven up against one another
Bake 14 to 18 minutes or until golden brown on top in your Kitchen Oven
Bake 14-18 minutes in a covered Dutch Oven (Coals for 400°F)
Recipe Notes
It is assumed you know proper coal/heat techniques for Dutch Oven baking Click this link if you need help with Dutch Oven Coal counting? We prefer the 3 uppy-down rule! Serve hot with butter, jam, gravy, etc.