
This handy Trivet accessory is great for Dutch Oven cooking. Primarily used as a lid stand or a trivet.

Used for elevating a legless cast iron pot, skillet, or coffee pot. Used to elevate a metal dish pan (stainless steel steamer trays) to heat water, just above charcoal coals. They can be configured to fit inside a Dutch Oven to elevate a pie tin or muffin tin. Used to double stack a skillet on top of a Dutch Oven to make use of the Dutch Oven lid coals.
Additionally the trivet can be used to invert a lid to be used as a skillet or additional cooking surface. The trivet, the design as shown here, allows the handle of the inverted lid to drop through the center of the trivet.
Do you need hot dish water? We carry stainless steel half steamer tray pans with us on outings. The steamer trays are available at restaurant supply stores. Place your trivet over some glowing coals. Then place your steamer tray of water on top of the trivet. It will be hot when you are done eating. Better have at least two. Use one tray for wash, the other for rinse. Even have a third tray for sanitizer/ bleach water, if you wish to meet any food handling code requirement.
A friend of mine gave me one of these similar looking trivets a couple years ago. It had fixed legs welded on. I wanted adjustable legs. I like this layout of the horseshoes the best. There are numerous patterns that could be made. But think your design through. While you might come up with a more appealing artsy look it may not be multi-functional.
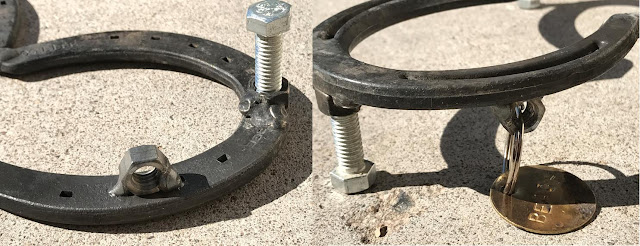
I made a design change to the fixed, welded on legs of the original one I was given. The ones I fabricated for this article have the modification of threaded adjustable legs. Nuts were welded to the underside that allows the legs (bolts) to screw in. This serves several purposes. First it allows the legs to be removed for easier transport and flatter storage. Secondly you could carry bolts of various lengths allowing you to adjust the height. Third, the head of the bolts acts like a foot to make the trivet much more stable especially when used on soft ground.
The horseshoe welding configuration shown (Open horseshoe tips welded to the next) was purposely done to create an open space in the center. This allows a inverted lid handle to drop through unobstructed. The lid and trivet can be placed over hot coals and used as a skillet, or domed oven effect for baking pizza.
Do you cook and compete in large cooking groups? If you tag your cooking pieces with a brass ID tag or similar attachment, consider welding an additional nut on the underside of the trivet. Welded on using one of the six sides of the nut. Creating a loop or hole to run your split ring or ID tag wire through. Let the ID tag hang from the bottom. Failing to add this modification and running a split ring through one of the existing horseshoe holes will create rocking action with the bottom of your pot. Ask me how I know! This ‘Tag nut” was my next modification after using the trivet one time.
Below is the parts list and approximate cost if parts purchased new, paying tax etc. If you have access to used discarded horseshoes and hardware, stuff kicking around in cans on the shelf of your garage or shop, these can be produced for nearly nothing. I used horseshoe size 00LITE purchased at a local Farm Supply outlet.
Amount Item Unit $ Total$
(3) Horseshoes $2.25 $6.75
(3) 3/8X1 ½ Bolt $ .40 $1.20
(3) 3/8 Nut $ .40 $1.20
(1) 3/8 Nut (tag nut) $ .40 $ .40
Weld wire $2.45
Argon/Co2 gas mix
Paint ——–
Total Material Cost $12.00
My standard leg is a 3/8 x 1 ½ inch long bolt. With the thickness of the shoe on top of the vertical bolt, your pot or skillet bottom surface is about 1 ¾ inch off the ground. Roughly the distance most Dutch Oven legs raise the pot. A perfect height for having a ring of charcoal or wood coals underneath your flat bottom (legless) Pot or Skillet.
To fabricate I used a MIG wire feed type welder with Argon/Co2 gas mix and steel wire. Start by placing the 3 shoes in the arrangement I show with the beveled side up. Arrange them on a flat surface (I use 12×12 concrete stepping stones) Weld at the 3 joining points and keep the weld lower than the flat surface of the shoe to avoid needing finish grinding. Since this is the beveled side of the shoe there is a nice “V” at the joint to float your weld in. This surface will be your finished pot surface. If you weld a bead a little too high, grind it level.
Flip the now wielded shoes over with the non-beveled shoe surface facing up. Weld at the 3 joints. (on the opposite side you already welded). This is to become the underside of your trivet. So if your weld mounds up slightly on this side, don’t worry. No grinding will be required on the finished under side. Thread your (3) 3/8 nuts on to your 3/8X1 ½ Inch bolts, almost all the way flush. Then back out the bolt about a ½ turn. Hold the nut end up against the bottom of your shoe assembly by holding the bolt with a welders glove, vice grips, etc. Weld the nut to the shoe in the center of each arc. (See Photo for location).
Weld your “Tag Nut” on the underside about 2 inches out from one of the “legs”. See photo example.
When all nuts/legs are welded on, flip unit so the leg feet are now down. Grind any welds (on the pot surface side) that might rise higher than the flat surface of the shoes to avoid a rocking pot. Hit all the weld locations with a power wire brush to clean up any soot or loose debris. Tighten the leg bolts with a wrench (remember you backed them out 1/2 a turn). That way the legs will not vibrate out and get lost. Carry different lengths of bolts for your desired cooking heights.
The finished assembly can either be finish painted with High Temp (2000°)Flat black paint (stove black paint), or given several coats of seasoning the same way you would season a cast iron Dutch Oven or skillet. If you will use these inside a pot for raising a pie tin, I would only season and never apply paint.
Shown here using the trivet under an inverted Dutch Oven lid to bake pizza. 
Article author, Rick Beach, has been cooking for over 45 years. Much of the cooking done in the outdoors. “If you want to add the years Mom used sifting and measuring cornmeal as a baby sitter, while she herself was baking…then its even longer”! “Mom instilled a love of cooking within me”.
Equally at home using the conveniences of a modern day kitchen, or outside cooking over coals from a campfire. An accomplished Dutch Oven cook as well as cooking and setting up for 100+ person events. While many recipes might be handed down family favorites, others are new personal recipes that have been created over the years. You might find Rick cooking anywhere in the western area of the USA. Loves the Outdoors, Traveling, Camping, and Cooking. If not cooking, there is always photography, hiking, and kayaking!
![]()